Link PEX and QuickBooks Online
Log into your PEX account to finalize the set up.Select your use case(s)
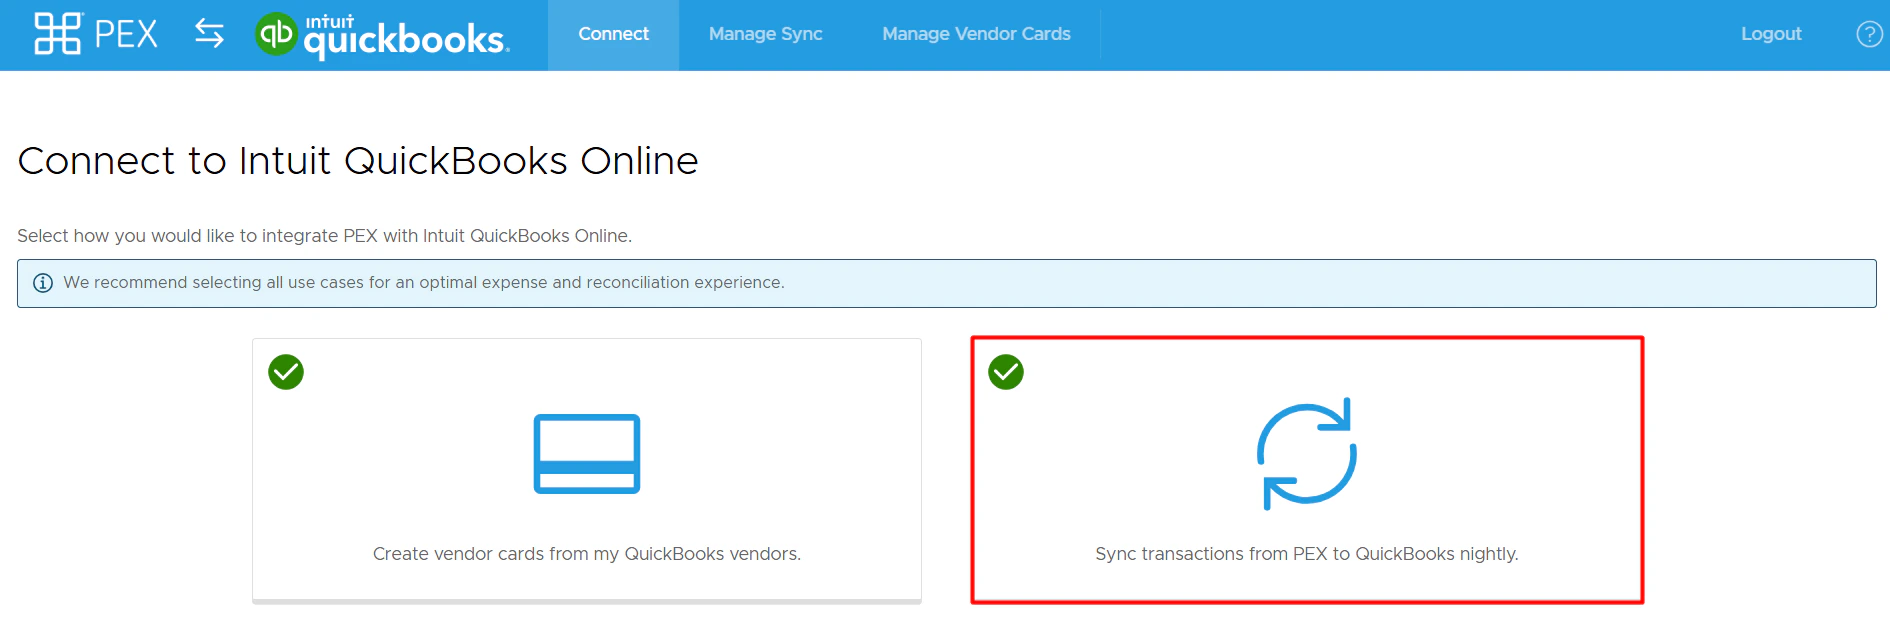
There are currently two options for how you can connect PEX with QuickBooks Online. We recommend as many as possible to make your reconciliation experience seamless.- Create vendor cards from my QuickBooks vendors.
- Sync transactions from PEX to QuickBooks nightly.

Choose What to Sync
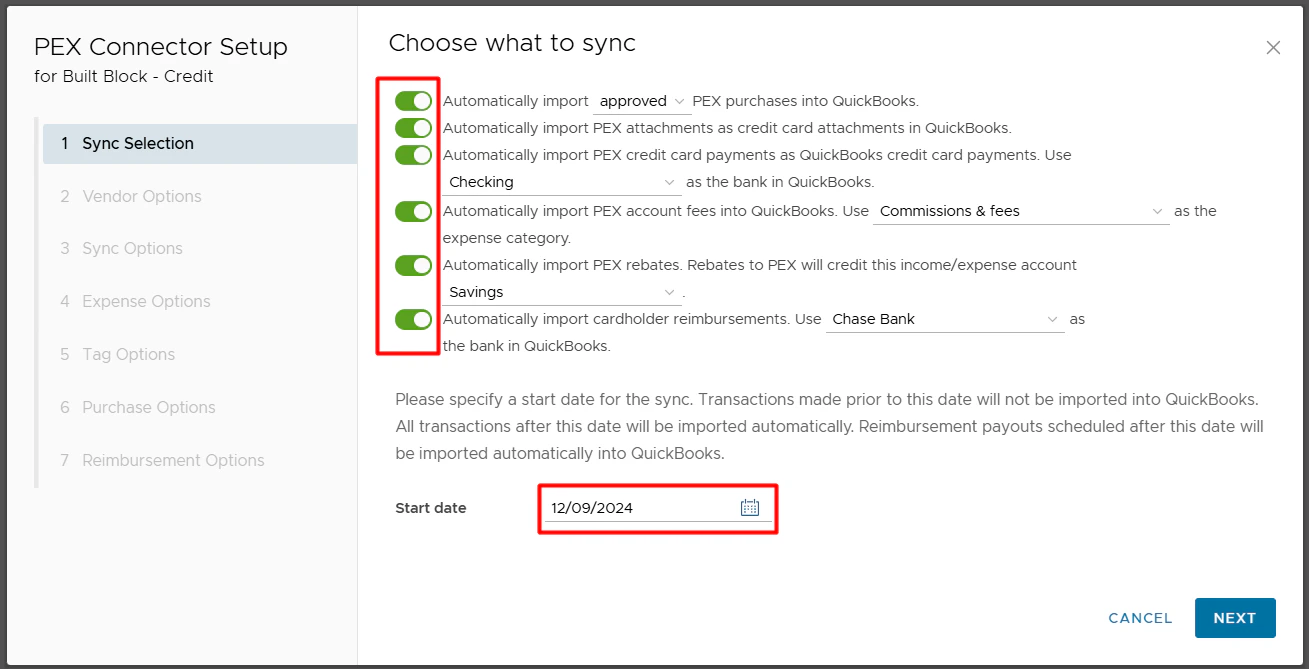
- Automatically import PEX purchases as QuickBooks expenses.
- Enable this option to import PEX purchases as expenses in QuickBooks.
- You can choose to sync all PEX transactions (regardless of approval status) or just approved (recommended).
- PEX purchases must have a Category PEX Tag in order to sync. For details on transaction review, please see our article How to Review Transactions.
- Enable this option to import PEX purchases as expenses in QuickBooks.
- Automatically import PEX attachments as expense attachments in QuickBooks.
- Enable this option to import PEX receipts as expense attachments in QuickBooks.
- If a purchase has multiple receipts, they will all sync to QuickBooks.
- This option is available only if the “Automatically import PEX purchases as QuickBooks expenses” toggle is enabled.
- Enable this option to import PEX receipts as expense attachments in QuickBooks.
- Automatically import PEX credit card payments as QuickBooks credit card payments.
- Enable this option to import PEX credit card payments as QuickBooks credit card payments.
- An example of a credit card payment would be an ACH debit from the linked bank account to pay the full statement balance.
- From the drop down list, please select the bank account in QuickBooks corresponding to your business checking account.
- This account will be credited when syncing credit card payments to QuickBooks.
- Enable this option to import PEX credit card payments as QuickBooks credit card payments.
- Automatically import PEX account fees as QuickBooks expenses.
- Enable this option to import PEX account fees.
- Examples of a PEX Fee include an ISA fee for international use or priority shipping fees.
- Only business-level fees will sync to QuickBooks if the “Automatically import PEX purchases as QuickBooks expenses” toggle is disabled. Card-level fees will not sync.
- From the drop down list, please select the expense category to debit when syncing fees to QuickBooks.
- Enable this option to import PEX account fees.
- Automatically import PEX rebates.
- Enable this option to import PEX account rebates.
- From the drop down list, please select the bank account, income or expense category to credit when syncing rebates to QuickBooks.
- This option is available only if the “Automatically import PEX purchases as QuickBooks expenses” toggle is enabled.
- Enable this option to import PEX account rebates.
- Automatically import cardholder reimbursements.
- Enable this option to import PEX cardholder reimbursements.
- From the drop down list, please select the bank account to credit when syncing reimbursements to QuickBooks.
- Enable this option to import PEX cardholder reimbursements.
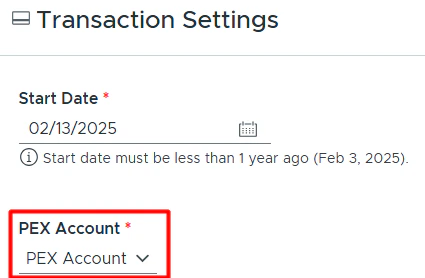
- Specify a start date for the sync.
- Transactions on and after this date will sync.
- Reimbursements with a payment processing date on and after this date will sync.
- The start date must be <1 year in the past.
- Transactions on and after this date will sync.
Configure vendor sync options
Select one of the following:- Choose a vendor for your purchases.
- With this option, all PEX purchases will be booked against a single vendor selected from the drop down list.
- Tip: Consider creating a new vendor in QuickBooks called “PEX” if you would like to book all of your PEX purchases against a single vendor.

- Create a vendor for each unique merchant.
- With this option, PEX will book purchases against corresponding vendors that already exist in your QuickBooks account. If there is no corresponding vendor then PEX will auto create a new vendor in your QuickBooks company file.
- Note that the connector will not create duplicate vendors, but “Walmart23455”, “Walmart-brooklyn223” are two unique vendors from the connector’s point of view. If you don’t want to have “Walmart23455” and “Walmart-brooklyn223” then read below.
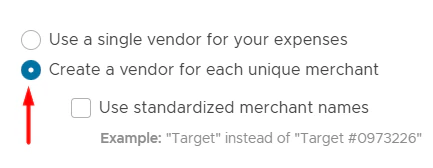
Standardized merchant names
With the “Create a vendor for each unique merchant” option, you can also sync your purchases with standardized merchant names if you check “Use standardized merchant names” checkbox.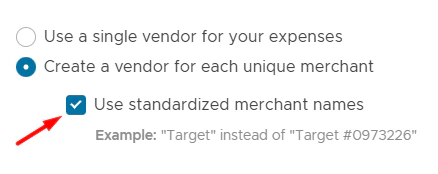
Configure Sync Options

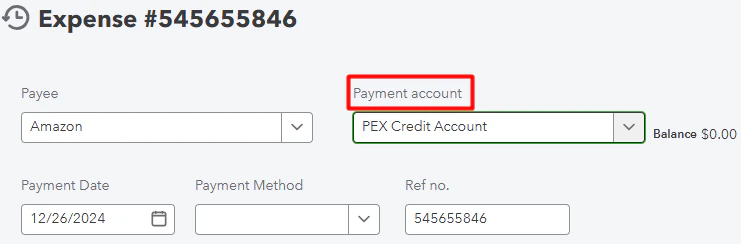
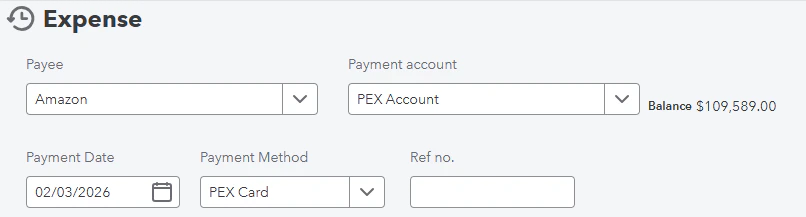
- Please choose a credit card payment account to show for your PEX purchases.
- The account you select will represent your PEX balance and serve as the Payment account for all your PEX expenses in QuickBooks. The account must be of Account Type: Credit Card and Detail Type: Credit Card.
- Learn how to add a payment account in QuickBooks Online here.
- We recommend creating a new payment account named “PEX Credit Account” to clearly identify all purchases made using PEX.
- Purchases will credit this account.
- Credit card payments will debit this account.
- Fees in PEX will credit this account.
- Rebates in PEX will debit this account.
- The account you select will represent your PEX balance and serve as the Payment account for all your PEX expenses in QuickBooks. The account must be of Account Type: Credit Card and Detail Type: Credit Card.
- Please choose a payment method to show for your PEX purchases.
- This will serve as the Payment Method for all your PEX expenses in QuickBooks.

- We recommend creating a new payment method named “PEX” to clearly identify all purchases made using PEX.
- This will serve as the Payment Method for all your PEX expenses in QuickBooks.
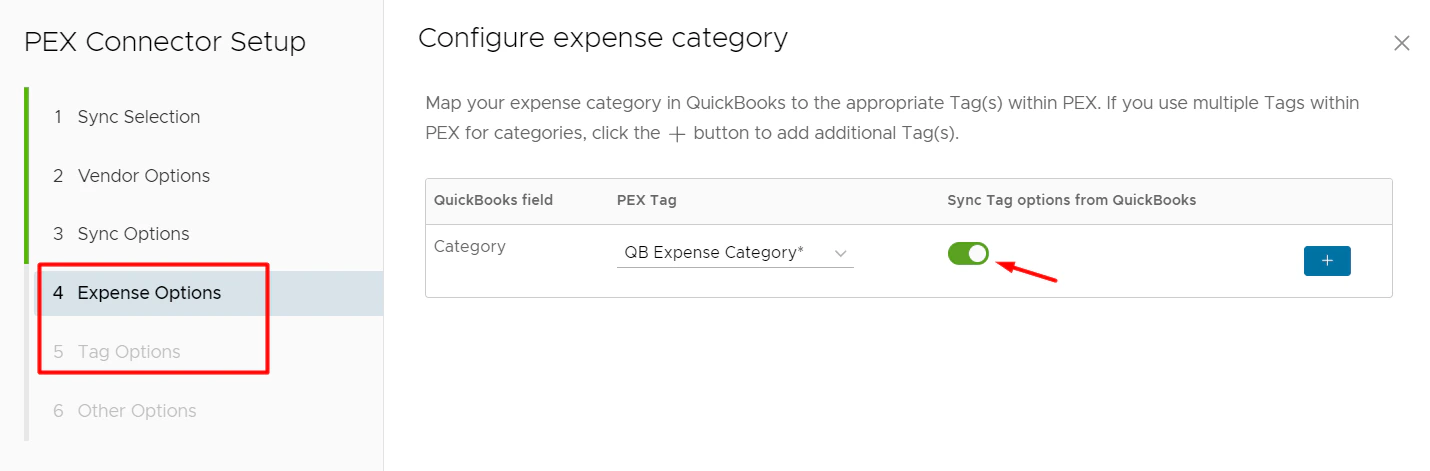
Configure expense category
Transaction tags are available with selected plans. Customers without tags will be asked to choose a default category for all transactions.- You can map a QuickBooks field “Category” to a PEX tag. That tag must be created beforehand, following the logic described in the Create PEX tags for QuickBooks Online article.
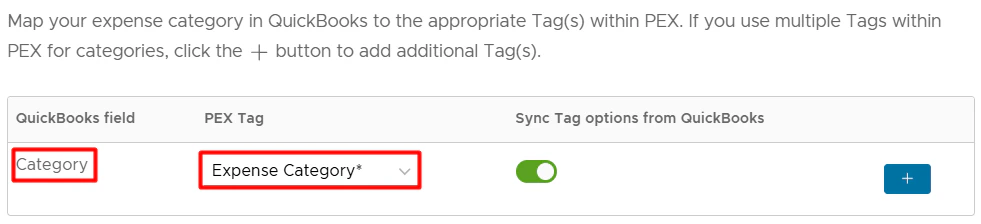
- Make sure to enable the “Sync Tag Options from QuickBooks” toggle. This will pull your expense categories from QuickBooks into PEX as tag option values.
The mapping and auto sync allows you and your cardholders to select a tag value for each purchase and reimbursement. For that go to the “Transactions” menu -> locate a transaction -> click on it -> select a tag value (“Advertising” in our example below) of the “Expense Category” tag -> click “Save”. Note that you and your cardholders can select one of the tag values for each purchase once you finish the QuickBooks connector setup and sync tag options from QuickBooks to PEX.
 The purchase will debit the expense category that it is tagged with (“Advertising in our example above). If you are using split tag functionality on the PEX platform, the connector will support that while exporting the purchases and create the same split structure for purchases in QuickBooks.
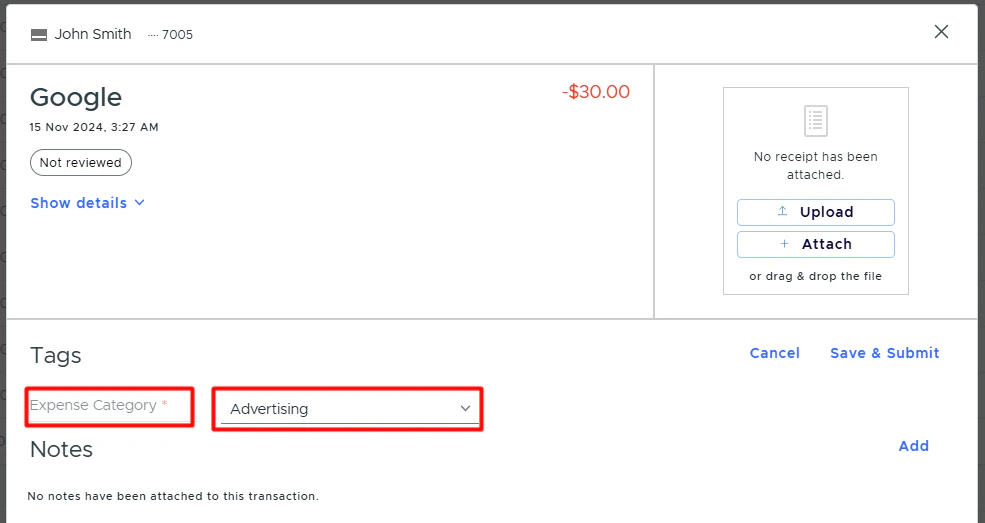
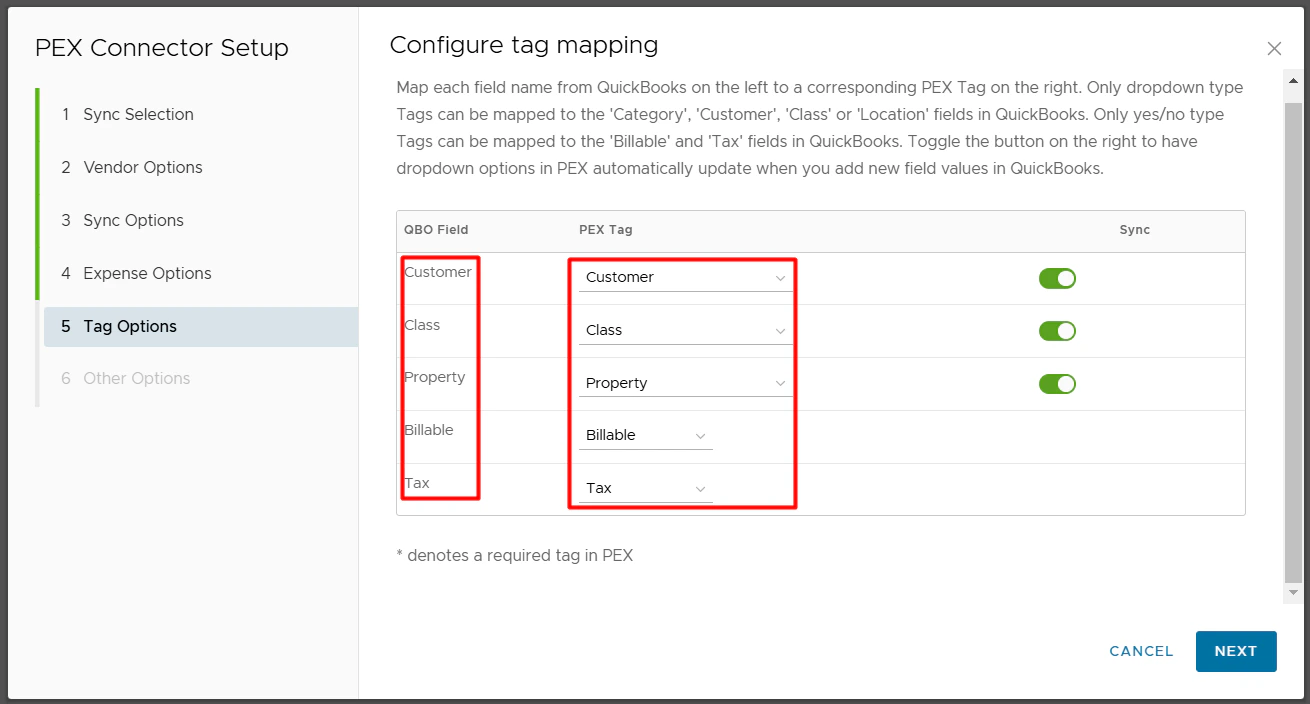
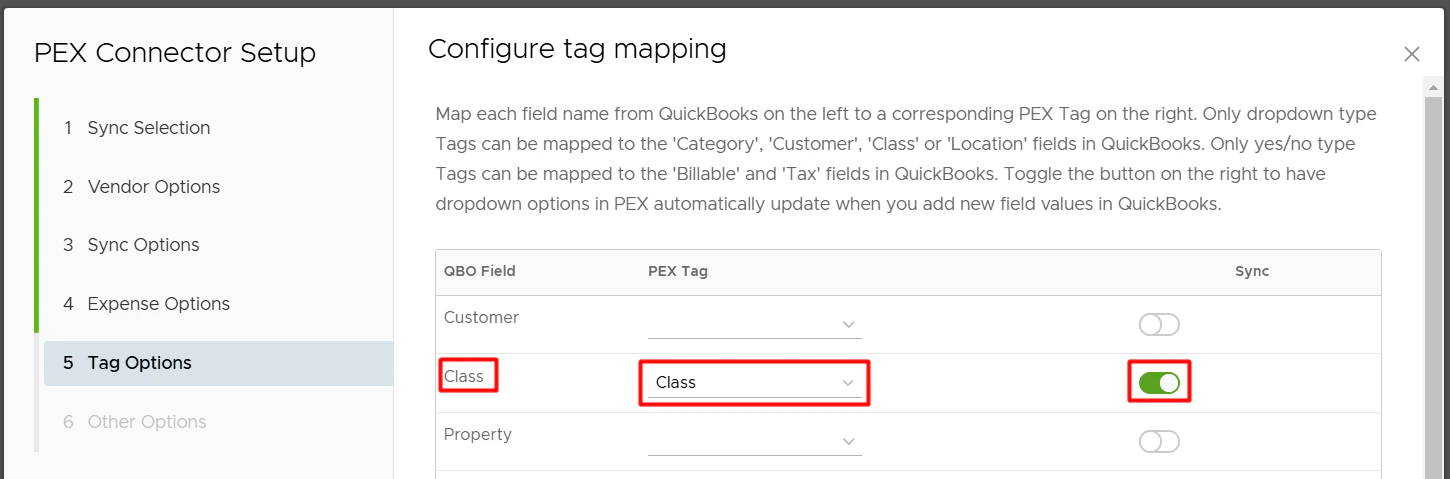
Configure Tag Mapping
PEX tags can also be mapped to other QuickBooks fields for coding of purchases and reimbursements.- If you use Class, Customer, Billable, or Tax fields in QuickBooks, map them to PEX tags. Those PEX tags must be created beforehand, following the logic described in the Create PEX tags for QuickBooks Online article. Note:
- Class, Customer, and Location should be mapped to PEX tags with the type set to “Dropdown”.
- Billable and Tax should be mapped to PEX tags with the type set to “Yes/No”.
- Class, Customer, and Location should be mapped to PEX tags with the type set to “Dropdown”.
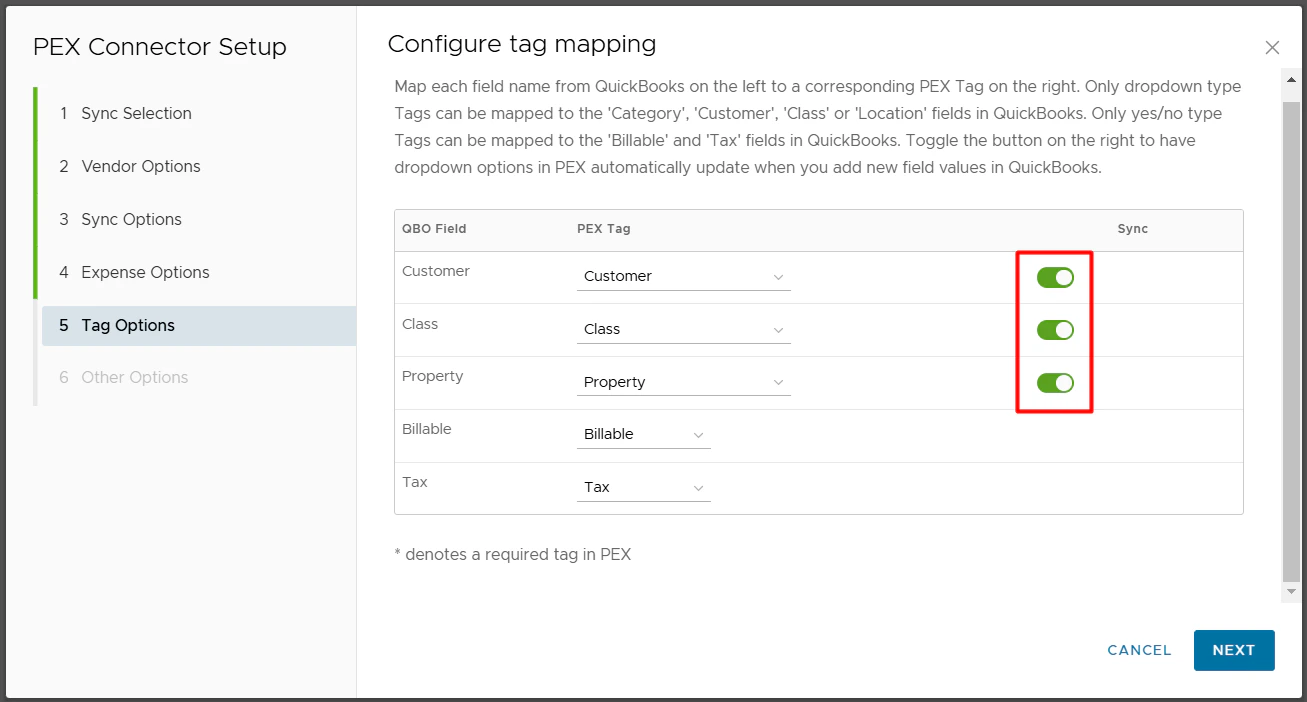
- Make sure to enable the “Sync” toggle. This will pull your Classes, Customers, and Locations from QuickBooks into PEX as tag option values.
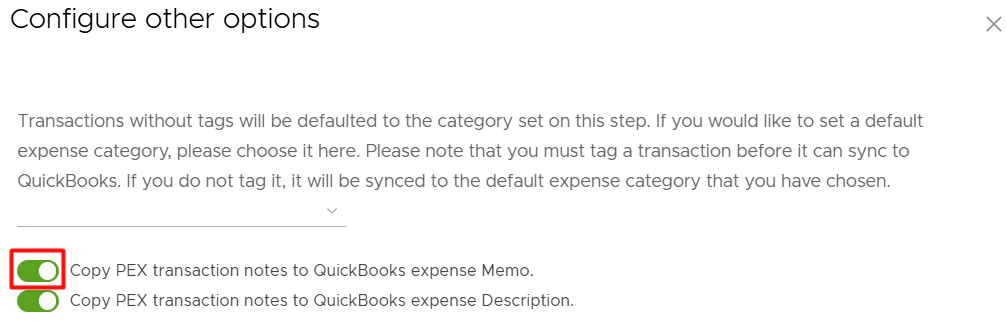
Choose default expense category
You can select a default expense category for your purchases. Only untagged purchases will default to the category selected here.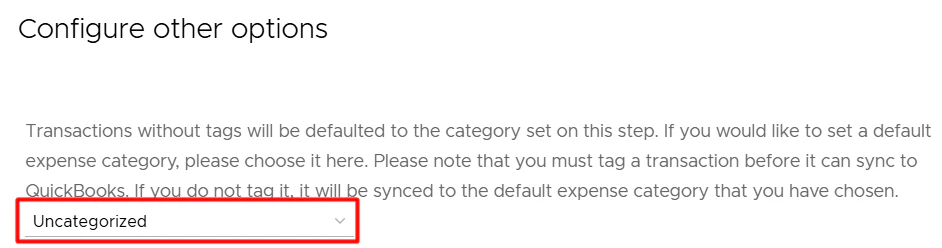
- Copy PEX transaction notes to QuickBooks expense Memo.
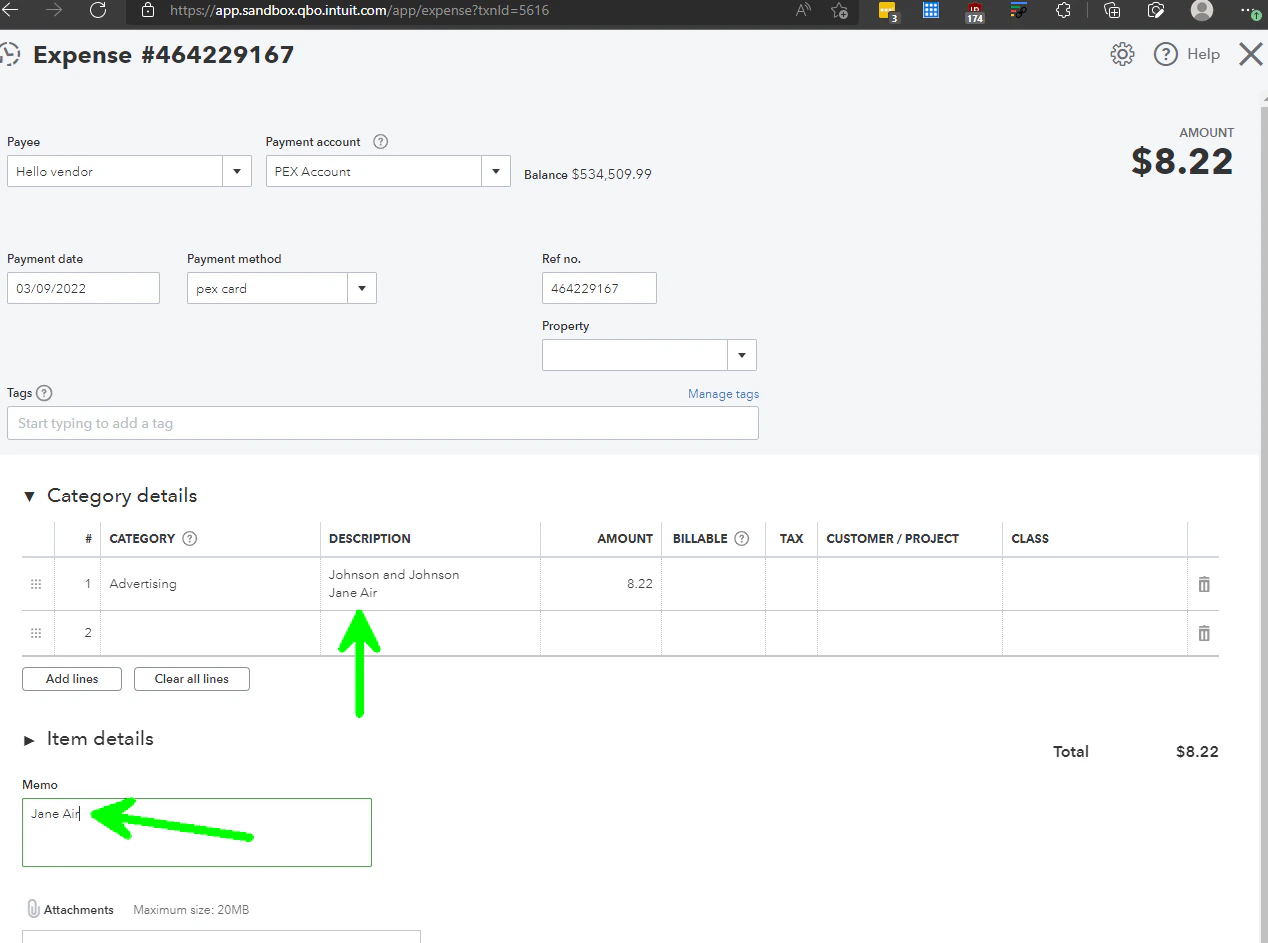
- Enable this option to include the cardholder’s name and purchase notes in the Memo field.
- If disabled, the Memo field will remain empty.
- Enable this option to include the cardholder’s name and purchase notes in the Memo field.
- Copy PEX transaction notes to QuickBooks expense Description.
- Enable this option to include the cardholder’s name and purchase notes in the Description field, along with the vendor name.
- If disabled, the Description field will contain only the vendor name.
- Enable this option to include the cardholder’s name and purchase notes in the Description field, along with the vendor name.
Configure reimbursement sync options
Configure your reimbursement sync options.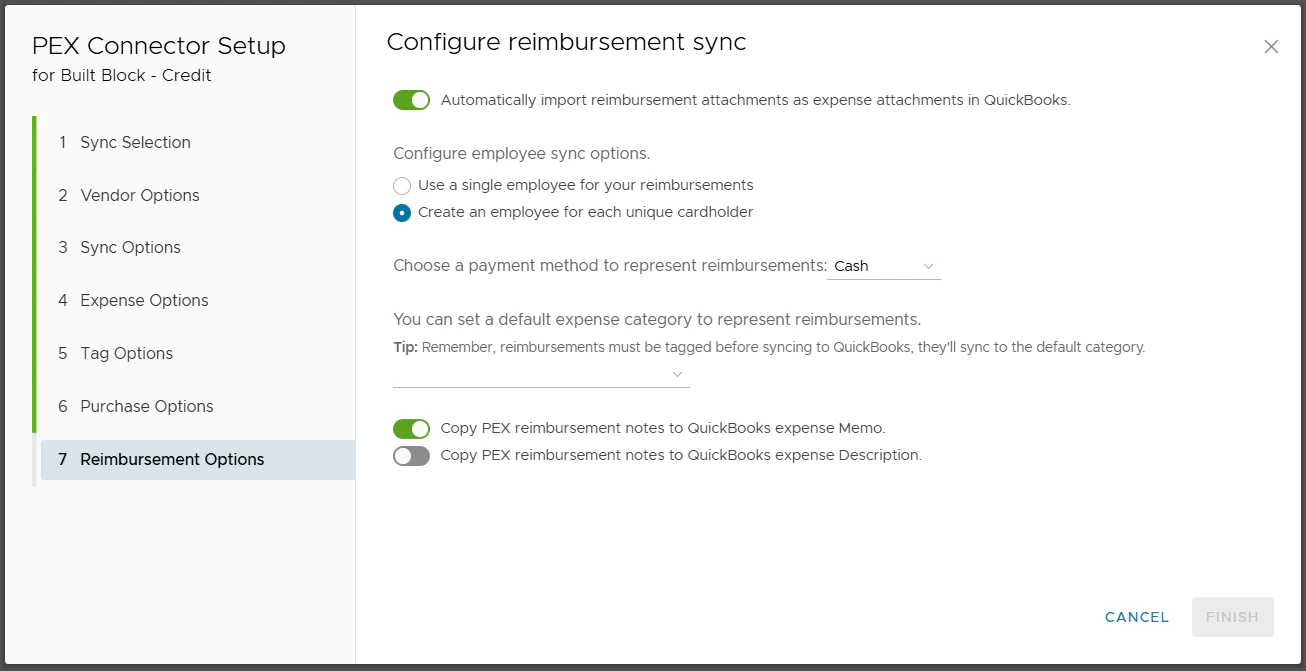
- Automatically import reimbursement attachments as expense attachments in QuickBooks.
- Enable this option to import reimbursement attachments as expense attachments in QuickBooks.
- Configure employee sync options.
- Use a single employee for your reimbursements.
- With this option, all PEX reimbursements will be booked against a single employee selected from the drop down list.
- Tip: Consider creating a new employee in QuickBooks called ‘PEX’ to book all of your PEX reimbursements with a single employee.
- Create an employee for each unique cardholder.
- With this option, PEX will book reimbursements against corresponding employees that already exist in your QuickBooks account. If there is no corresponding employee then PEX will auto create a new employee for the given cardholder in your QuickBooks company file.
- With this option, all PEX reimbursements will be booked against a single employee selected from the drop down list.
- Use a single employee for your reimbursements.
- Choose a payment method to represent reimbursements.
- This will serve as the Payment Method for all PEX reimbursements in QuickBooks.

- This will serve as the Payment Method for all PEX reimbursements in QuickBooks.
- You can set a default expense category for reimbursements.
- Only reimbursements without a category tag will default to the category selected here. They will debit the selected default category.
- Note: It’s recommended to tag reimbursements before syncing to QuickBooks. Tagged reimbursements will debit the expense category that they are tagged with (“Office Supplies” in the examples below).
Admin view
For that go to the “Requests” menu -> select “Reimbursements” -> select any request -> select an expense category value (“Office Supplies” in our example below) of a tag (“Expense Category” in our example below).Cardholder view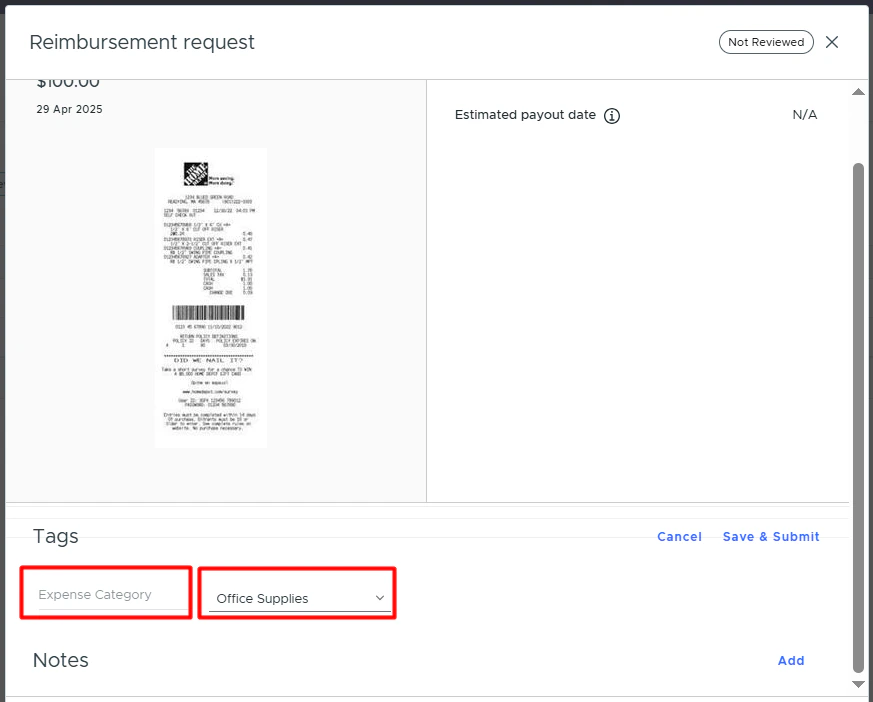
For that cardholders go to the “Requests” menu -> select “Reimbursements” -> click “New reimbursement” -> select an expense account value (“Office Supplies” in our example below) of a tag (“Expense Category” in our example below).Note that you and your cardholders can select one of the tag values for each reimbursement once you finish the QuickBooks connector setup and sync tag options from QuickBooks to PEX.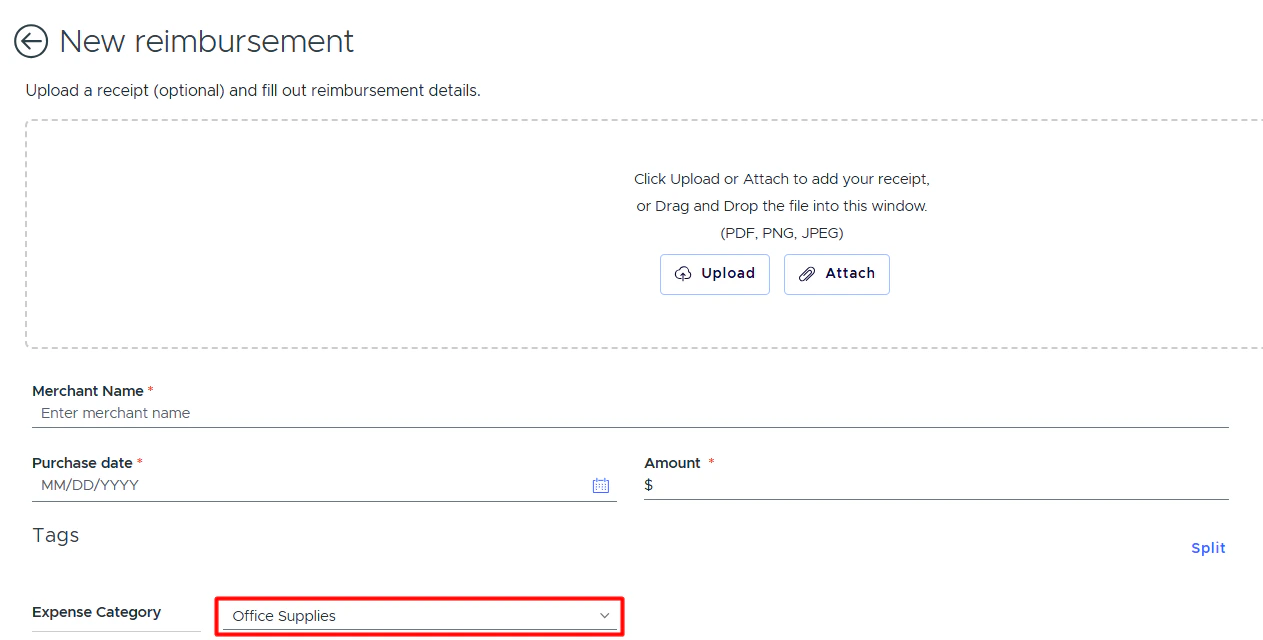
- Note: It’s recommended to tag reimbursements before syncing to QuickBooks. Tagged reimbursements will debit the expense category that they are tagged with (“Office Supplies” in the examples below).
Admin view
- Only reimbursements without a category tag will default to the category selected here. They will debit the selected default category.
- Also, you can select additional configurations to map reimbursement notes within your QuickBooks account.
- Copy PEX reimbursement notes to QuickBooks expense Memo.
- Enable this option to include the cardholder’s name and reimbursement notes in the Memo field.
- If disabled, the Memo field will remain empty.
- Copy PEX reimbursement notes to QuickBooks expense Description.
- Enable this option to include the cardholder’s name and reimbursement notes in the Description field, along with the vendor name.
- If disabled, the Description field will contain only the vendor name.
- Copy PEX reimbursement notes to QuickBooks expense Memo.
Configure bill sync
Configure your bill sync from PEX to QuickBooks. PEX can sync bill payments as expenses or as bill payments.

- Sync as:
- Expenses — Select a payment method. We recommend creating a payment method called “PEX” to easily track all bills paid in PEX.
- Bill payments — Select a bank account that bill payments made via ACH will be deducted from.
- Note that bill payments made with a vendor card will be deducted from the account selected in the PEX Account field.
- Expenses — Select a payment method. We recommend creating a payment method called “PEX” to easily track all bills paid in PEX.
- Sync attachments.
- If checked, bill attachments will sync to QuickBooks.
- Create a vendor in QuickBooks for each unique merchant.
- Checked: PEX will match bill payments to existing QuickBooks vendors or auto-create new ones if they don’t exist.
- Unchecked: Map vendors manually using a static value or PEX tag in the Mappings table below.
- Copy PEX notes to QuickBooks Memo.
- Checked: The Memo field will include “Paid by [user name]” and the bill payment notes.
- Unchecked: The Memo field will only include “Paid by [user name].”
- Copy PEX notes to QuickBooks Description.
- Checked: The Description field will include the vendor name and bill payment notes.
- Unchecked: The Description field will only include the vendor name.
Bill Payment Fields Mapping
Fields can be mapped to either static values or PEX tags. If using PEX tags, create them in advance following the Create PEX tags for QuickBooks Online article. Example: Mapping the “Expense Account” field Option 1: Static value- Select a single QuickBooks account (e.g., “Advertising”) that will apply to all PEX bills during sync.
Note: Static values are used only during sync — they won’t appear on the bill details in PEX.

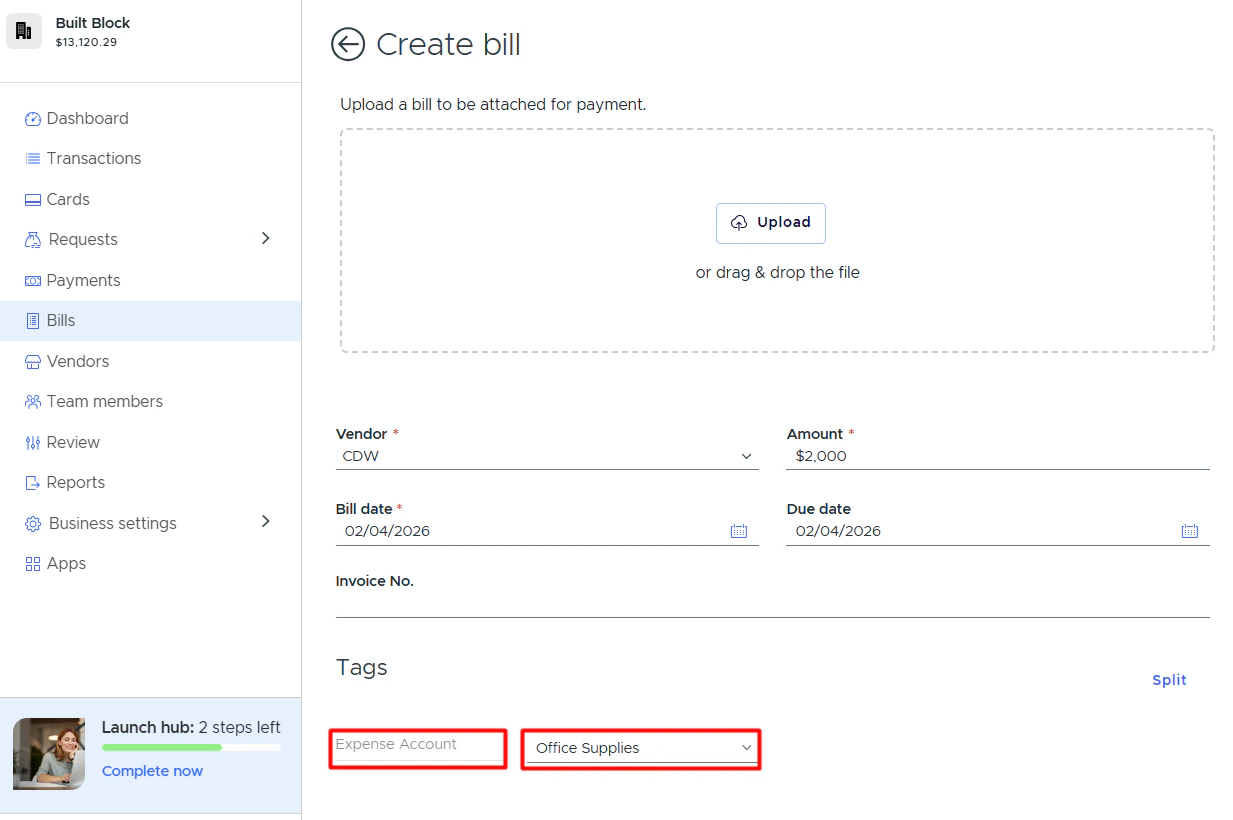
- Map to a PEX tag (e.g., “Expense Account”) so you can select a value for each bill.
You can add tags when creating or updating a bill: go to the Tags section -> select a tag value (e.g., “Office Supplies”) -> click “Preview”. Note: Tag values are available after completing the QuickBooks connector setup and syncing tag options from QuickBooks to PEX.

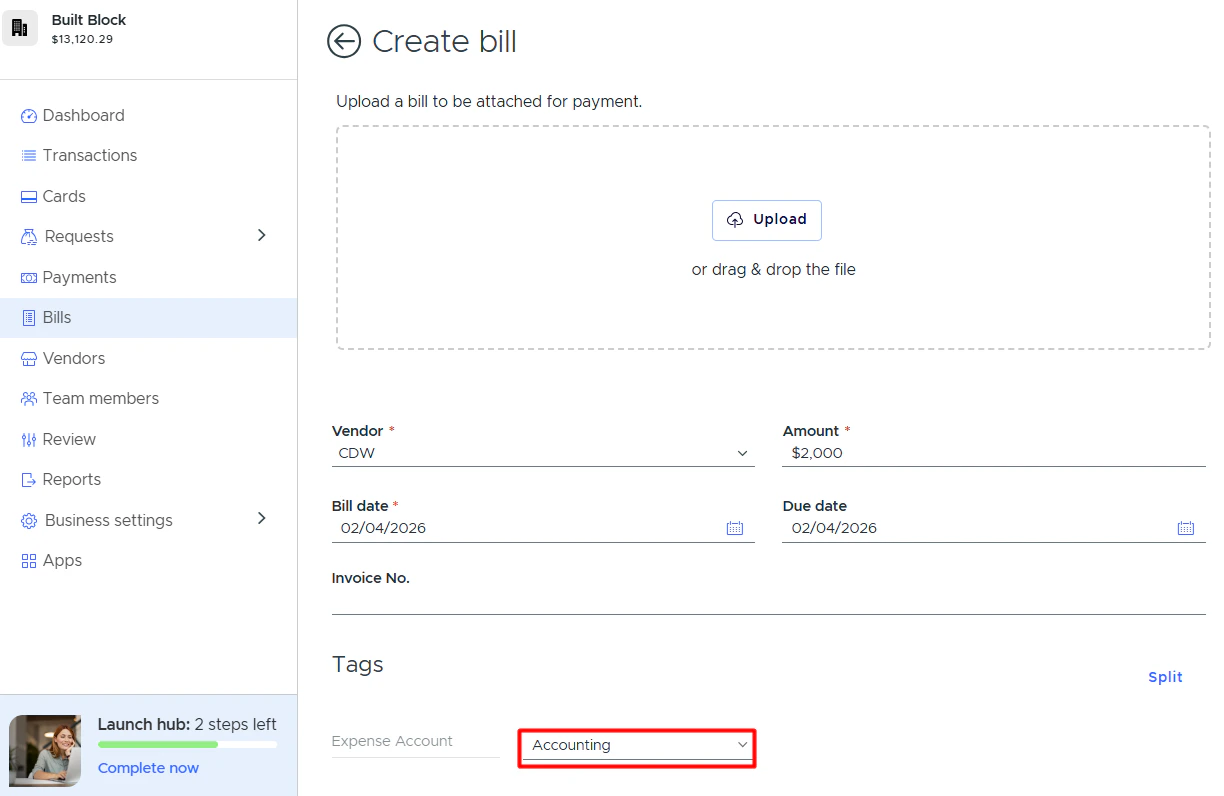
- When mapping to a tag, you can specify a default value (e.g., “Uncategorized”). If a bill isn’t tagged before sync, the default value is applied.
The default value (e.g., “Uncategorized”) won’t appear on the bill details in PEX. It’s only applied during sync if the bill hasn’t been tagged. If you tag a bill (e.g., with “Accounting”), that tag value will be used instead. Tags take precedence over default values.


When will bill payments sync to QuickBooks?
Bill payments made with vendor cards will sync when the transfer shows “Completed” status.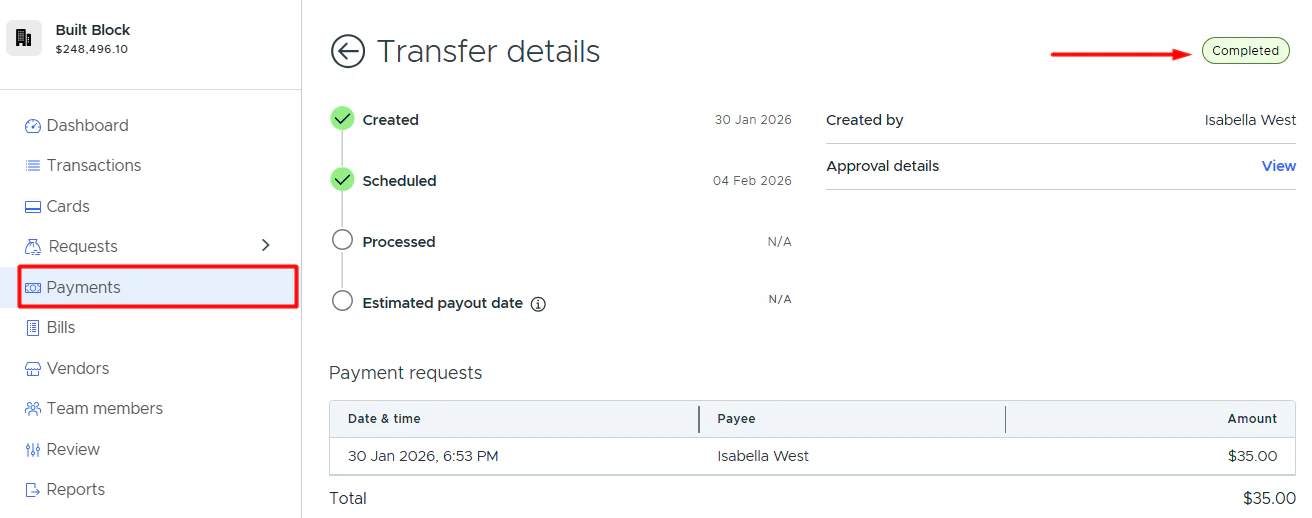

Auto Tagger
The Auto Tagger app is a great compliment to QuickBooks. It allows you to create rules that auto-tag purchases. Learn more.Approve Transactions in PEX


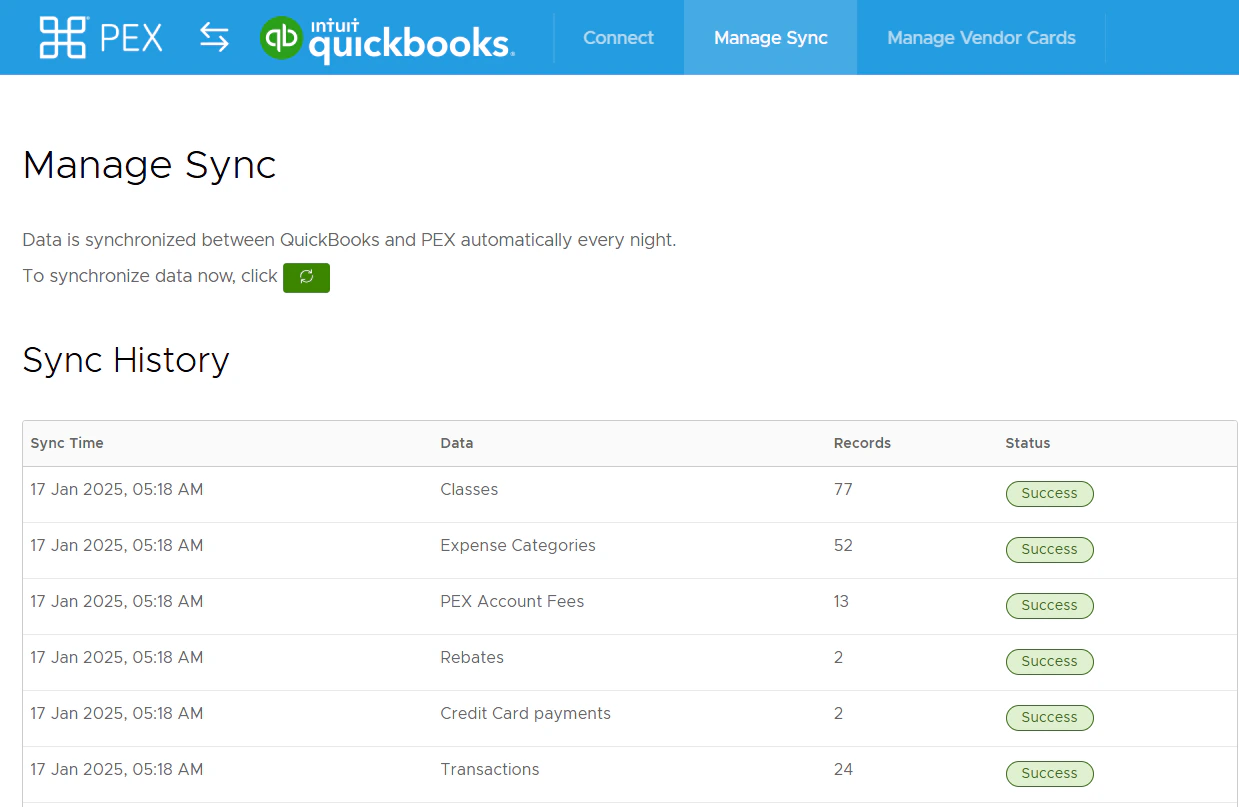
Start syncing
Navigate to the Manage Sync tab and click on the green sync button to initiate the sync between PEX and QuickBooks.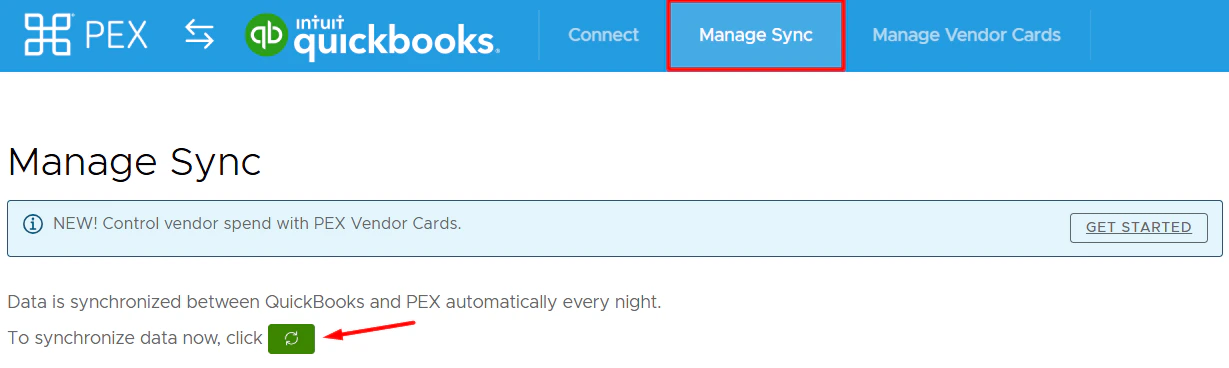


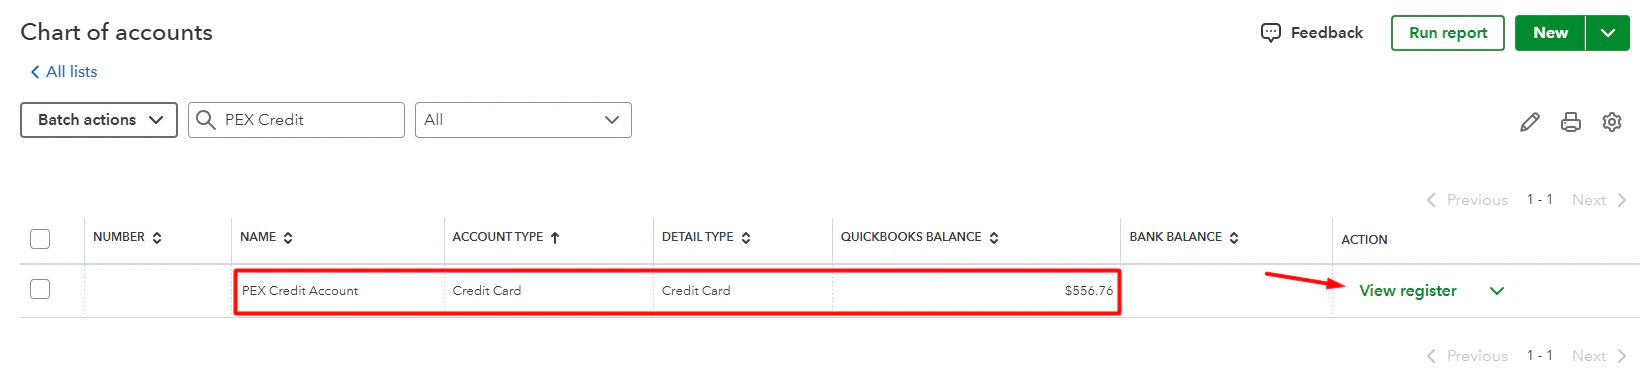
View Transactions in QuickBooks
Log into QuickBooks account and navigate to Transactions -> Chart of accounts -> Click “View Register” next to the account representing your PEX account (“PEX Credit Account” in the example below) to view synced transactions.
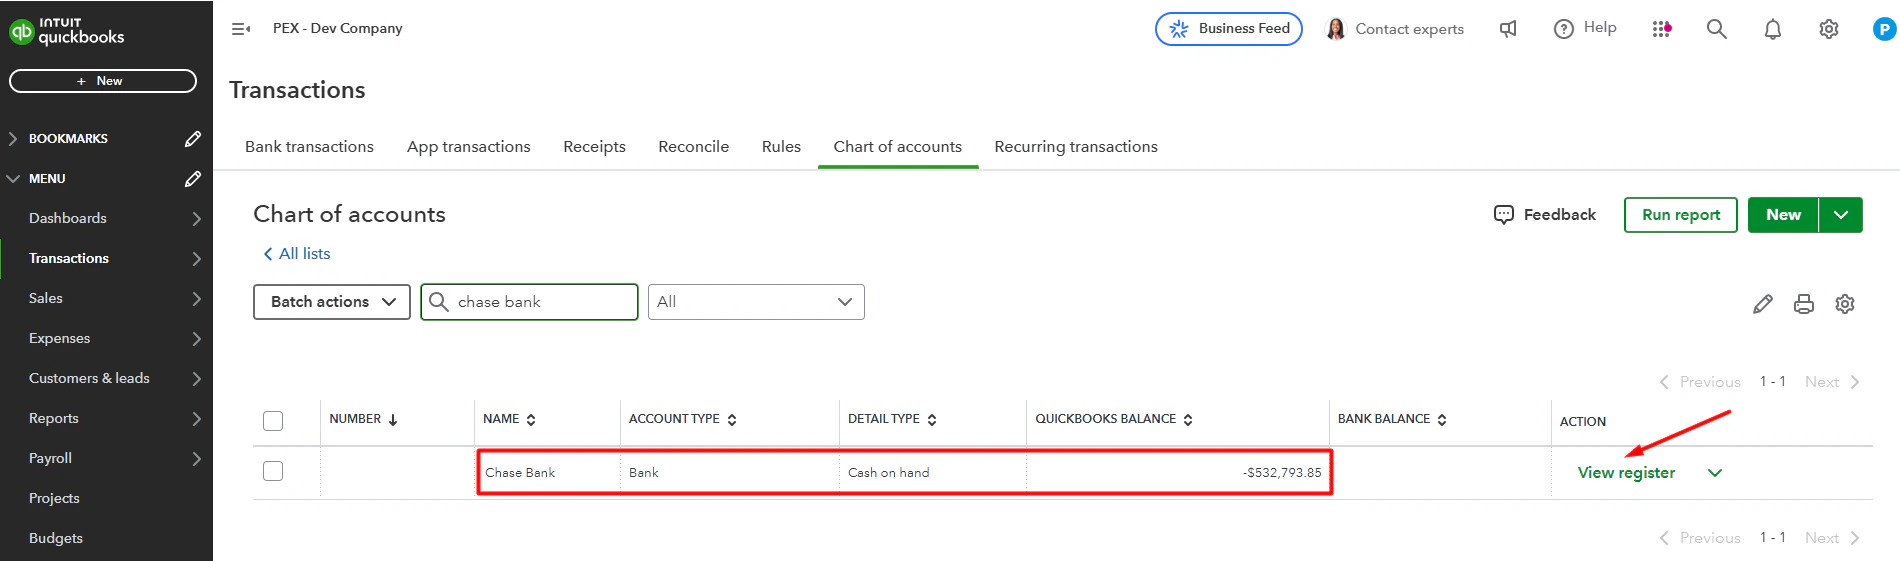
View Reimbursements in QuickBooks
Log into QuickBooks account and navigate to Transactions -> Chart of accounts -> Click “View Register” next to the bank account you selected to use for reimbursements (“Chase Bank” in the example below) to view synced reimbursements.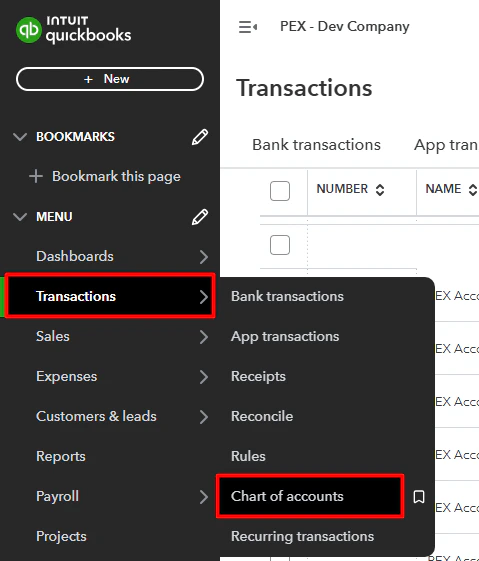
Manage sync
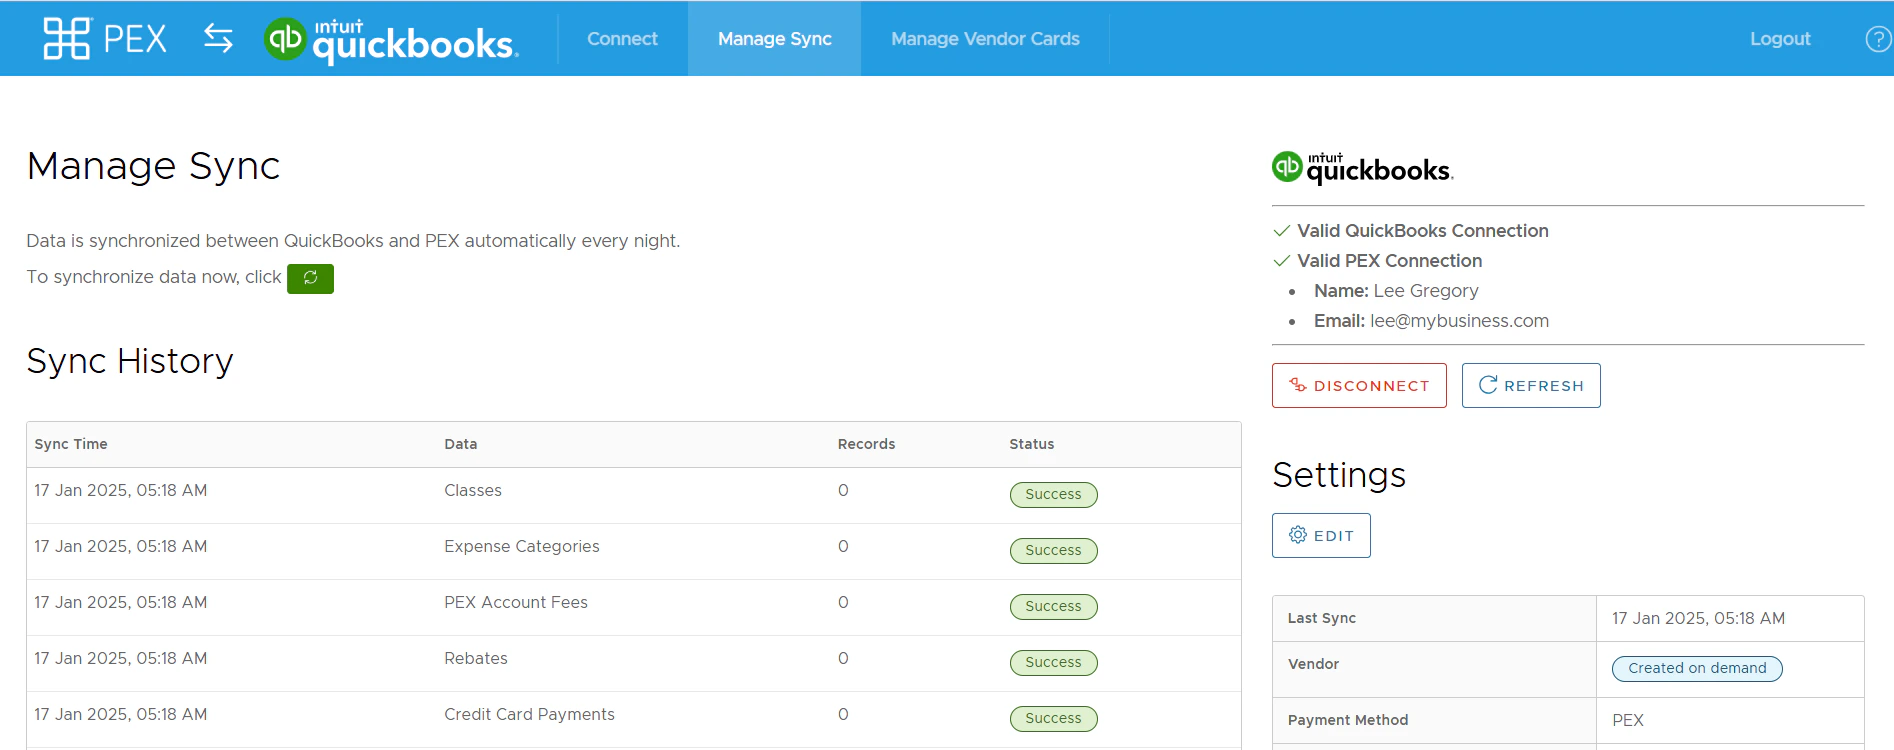
- Run a manual sync between PEX and QuickBooks by clicking on the green sync button.

- Auto-sync is enabled by default. With auto-sync enabled, transactions and tag option values sync automatically every 24 hours.
- Auto-sync will always process transactions based on the start date specified on the Sync Selection step, with a maximum limit of 2 months back from today. If there is no start date specified on the Sync Selection step then auto-sync will sync transactions up to 2 months back from today.

- View/Edit configuration settings.
- View/Edit tag mapping.
- View Sync history.
- Disconnect from your QuickBooks account.
FAQ
Can the connector support separate QuickBooks Online accounts for each card?
Can the connector support separate QuickBooks Online accounts for each card?
Can I combine manual tag options creation and automatic tag options sync from QuickBooks Online to PEX?
Can I combine manual tag options creation and automatic tag options sync from QuickBooks Online to PEX?
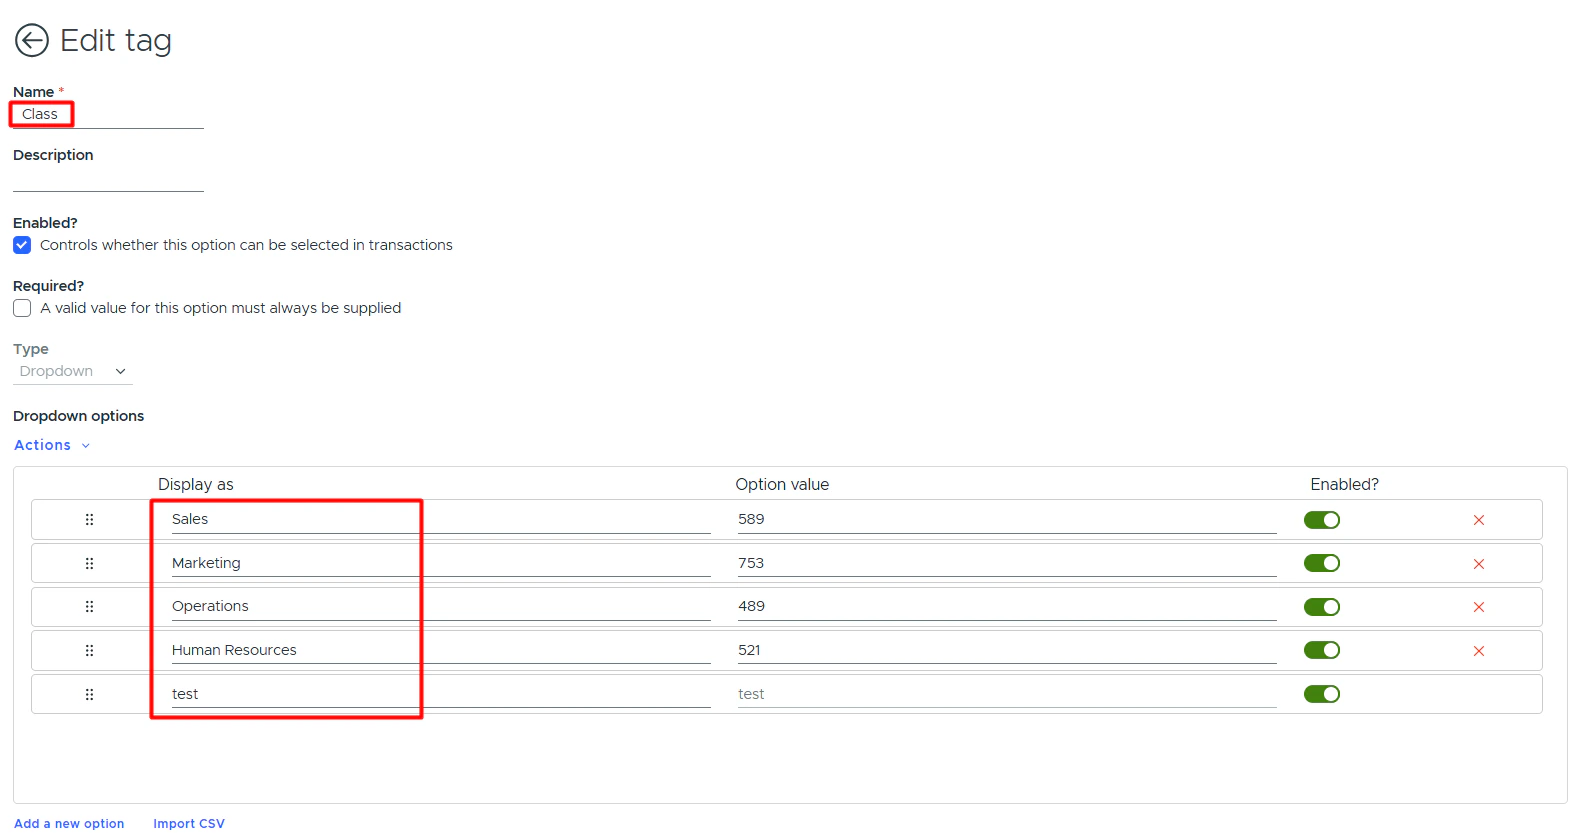
Can tags be set up to feed into the Class field in QuickBooks Online?
Can tags be set up to feed into the Class field in QuickBooks Online?
For the accounts in QuickBooks that have Parent/Child accounts or sub-accounts how does that look in tags?
For the accounts in QuickBooks that have Parent/Child accounts or sub-accounts how does that look in tags?
Can I import tag options from a CSV file?
Can I import tag options from a CSV file?
Can I update transactions that have already been synced to my QuickBooks Online account?
Can I update transactions that have already been synced to my QuickBooks Online account?

Will a previously synced transaction re-sync to my QuickBooks Online account if I change its status (Rejected -> Approved), re-tag or add another receipt?
Will a previously synced transaction re-sync to my QuickBooks Online account if I change its status (Rejected -> Approved), re-tag or add another receipt?
How do I sync the cardholder name with each transaction in QuickBooks Online?
How do I sync the cardholder name with each transaction in QuickBooks Online?
- Copy PEX transaction notes to QuickBooks expense Memo.
- Enable this option to include the cardholder’s name and purchase notes in the Memo field.
- If disabled, the Memo field will remain empty.
- Enable this option to include the cardholder’s name and purchase notes in the Memo field.
- Copy PEX transaction notes to QuickBooks expense Description.
- Enable this option to include the cardholder’s name and purchase notes in the Description field, along with the vendor name.
- If disabled, the Description field will contain only the vendor name.
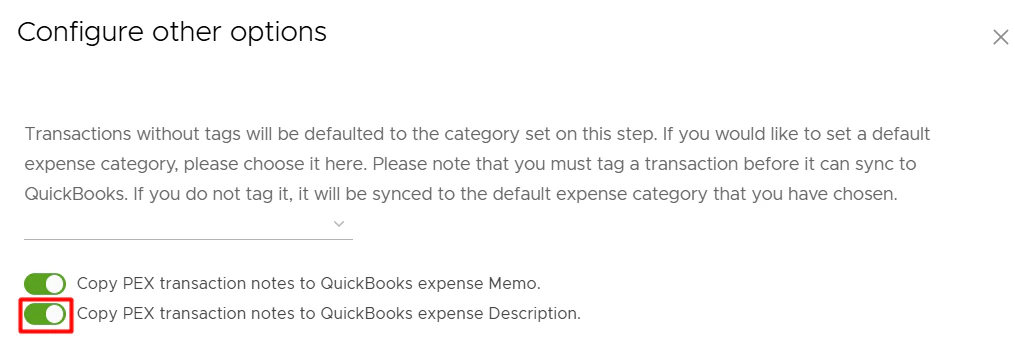
- Enable this option to include the cardholder’s name and purchase notes in the Description field, along with the vendor name.
What types of accounts are supported?
What types of accounts are supported?
Can transactions be automatically tagged?
Can transactions be automatically tagged?
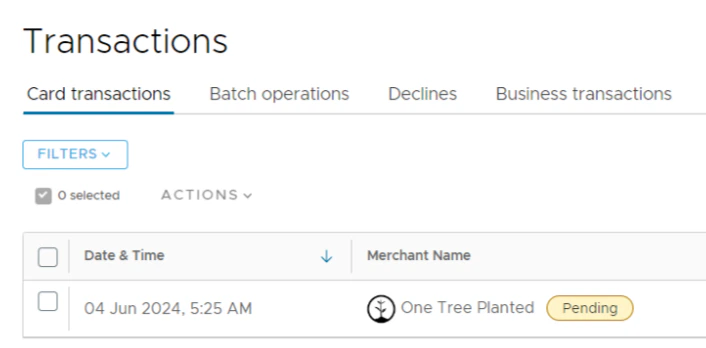
Do pending transactions get synced?
Do pending transactions get synced?
Need to export transactions manually via a file?
Need to export transactions manually via a file?