1. Upload Your Chart of Accounts
Begin by uploading your Wrapbook Chart of Accounts into the Tag Manager in PEX. More details here. Once your Chart of Accounts is in PEX, let’s access the app:- Log in to http://dashboard.pexcard.com/
- Navigate to Apps > Available
- Locate Exporter for Wrapbook.
- Click More info > Install > Launch.
Note:To install the exporter, you need to enable the following permissions: Edit business settings & apps, Manage cardholder, View card transactions. You can enable them in My Profile → Permissions.
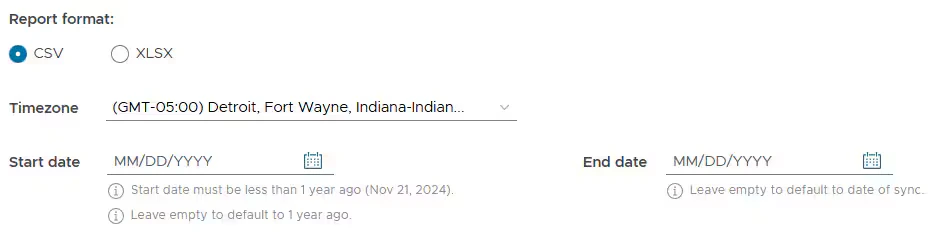
Configure format, timezone and dates
After the app launches:Select the earliest transaction date you want to export to Wrapbook using the date picker (up to 1 year ago).
- You can leave it empty to default 1 year ago.
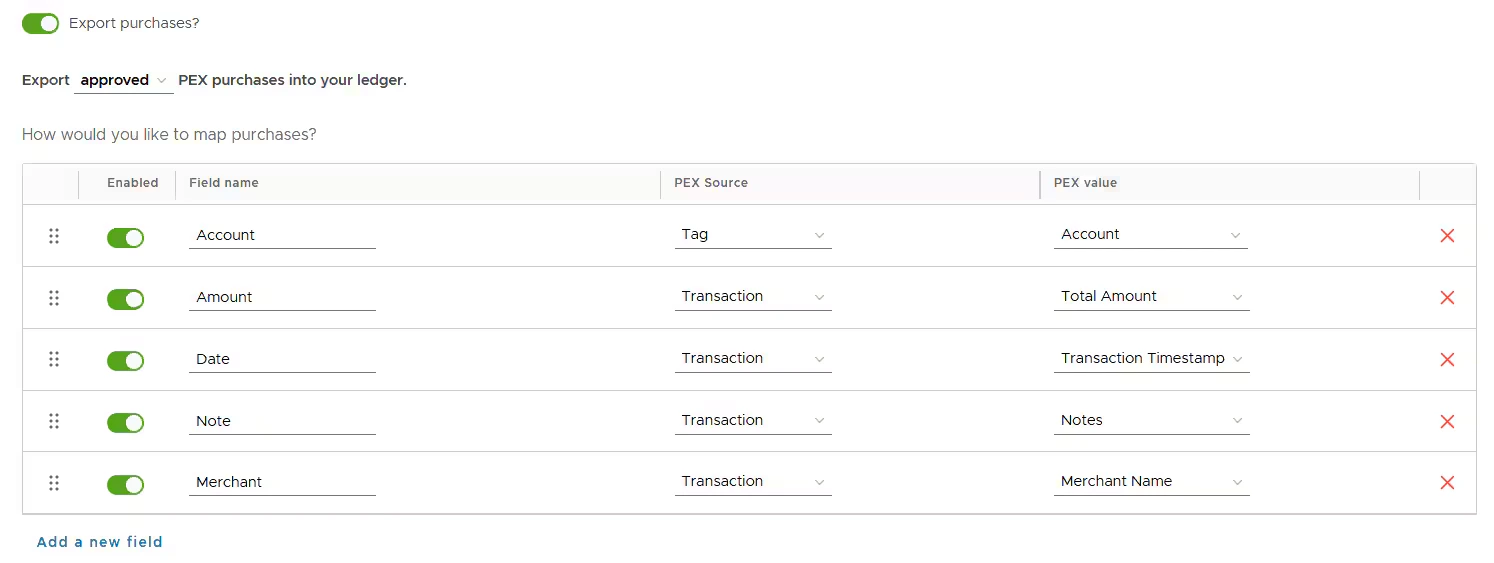
2. Configure Purchases
You can export purchases to Wrapbook.- Enable “Export purchases?” to successfully export PEX purchases, which will update the toggle from grey to green.
- Choose to sync all PEX purchases (regardless of approval status) or just approved (recommended).
- There is a set of standard fields: Account, Amount, Date, Notes, Merchant.
- The PEX source and PEX value are prepopulated for you but you can update them if needed.
- We recommend mapping the Account field to the PEX source Tag. This enables the expense account to be dynamic for each purchase. In the PEX value column, select a tag that you previously created by following the instructions in the Create Tags for Exporter app article.
- Rename fields to make them have the same names as in Wrapbook.
- As soon as you rename a field in one section, it is auto renamed in all sections (Export purchases?, Export transfers?, Export bill payments?, Export fees?).
- Add a new field(s).
- As soon as you add a new field (e.g., Class), it (Class) appears in all sections (Export purchases?, Export transfers?, Export bill payments?, Export fees?).
Add a new field
To add a field that you have in Wrapbook:- Click Add a new field.

- Add a field name.
Add a PEX source.
- It can be Text, Tag, or Transaction.
- Add a PEX value for a new field.
- The PEX value will change based on the PEX source selected.
- Remove any field that you don’t need.
- As soon as you remove a field in one section, it is auto removed in all sections (Export purchases?, Export transfers?, Export bill payments?, Export fees?).
- Reorder fields.
- As soon as you reorder fields in one section, they are reordered in all sections (Export purchases?, Export transfers?, Export bill payments?, Export fees?).
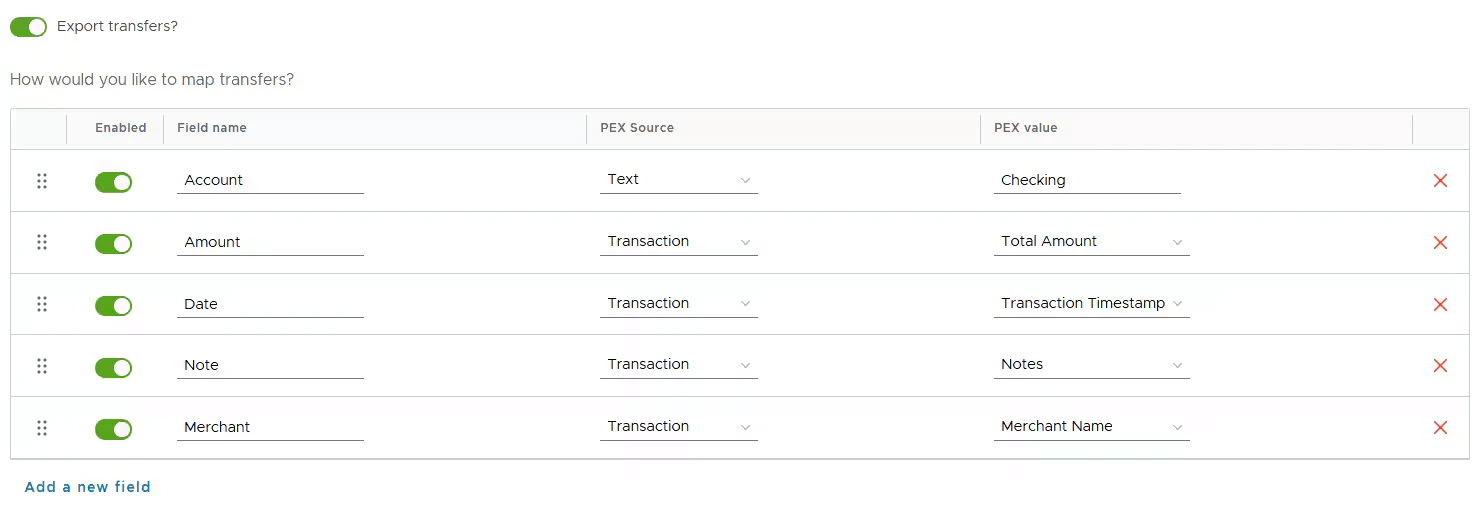
3. Configure Transfers/Bill Payments
You can export transfers (if your business is prepaid) or bill payments (if your business is credit) to Wrapbook.- Enable “Export transfers?/Export bill payments?” to successfully export PEX transfers/bill payments, which will update the toggle from grey to green.
- There is a set of standard fields: Account, Amount, Date, Notes, Merchant.
- The PEX source and PEX value are prepopulated for you but you can update them if needed.
- Rename fields to make them have the same names as in Wrapbook.
- As soon as you rename a field in one section, it is auto renamed in all sections (Export purchases?, Export transfers?, Export bill payments?, Export fees?).
- Add a new field(s).
- As soon as you add a new field (e.g., Class), it (Class) appears in all sections (Export purchases?, Export transfers?, Export bill payments?, Export fees?).
Add a new field
To add a field that you have in Wrapbook:- Click Add a new field.

- Add a field name.
- Add a PEX source.
- It can be Text, Tag, or Transaction.
- Add a PEX value for a new field.
- The PEX value will change based on the PEX source selected.
- Remove any field that you don’t need.
- As soon as you remove a field in one section, it is auto removed in all sections (Export purchases?, Export transfers?, Export bill payments?, Export fees?).
- Reorder fields.
- As soon as you reorder fields in one section, they are reordered in all sections (Export purchases?, Export transfers?, Export bill payments?, Export fees?).
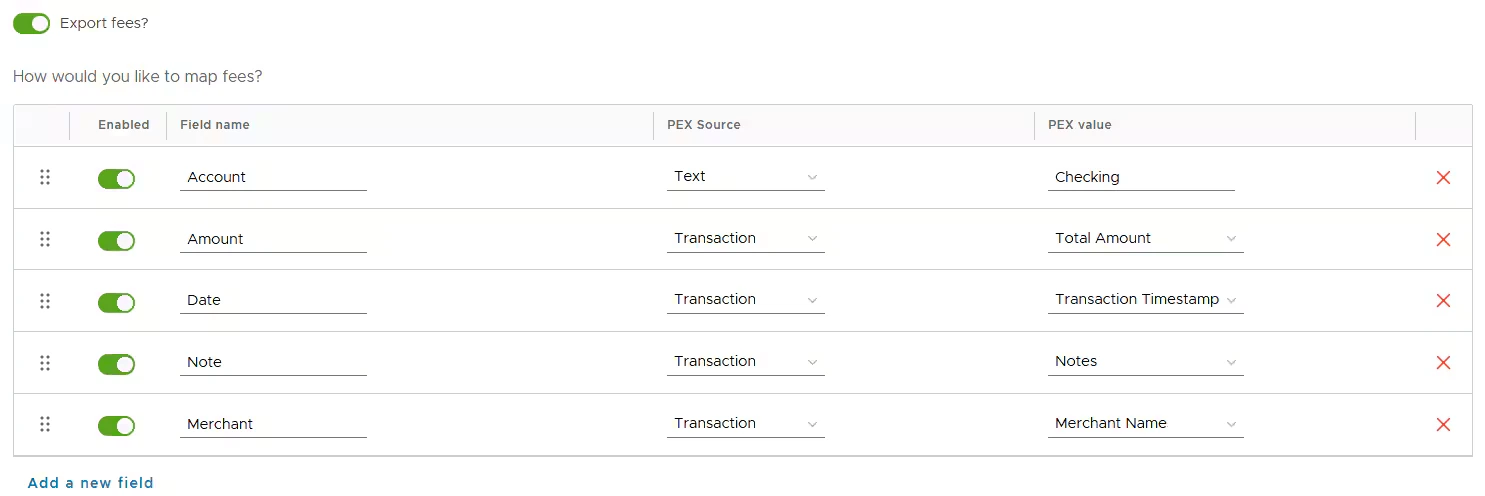
4. Configure Fees
You can export fees to Wrapbook.- Enable “Export fees?” to successfully export PEX fees, which will update the toggle from grey to green.
- There is a set of standard fields: Account, Amount, Date, Notes, Merchant.
- The PEX source and PEX value are prepopulated for you but you can update them if needed.
- Rename fields to make them have the same names as in Wrapbook.
- As soon as you rename a field in one section, it is auto renamed in all sections (Export purchases?, Export transfers?, Export bill payments?, Export fees?).
- Add a new field(s).
- As soon as you add a new field (e.g., Class), it (Class) appears in all sections (Export purchases?, Export transfers?, Export bill payments?, Export fees?).
Add a new field
To add a field that you have in Wrapbook:- Click Add a new field.

- Add a field name.
Add a PEX source.
- It can be Text, Tag, or Transaction.
- Add a PEX value for a new field.
- The PEX value will change based on the PEX source selected.
- Remove any field that you don’t need.
- As soon as you remove a field in one section, it is auto removed in all sections (Export purchases?, Export transfers?, Export bill payments?, Export fees?).
- Reorder fields.
- As soon as you reorder fields in one section, they are reordered in all sections (Export purchases?, Export transfers?, Export bill payments?, Export fees?).
Save configuration
When you configured everything, click Save to save your configuration.5. Export transactions
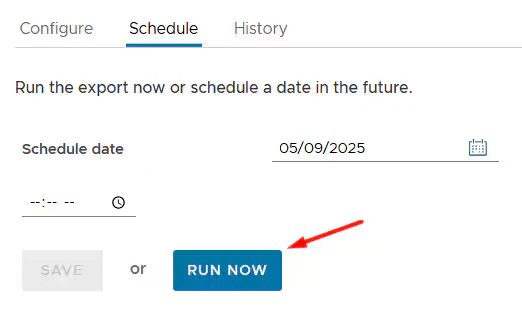
To export transactions, click on the Schedule tab. There are three options:-
Run Now: To run the export now, click Run now.
-
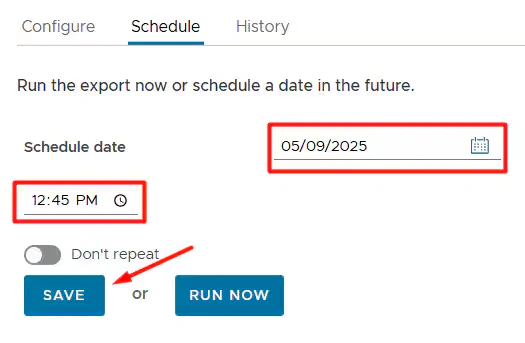
One time scheduled export: To schedule a one time export, select a date and time and click Save.
-
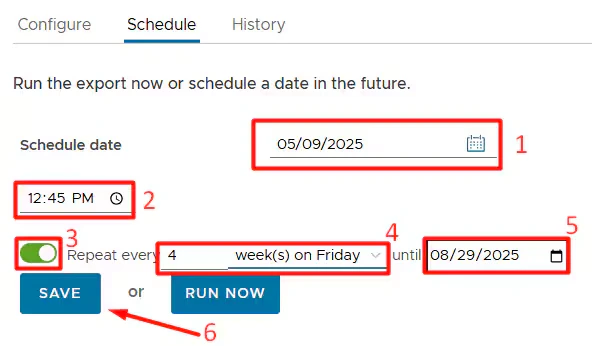
Recurring export: To run this export on a recurring basis:
- Select a date and time.
- Enable the Repeat toggle.
- Select the frequency.
- Select end date for the schedule.
- Click Save.
View History
The History tab shows you a list of prior exports including the date range selected, status, # transactions found, # transactions eligible, and # transactions exported.

Download Export File
You will see a Download button in the Action column on the History tab once the export file can be downloaded. Click Download to download the file.-
If you selected a small date range with a low number of transactions, the export file should be ready for download in less than a minute. If the date range contains a large number of transactions, it may take a few minutes. Simply refresh the screen to get the latest update.

6. Import to Wrapbook
Log in to your Wrapbook account and follow the steps to import the downloaded export file into your system.Export Receipts
The Exporter for Wrapbook cannot export receipts to Wrapbook. But you can export receipts from PEX using the following apps:- Google Drive. More details here.
- Microsoft OneDrive. More details here.
- Envelope PDF. More details here.
FAQ
Are split tags supported for the export?
Are split tags supported for the export?
Can I re-export a purchase?
Can I re-export a purchase?
Every exported purchase has a “Synced to PEX Connector for Wrapbook” note. If you remove this note, the purchase will be re-exported.