Connect from Blackbaud marketplace
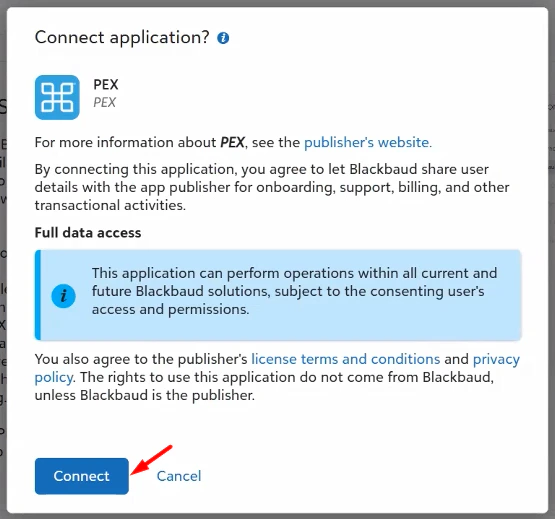
First, connect your Blackbaud and PEX accounts from the Blackbaud Marketplace. Note: Only Marketplace admins have permission to connect an application in Blackbaud marketplace.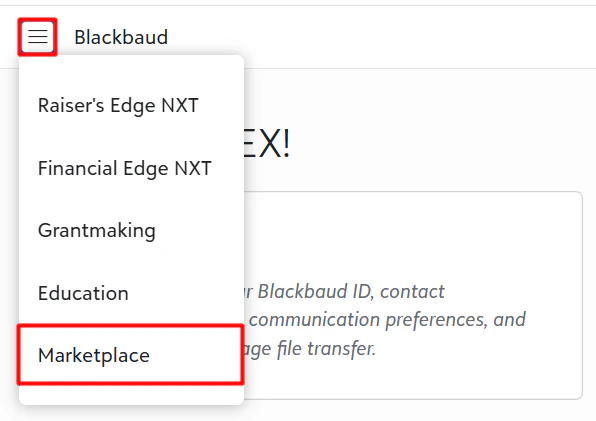
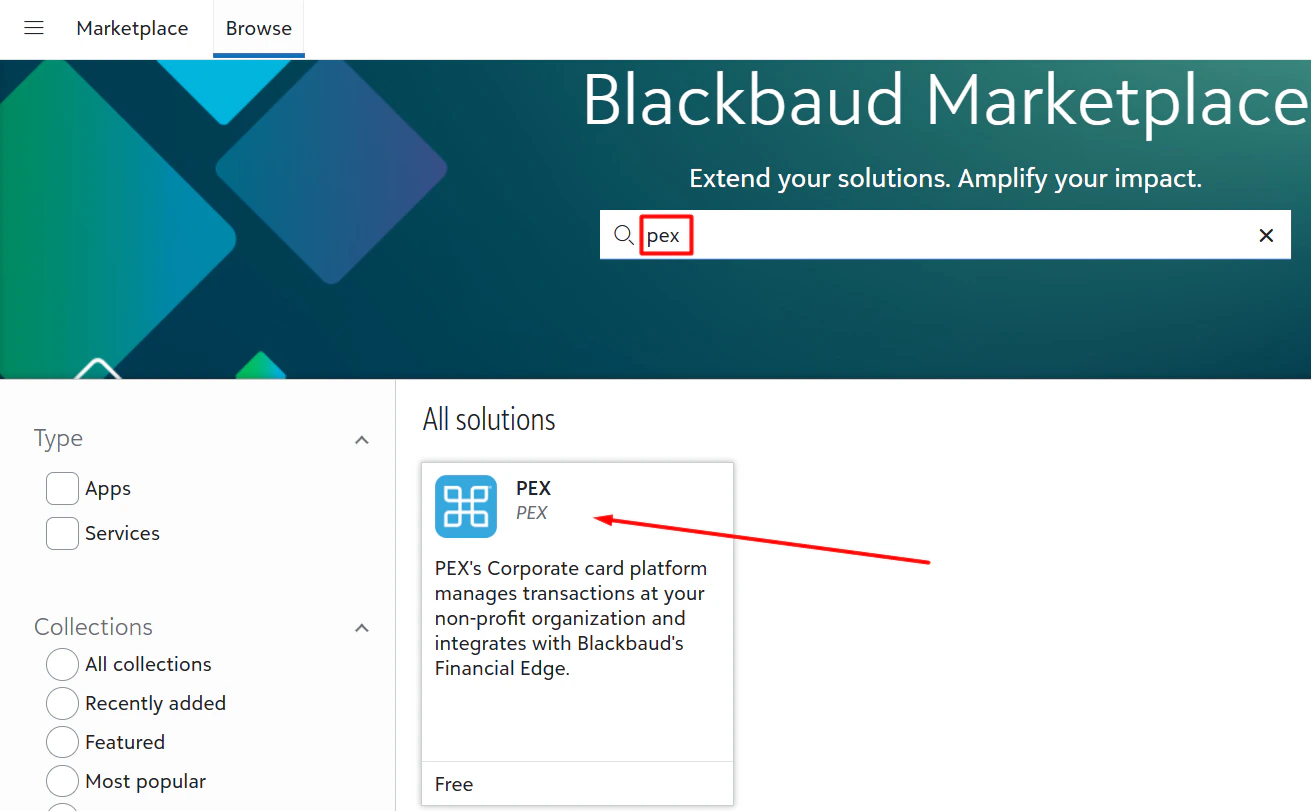
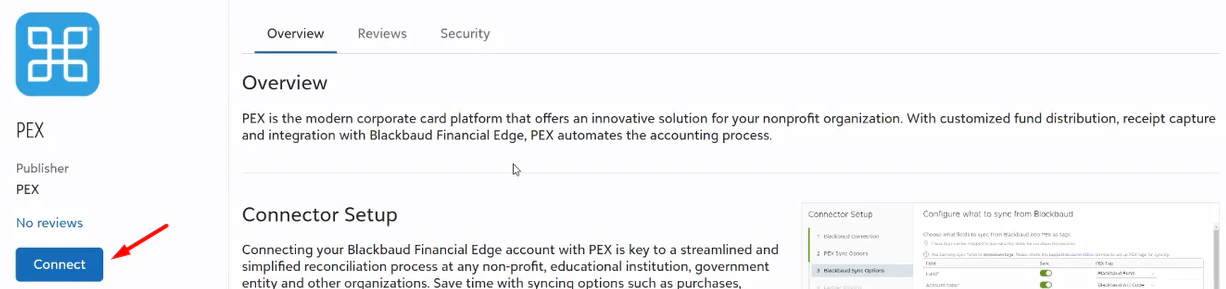

LINK PEX AND Blackbaud
Link your PEX and Blackbaud accounts now through the PEX Marketplace:PEX sync options
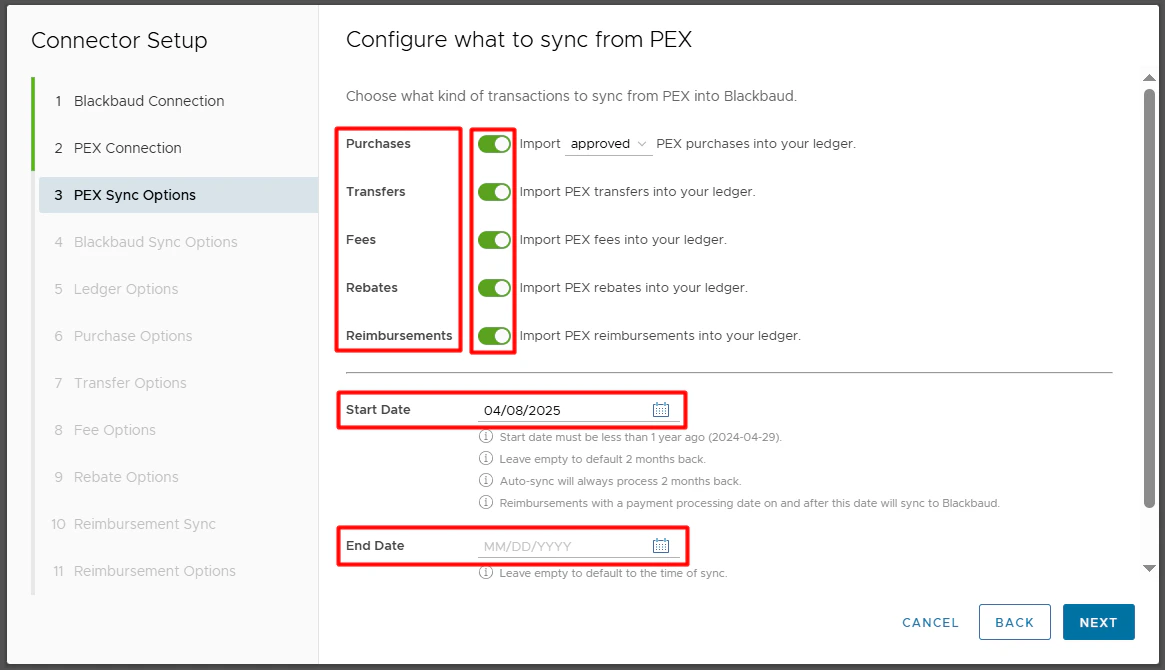
Select what type of transactions to sync: Purchases Enable this option to allow PEX to import PEX purchases in Blackbaud. You can choose to sync all PEX transactions (regardless of approval status) or just approved ones. For details on transaction review, see our resource on reviewing transactions. Transfers Enable this option to have PEX import transfers to Blackbaud. An example of a transfer would be an ACH/wire transfer from your business checking account to your PEX business account. Fees Enable this option to have PEX import PEX fees to Blackbaud. Rebates Enable this option to have PEX import rebates to Blackbaud. This option is available only if the “Purchases” toggle is ON. Reimbursements Enable this option to have PEX import reimbursements to Blackbaud. Start Date Specify a start date for the sync.- Transactions on and after this date will sync.
- Reimbursements with a payment processing date on and after this date will sync.
- The end date is optional.
- The start date and the end date could facilitate a narrow transaction window which is helpful initially to check the transaction sync.
- Start date must be less than 1 year ago.
- Leave empty to default 2 months back.
- Auto-sync will always process 2 months back.
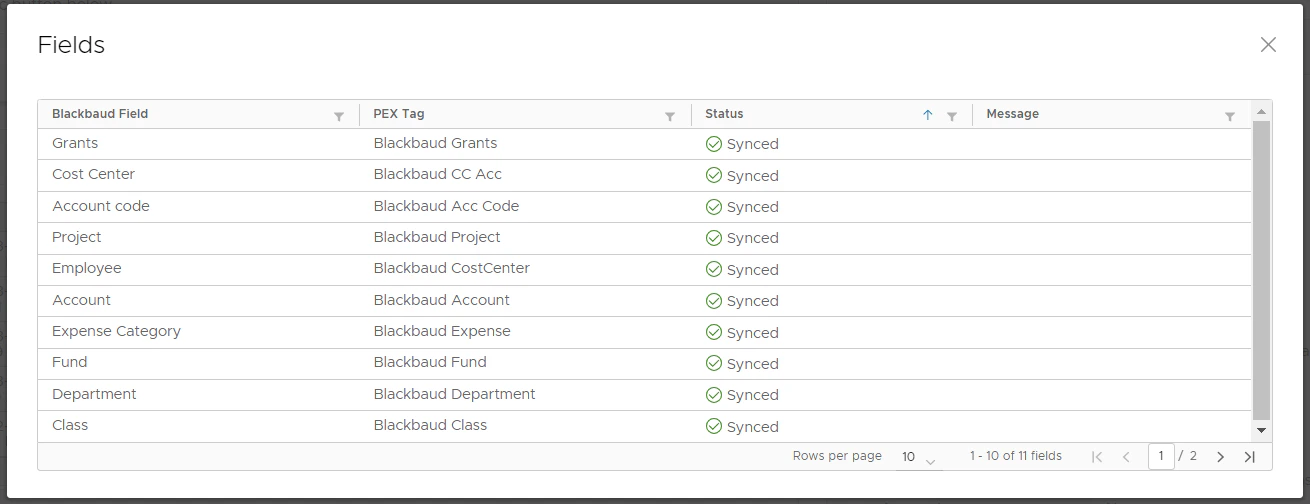
Blackbaud SYNC OPTIONS
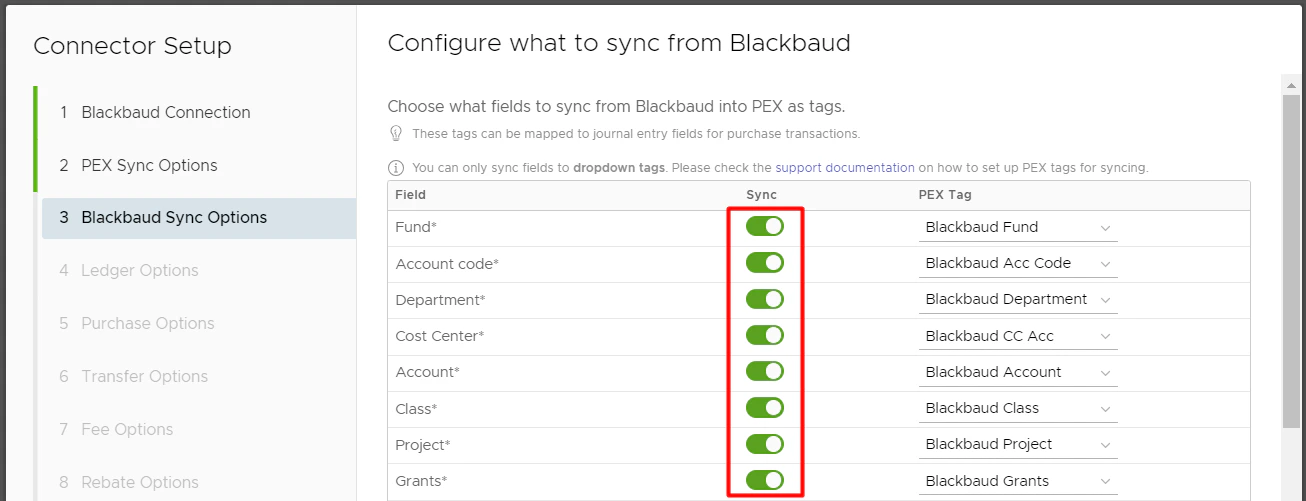
On this step, select which fields from Blackbaud Financial Edge NXT to sync to PEX as dropdown tags for coding of purchases and reimbursements. Field Column will show all the fields from Blackbaud. You can link each of these fields to an existing PEX tag. If you choose to use PEX tags, you must create them in advance, following the logic described in the Create PEX tags for Blackbaud article. Syncing tag options should be on to import data from Blackbaud. For example, the values for the PEX tag “Department” will be populated with the names of all your departments.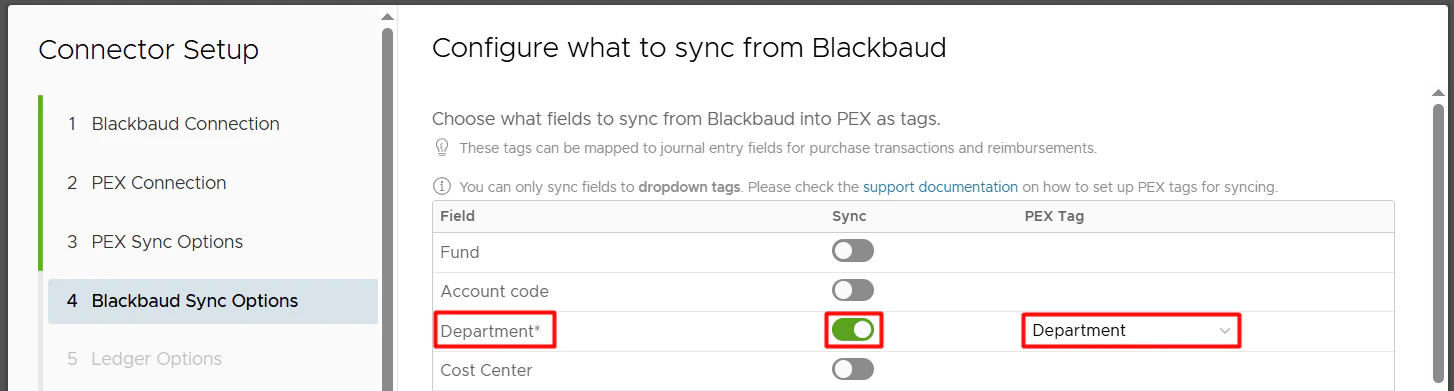
Ledger Options
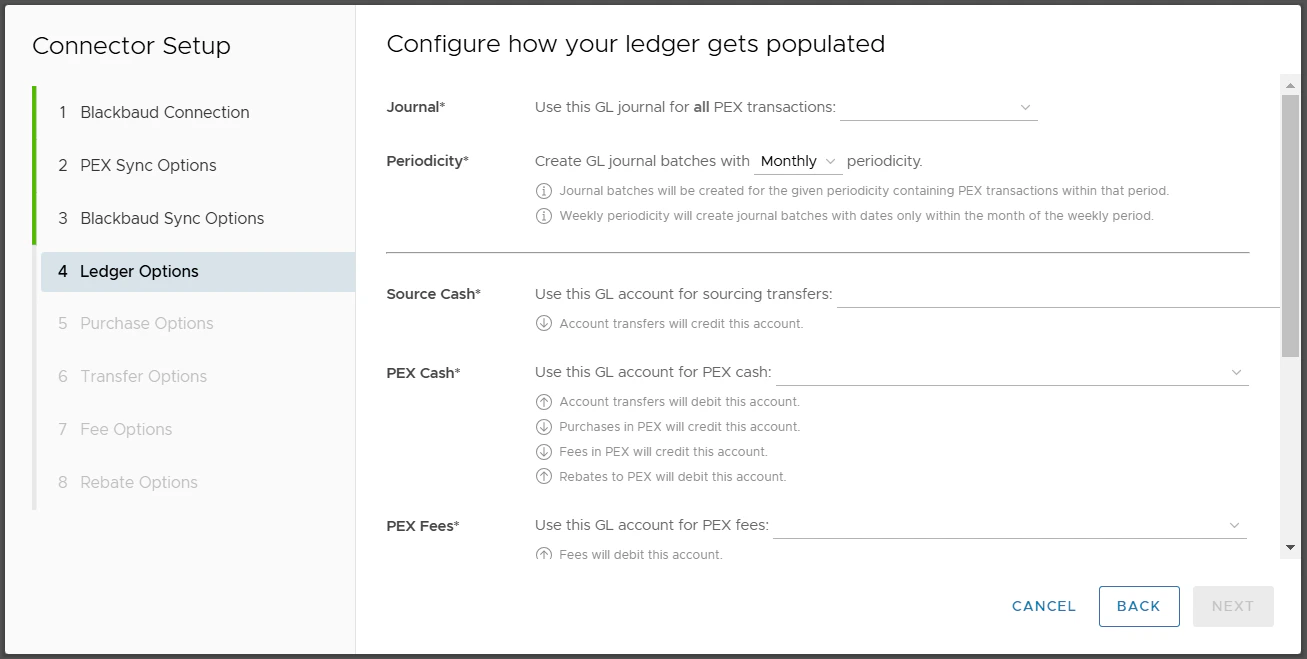

- Select the Journal Periodicity (Daily, Weekly, Monthly) to create journal entry batches.
- Journal batches will be created for the given periodicity containing PEX transactions within that period.
-
Weekly periodicity will create journal batches with dates only within the month of the weekly period so a journal batch contains data within the same month.

- If a journal batch for the given period has been posted, is pending approval, has been approved, or has been deleted.
- And there are still new transactions within that period ready to be synced.
- Then PEX will create a new journal batch for the same period to sync those transactions to the new batch.
- Select a GL account (e.g., asset type account that is your cash account) from Blackbaud that represents your business checking account.
-
Transfers to PEX will credit this account.

-
Select a GL account (e.g., expense or asset type account) from Blackbaud that represents your PEX business balance.
- You can select an existing account or create a new one in Blackbaud before making your selection.
- Transfers to PEX will debit this account.
- Purchases in PEX will credit this account.
- Fees in PEX will credit this account.
-
Rebates to PEX will debit this account.


-
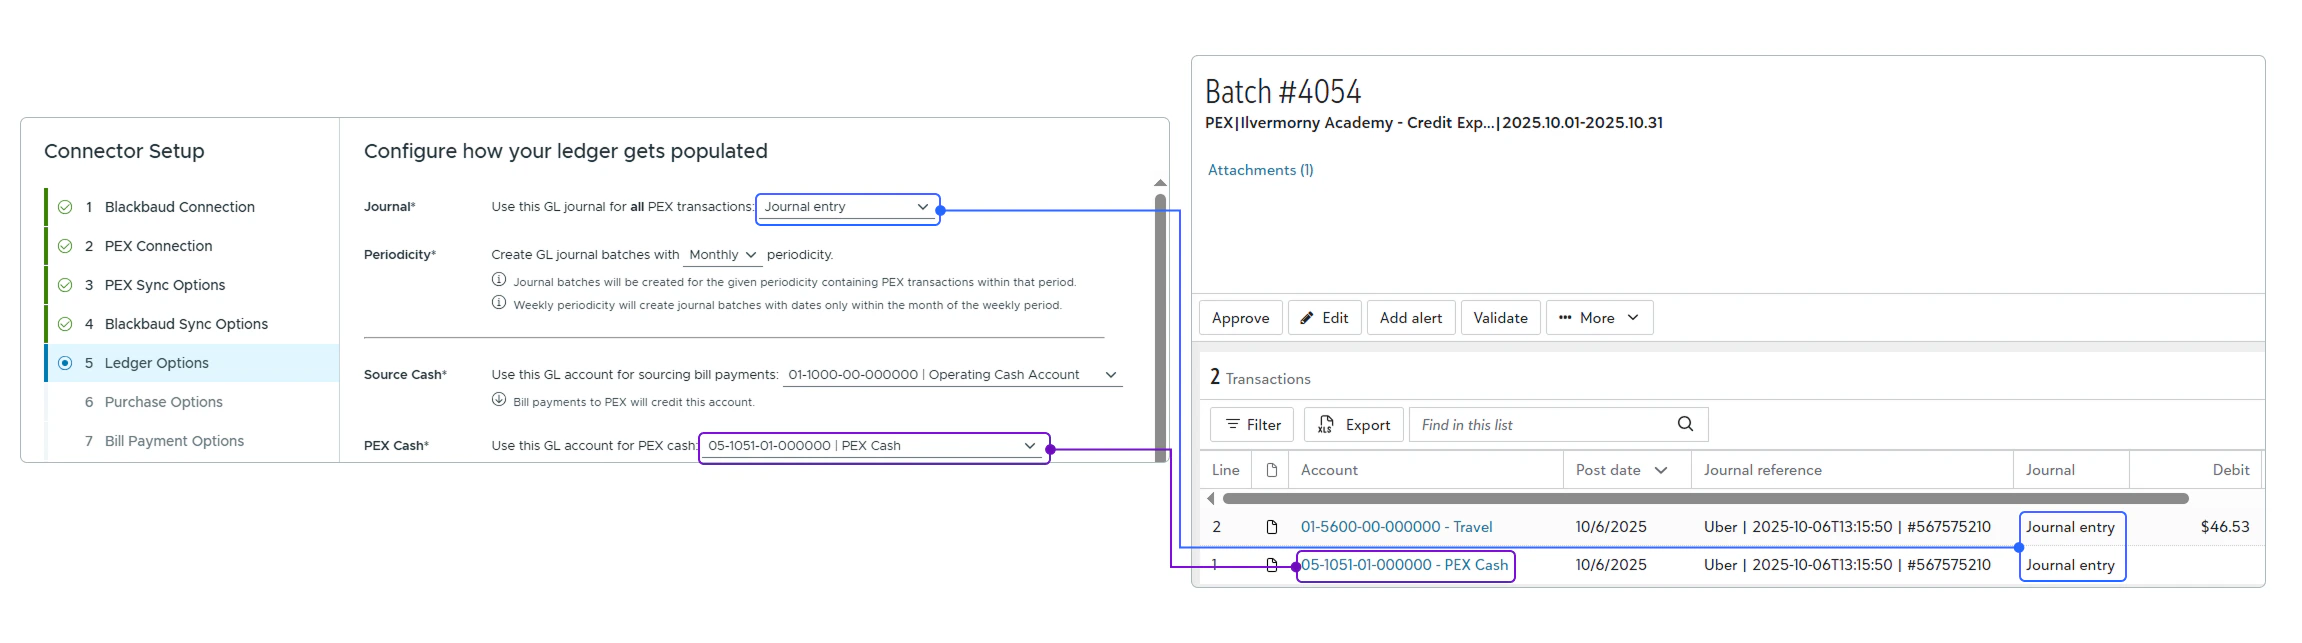
Static option. Use
<a single static GL account>for PEX purchases:<Blackbaud expense account>. All PEX purchases will be recorded against a single GL expense account that you select in the second highlighted field below (“PEX Purchases” in our example).You must select one account of the “Expense” type. You can select an existing account or create a new one in Blackbaud before making your selection. The same account can be used for both purchases and fees.
- PEX purchase transactions that sync to Blackbaud will debit the selected expense account (“PEX Purchases” in our example above).
-
PEX Tag.
-
Use
<a single GL account from PEX tag>for PEX purchases:<PEX tag name>. Select a PEX tag for expense accounts in the second highlighted field below (“Expense Account” in our example). That tag must be created beforehand, following the logic described in the Create PEX tags for Blackbaud article.
- This lets a Blackbaud expense account be dynamic for each purchase.
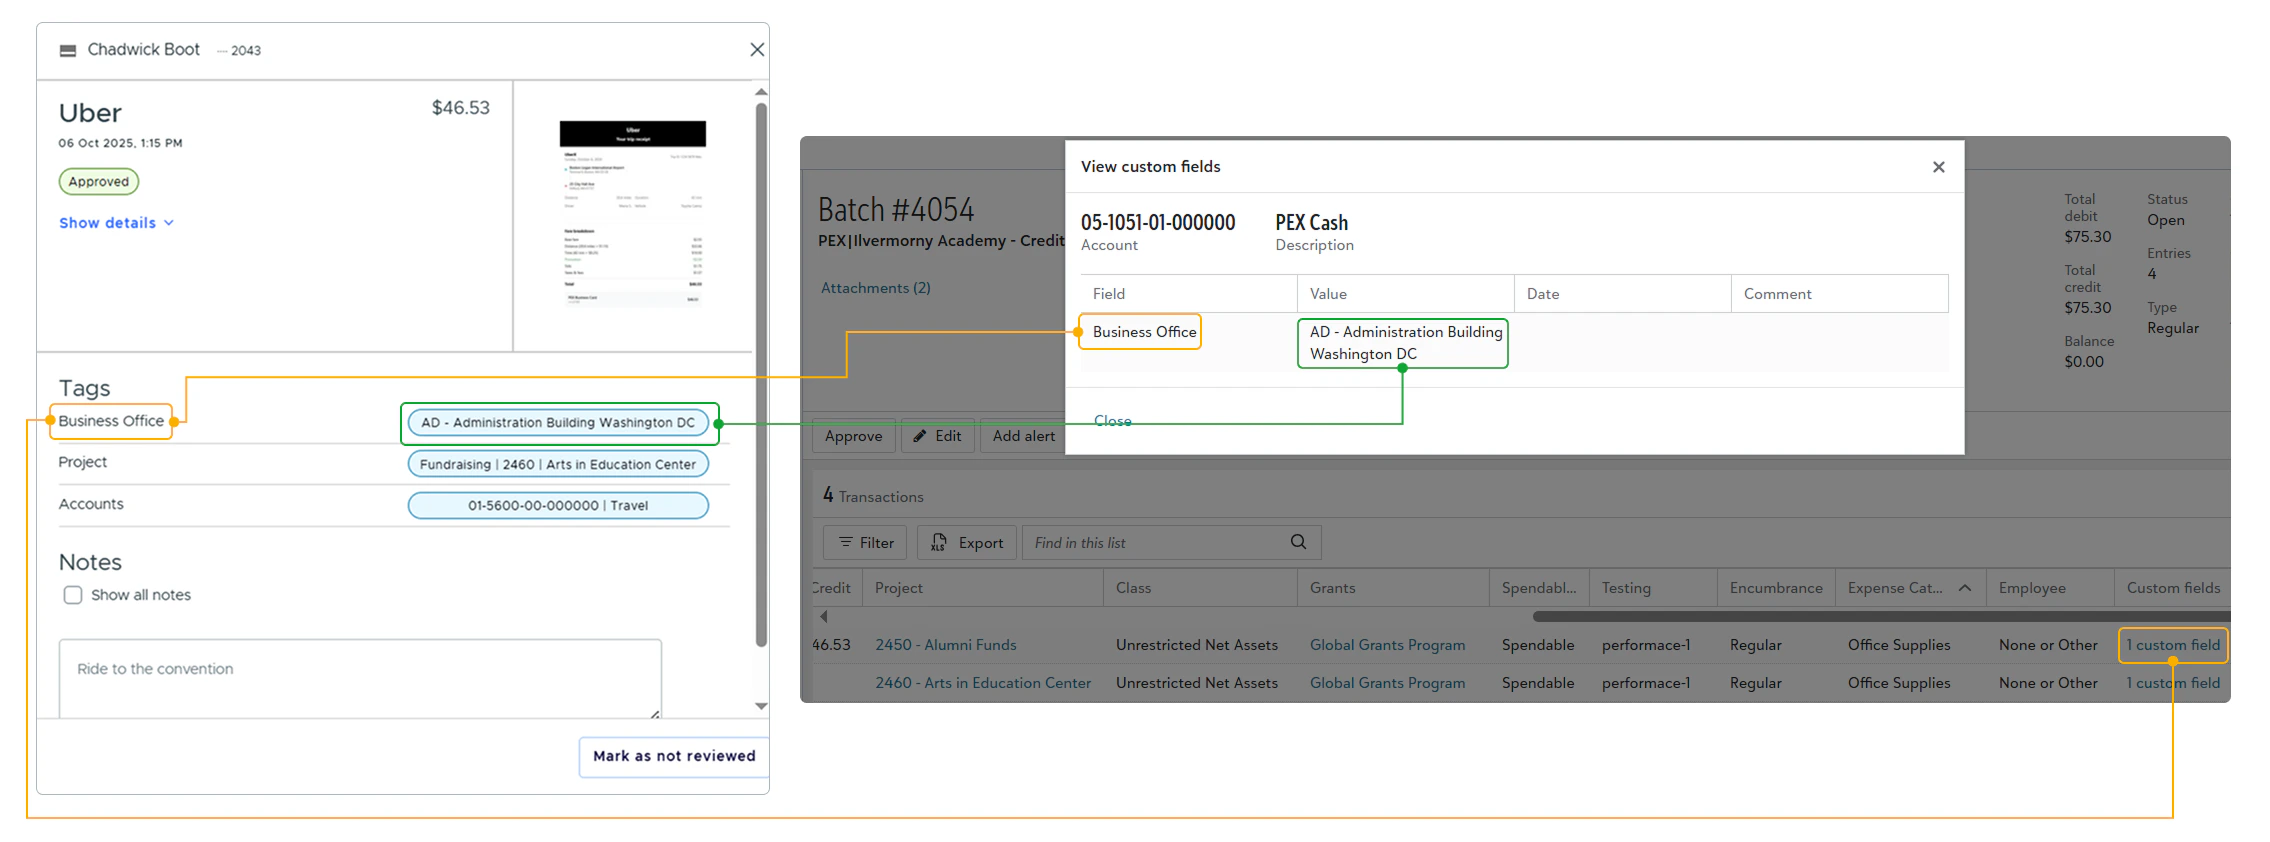
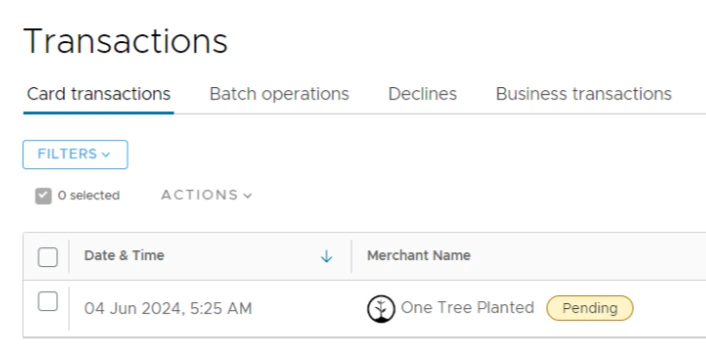
- If you select a PEX tag in the second highlighted field above (“Expense Account” in our example) then you and your cardholders will be able to select one of the expense accounts for each purchase transaction. For that go to the “Transactions” menu -> locate a purchase-> click on it -> select an expense account value (“Advertising” in our example below) of a tag (“Expense Account” in our example below) -> click “Save”. Note that you and your cardholders can select one of the tag values for each purchase once you finish the Blackbaud connector setup and sync tag options from Blackbaud to PEX.
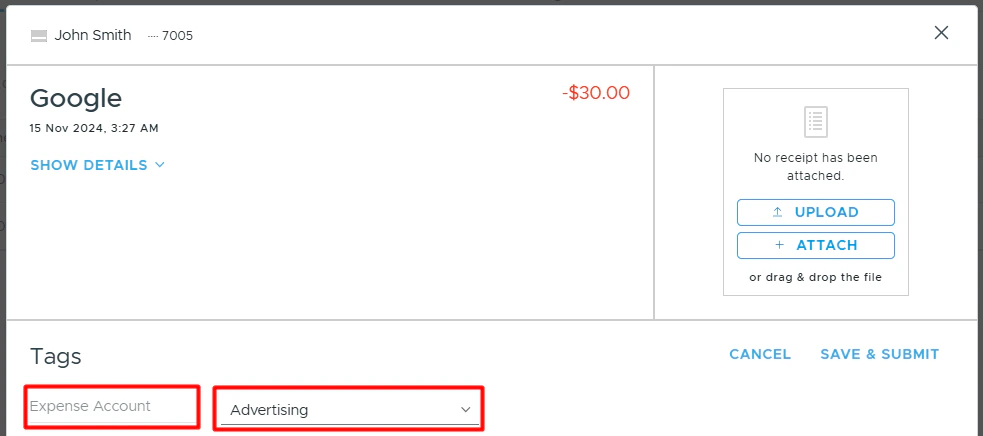
- The above purchase that syncs to Blackbaud will debit the selected expense account (“Advertising” in our example above).
-
Use
-
**GL account structure from mappings.
**- Use
<GL account structure from mappings>for PEX purchases. This will sync purchase transactions to Blackbaud with values you define on the next step “Purchase Options”.
- Use
PEX rebate transactions that we sync to Blackbaud will credit this account (“Other Revenue” in our example below). You should select one account of the “Expense” or “Revenue” type. You can select an existing account or create a new one in Blackbaud before making your selection.

Select what date to use as a post date in Blackbaud: settlement date or a transaction date. This applies to purchases, transfers, fees, and rebates. Receipts
Select whether you wish to automatically sync receipt images from PEX into Blackbaud.

Purchase Options
Configure how purchase transactions will populate the journal entries. A given account may have certain fields that are required. You can map the fields from Blackbaud to a static value, a PEX tag, or a text value. If you go with PEX tags then you must create them beforehand following the same logic described in the Create PEX tags for Blackbaud article. For example, if the “Grants” is one of the fields on your purchase:-
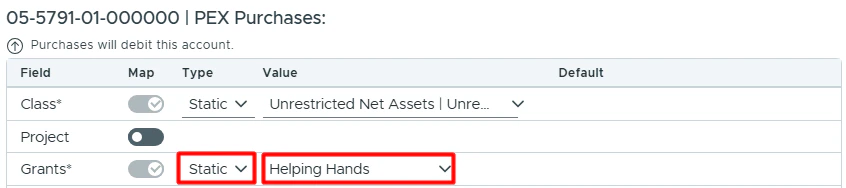
Mapping the “Grants” to a static value allows you to select one grant (“Helping Hands” in our example below) from Blackbaud, which will then be applied to all PEX purchases.
Note that a purchase will not be tagged with this static value. You will not see this static value on the transaction details screen. The static value will be used only when syncing a purchase to Blackbaud.
-
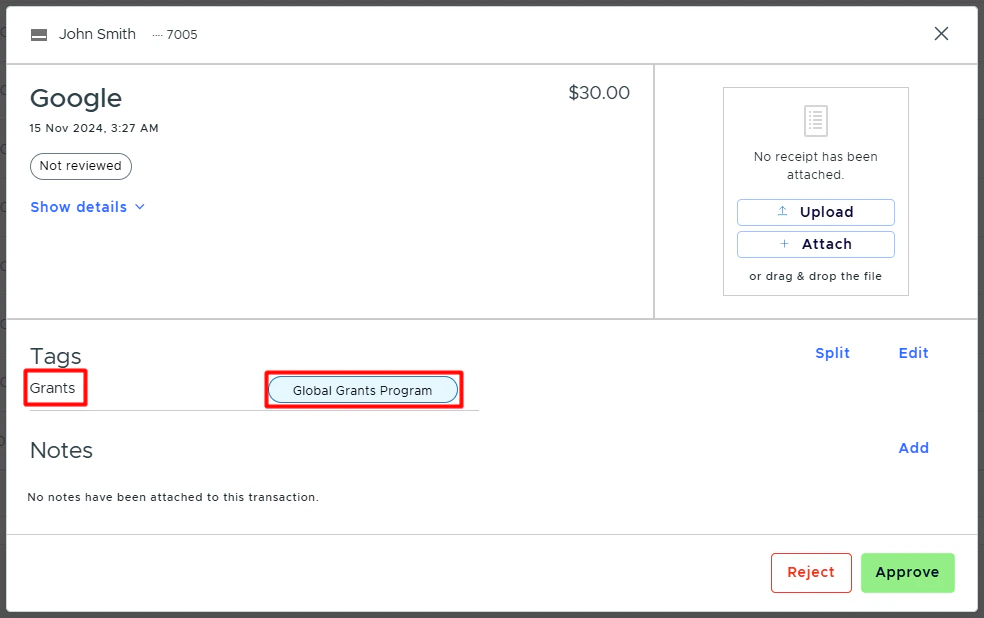
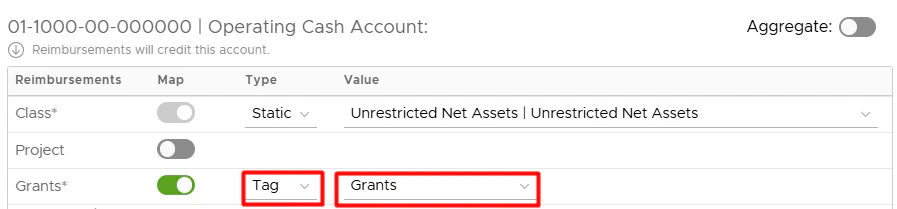
Mapping the “Grants” to a PEX tag (“Grants” in our example below) means that you and your cardholders can select one of the tag values for each purchase.
For that go to the “Transactions” menu -> locate a transaction -> click on it -> select a tag value (“Global Grants Program” in our example below) of the “Grants” tag -> click “Save”. Note that you and your cardholders can select one of the tag values for each purchase once you finish the Blackbaud connector setup and sync tag options from Blackbaud to PEX.
 When mapping to a tag, you can also specify a default “Grants” value: for example, Community Development Grant, as highlighted below.
 Note that a purchase will not be tagged with this default value (“Community Development Grant” in our example) on the purchase details. It means that if you or your cardholders forget to tag a purchase before it is synced to Blackbaud, the default value (“Community Development Grant” in our example) will be applied to this purchase during the sync. If you or your cardholders do tag a purchase with the tag option from the tag chosen in the highlighted field below,
 that specific purchase will be recorded against the grant (“Global Grants Program” in our example below) you tagged the purchase with. Tags take precedence over default values.
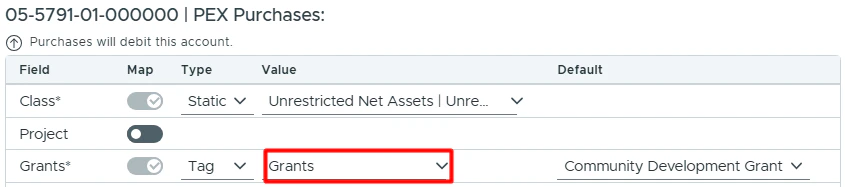
-
Mapping the “Grants” to a text value allows you to specify a custom text value (“General” in the example below), which will then be applied to all PEX purchases.
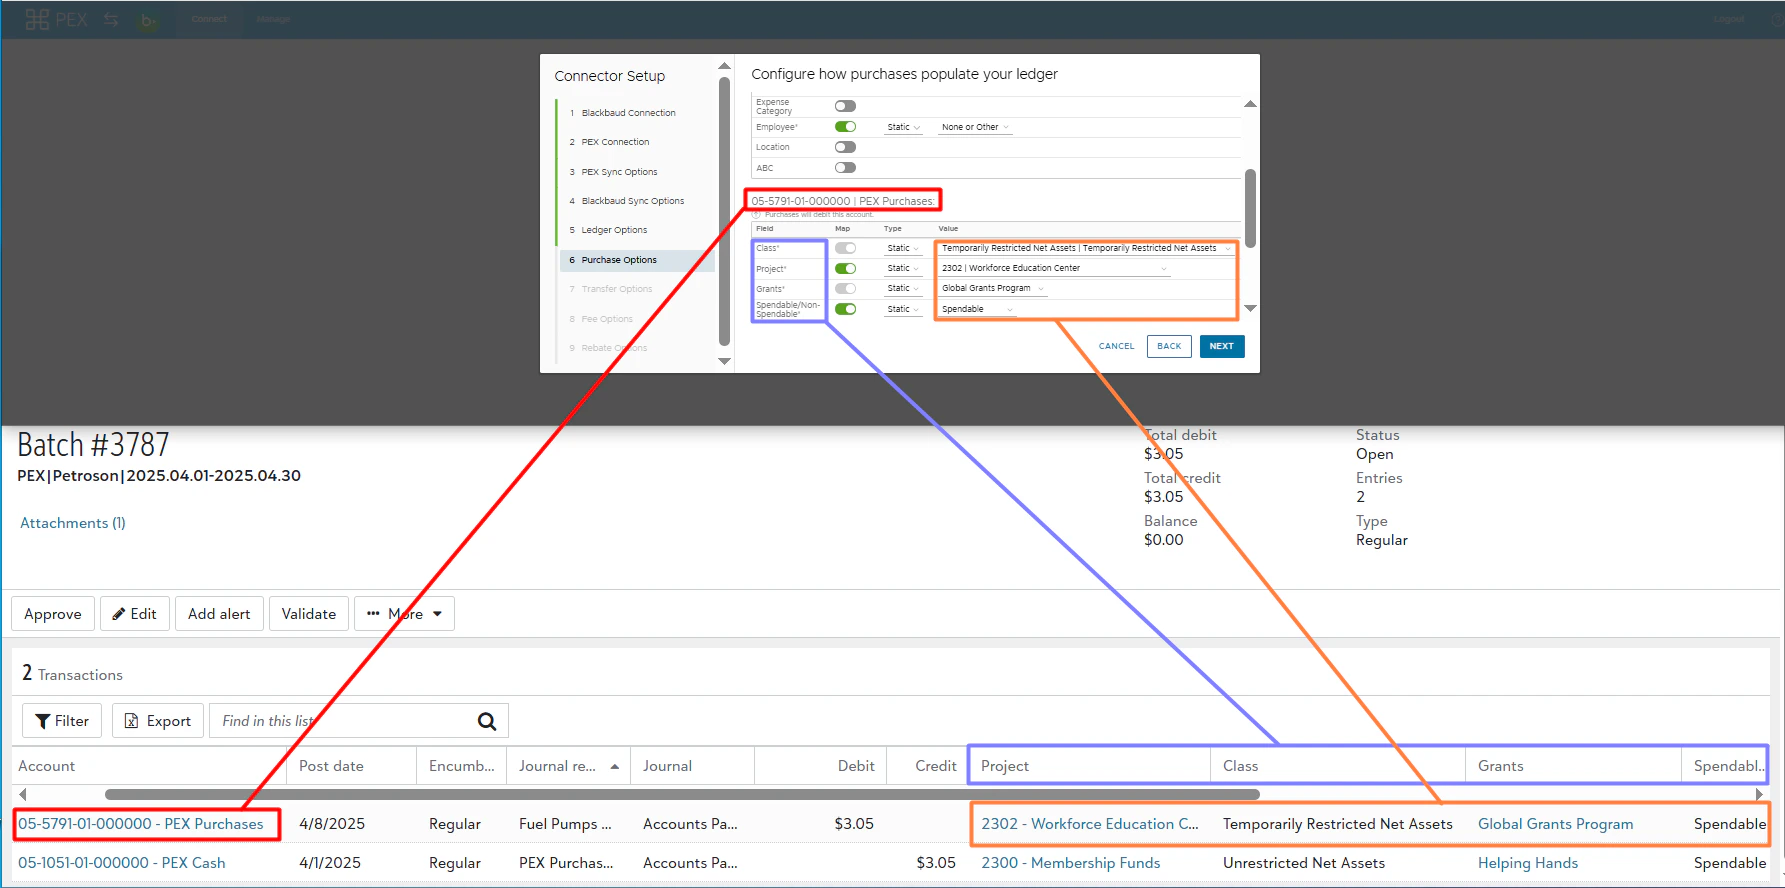
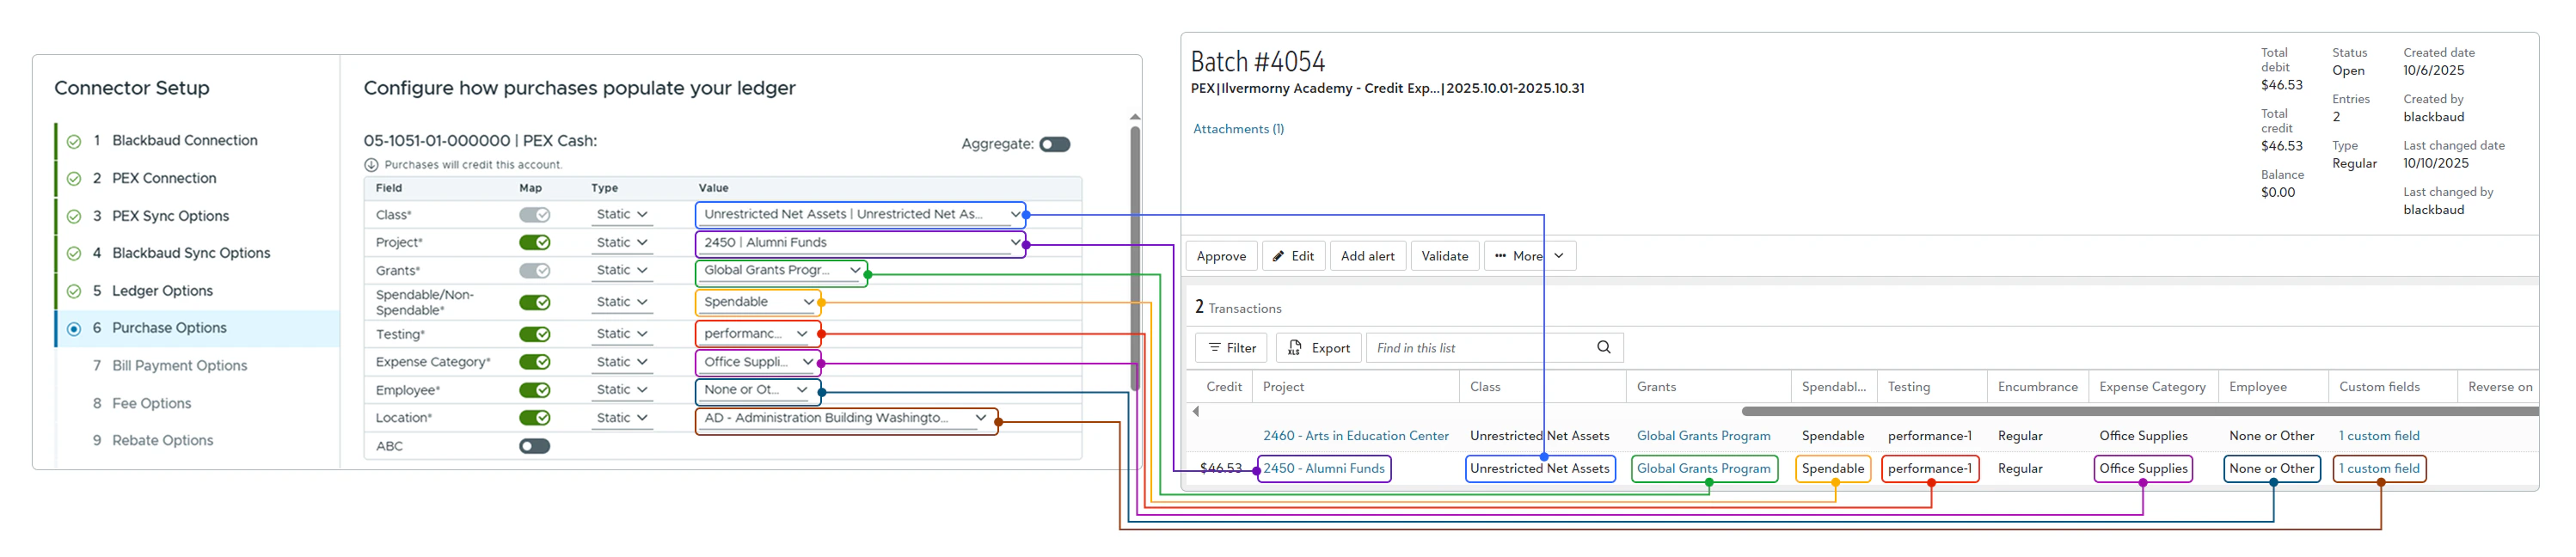
Note that a purchase will not be tagged with this text value. You will not see this text value on the transaction details screen. The text value will be used only when syncing a purchase to Blackbaud. See an example of the credit side configured in the connector (Grants – Static – Helping Hands and other fields), and how it appears in Blackbaud after the purchase sync:
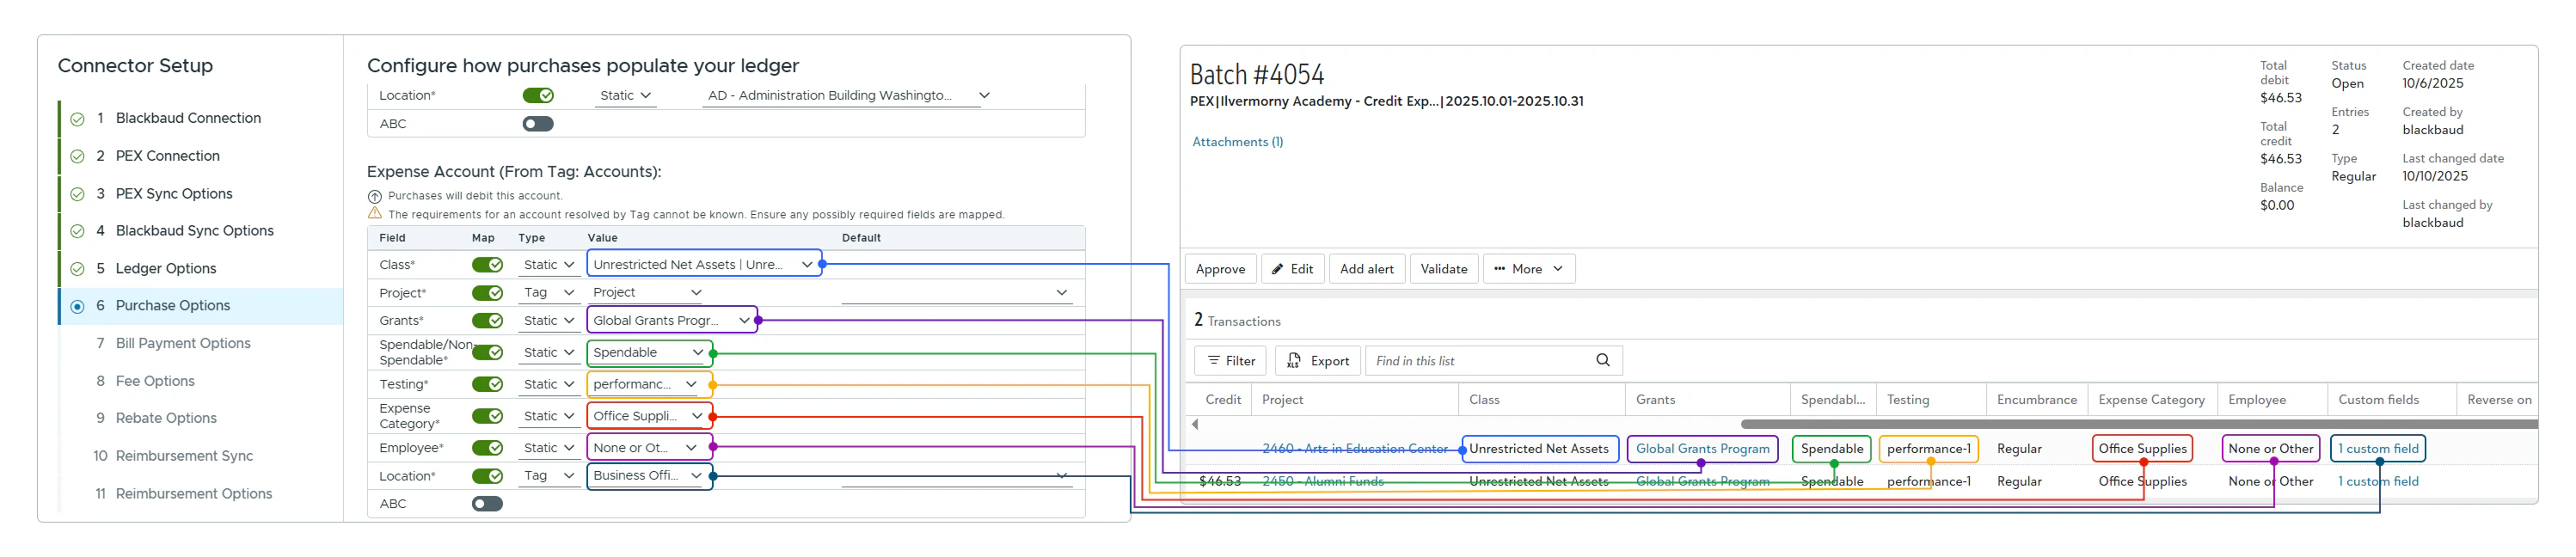
 The debit side (Grants - Static - Global Grants Program and other fields):
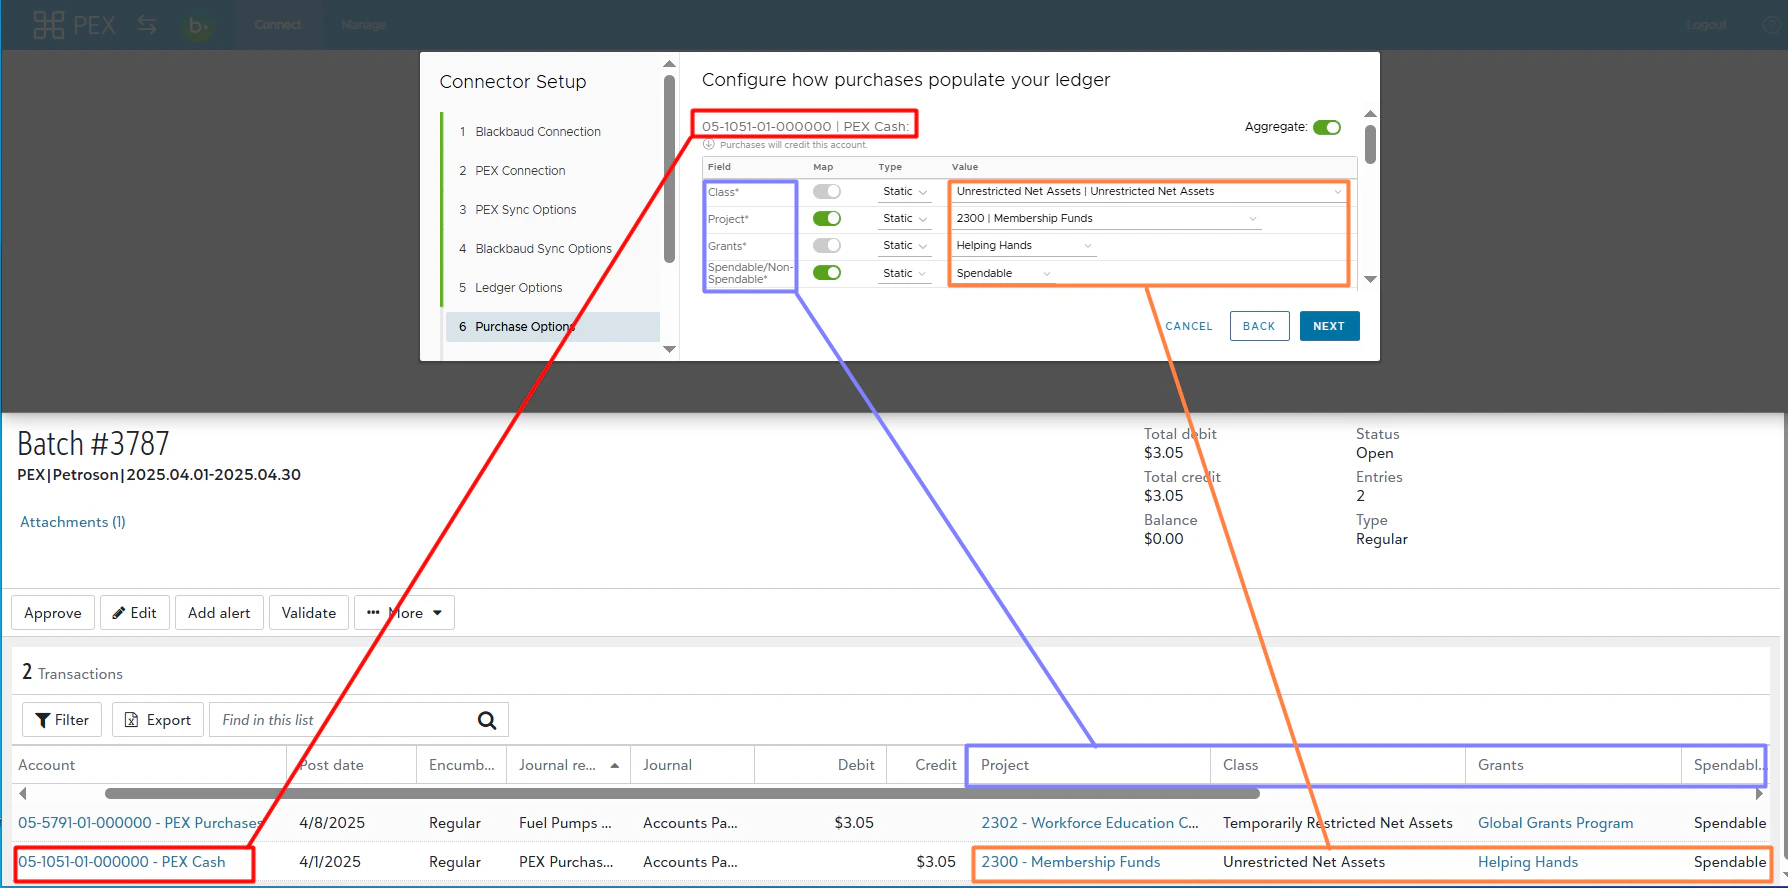

Transfer Options
Configure how transfer transactions will populate the journal entries. A given account may have certain fields that are required. You can map the fields from Blackbaud to a static or text value (transfers do not have tags). The Aggregate Credits toggle at the top right allows the connector to aggregate the credit journal entries into a single entry, thus greatly reducing the amount of entries in the Journal Entry Batch. Some clients only care about the debit side of the General Ledger.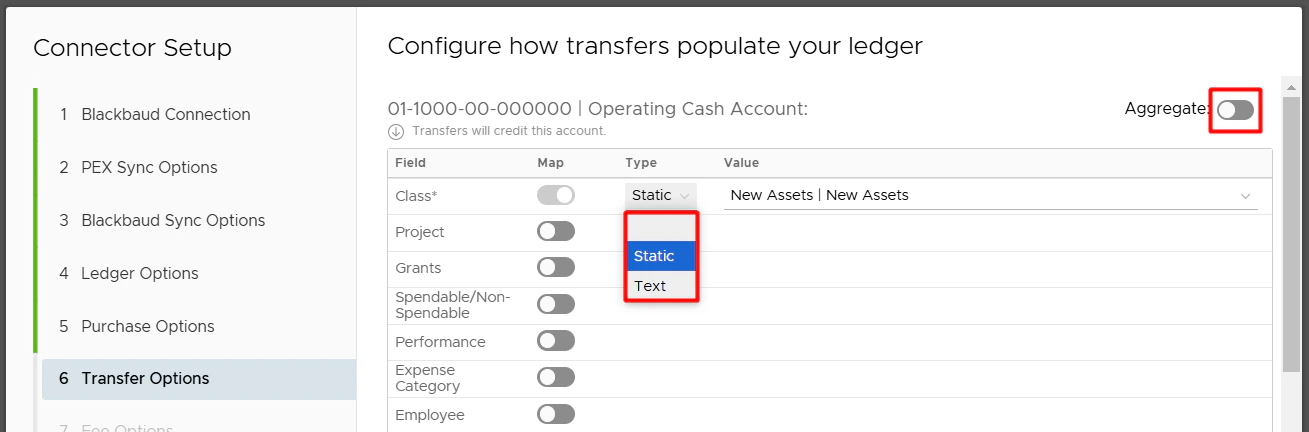
Fee Options
Configure how fee transactions will populate the journal entries. A given account may have certain fields that are required. You can map the fields from Blackbaud to a static or text value (fees do not have tags). The Aggregate Credits toggle at the top right allows the connector to aggregate the credit journal entries into a single entry, thus greatly reducing the amount of entries in the Journal Entry Batch. Some clients only care about the debit side of the General Ledger.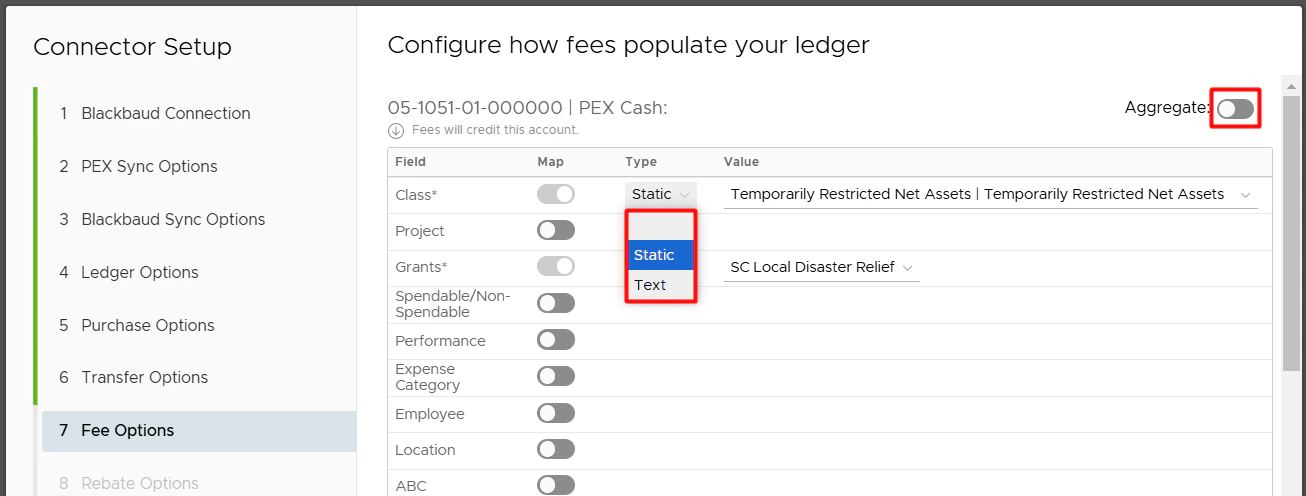
Rebate Options
Configure how rebate transactions will populate the journal entries. A given account may have certain fields that are required. You can map the fields from Blackbaud to a static or text value (rebates do not have tags). The Aggregate Credits toggle at the top right allows the connector to aggregate the credit journal entries into a single entry, thus greatly reducing the amount of entries in the Journal Entry Batch. Some clients only care about the debit side of the General Ledger.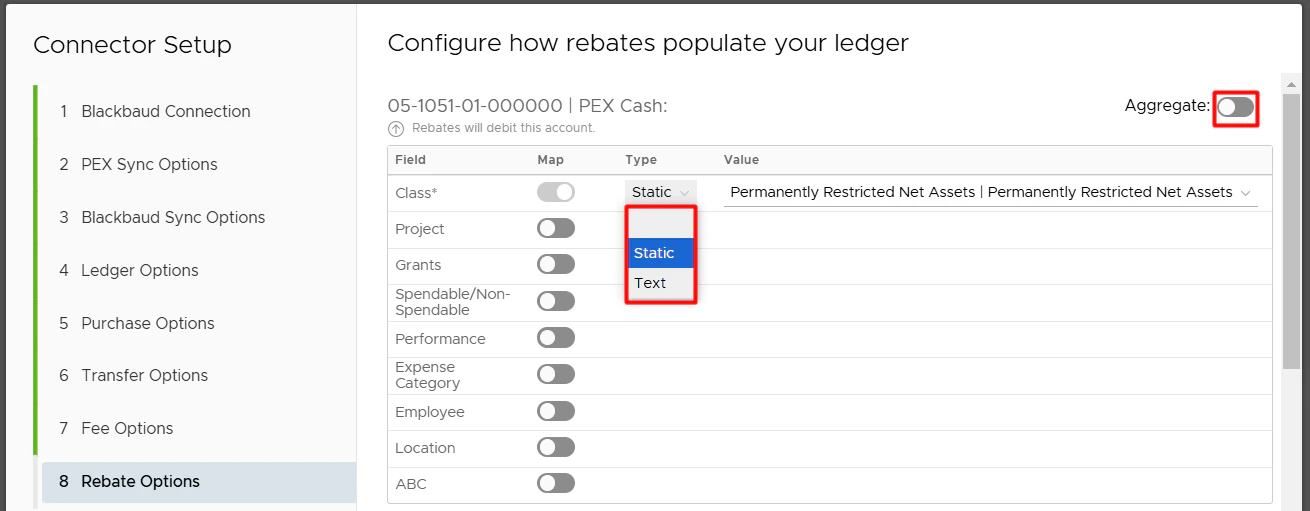
Reimbursement Sync
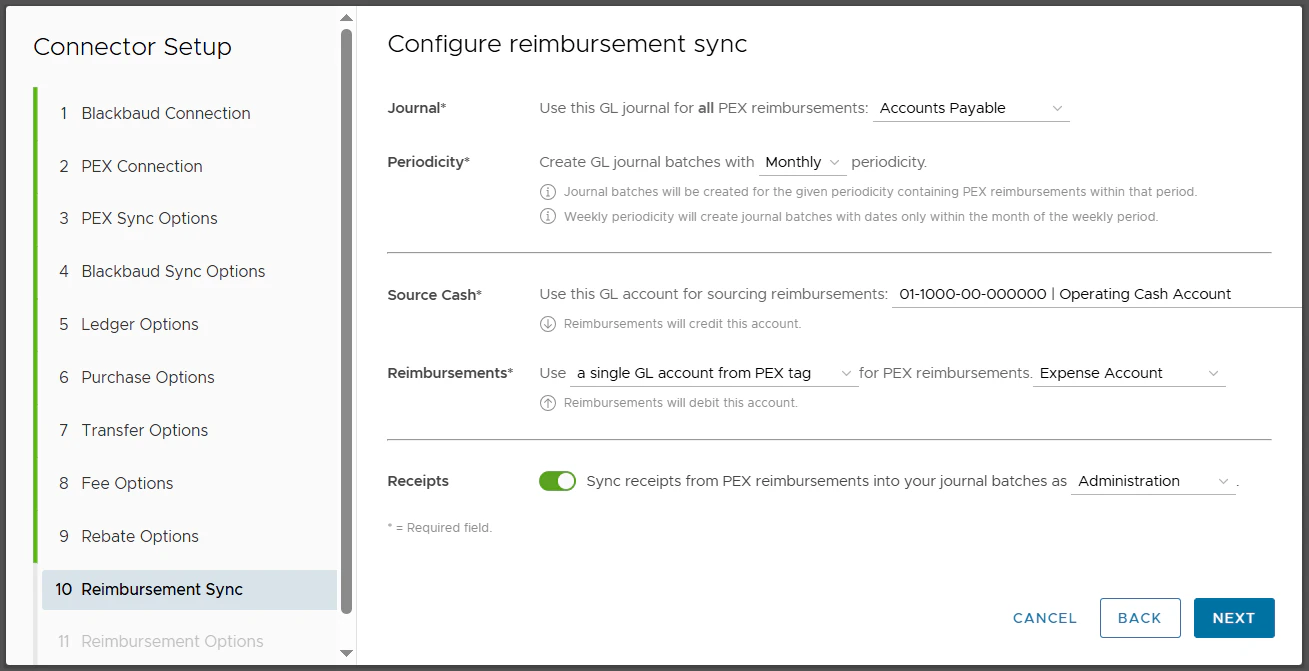
Select a GL journal for all PEX reimbursements.

- Select the Journal Periodicity (Daily, Weekly, Monthly) to create journal entry batches.
- Journal batches will be created for the given periodicity containing PEX reimbursements within that period.
-
Weekly periodicity will create journal batches with dates only within the month of the weekly period so a journal batch contains data within the same month.
 Note:
Note:- If a journal batch for the given period has been posted, is pending approval, has been approved, or has been deleted.
- And there are still new reimbursements within that period ready to be synced.
- Then PEX will create a new journal batch for the same period to sync those reimbursements to the new batch.
- Select a GL account (e.g., asset type account that is your cash account) from Blackbaud that represents your business checking account.
-
Reimbursements will credit this account.

- **Static option. Use
<a single static GL account>for PEX reimbursements:<Blackbaud expense account>. All PEX reimbursements will be recorded against a single GL expense account that you select in the second highlighted field below (“PEX Reimbursements” in our example).Select one account of the “Expense” type. You can select an existing account or create a new one in Blackbaud before making your selection.
- PEX reimbursements that sync to Blackbaud will debit the selected expense account (“PEX Reimbursements” in our example above).
- PEX Tag.
-
**Use
<a single GL account from PEX tag>for PEX reimbursements:<PEX tag name>. Select a PEX tag for expense accounts in the second highlighted field below (“Expense Account” in our example). That tag must be created beforehand, following the logic described in the Create PEX tags for Blackbaud article.
- This lets a Blackbaud expense account be dynamic for each reimbursement.
- If you select a PEX tag in the second highlighted field above (“Expense Account” in our example) then you and your cardholders will be able to select one of the expense accounts for each reimbursement.
Admin view
For that go to the “Requests” menu -> select “Reimbursements” -> select any request -> select an expense account value (“Supplies” in our example below) of a tag (“Expense Account” in our example below).
**Cardholder view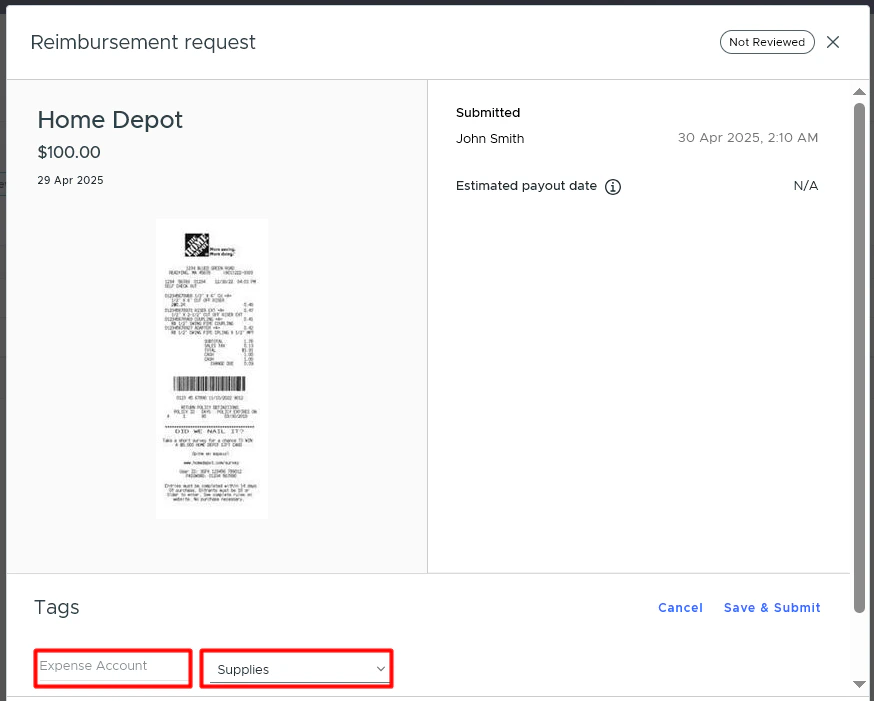
**For that cardholders go to the “Requests” menu -> select “Reimbursements” -> click “New reimbursement” -> select an expense account value (“Supplies” in our example below) of a tag (“Expense Account” in our example below).Note that you and your cardholders can select one of the tag values for each reimbursement once you finish the Blackbaud connector setup and sync tag options from Blackbaud to PEX.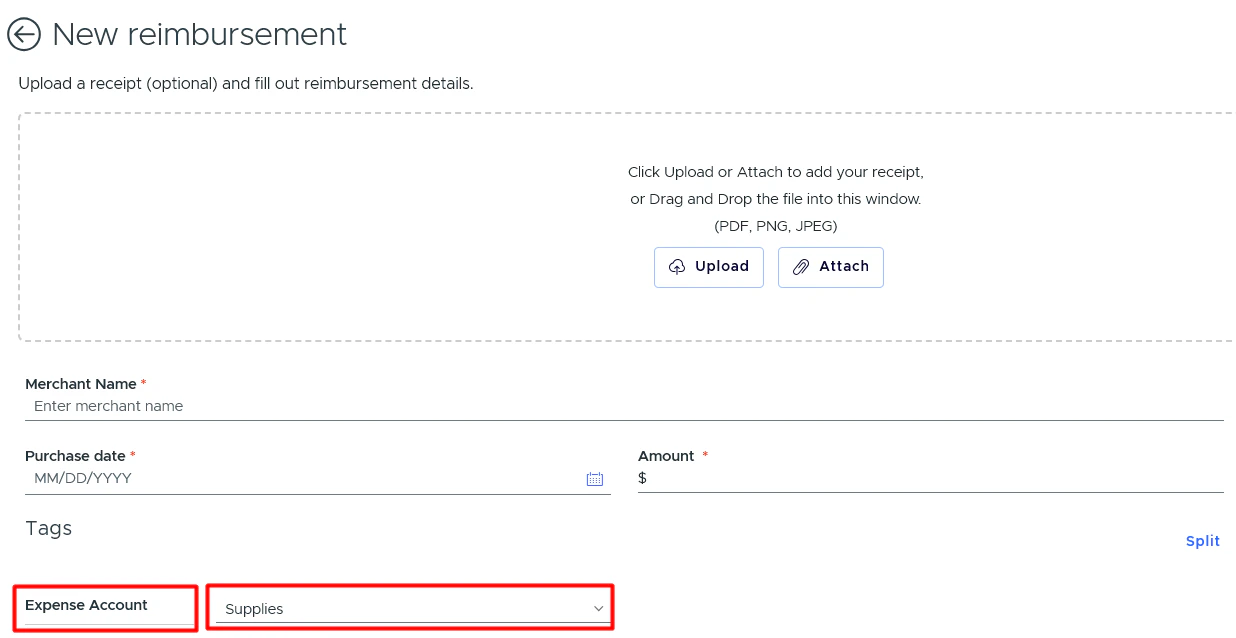
- The above reimbursement that syncs to Blackbaud will debit the selected expense account (“Supplies” in our example above).
-
**Use
- GL account structure from mappings.
- Use
<GL account structure from mappings>for PEX reimbursements. This will sync reimbursements to Blackbaud with values you define on the next step “Reimbursement Options”.
- Use
Select whether you wish to automatically sync receipts from PEX reimbursements to Blackbaud.

Reimbursement Options
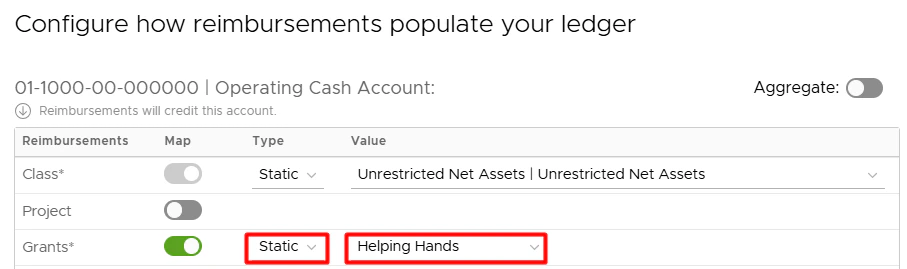
Configure how reimbursements will populate the journal entries. A given account may have certain fields that are required. You can map the fields from Blackbaud to a static value, a PEX tag, or a text value. If you go with PEX tags then you must create them beforehand following the same logic described in the Create PEX tags for Blackbaud article. For example, if the “Grants” is one of the fields on your reimbursement:-
Mapping the “Grants” to a static value allows you to select one grant (“Helping Hands” in our example below) from Blackbaud, which will then be applied to all PEX reimbursements.
Note that a reimbursement will not be tagged with this static value. You will not see this static value on the reimbursement details screen. The static value will be used only when syncing a reimbursement to Blackbaud.
-
Mapping the “Grants” to a PEX tag (“Grants” in our example below) means that you and your cardholders can select one of the tag values for each reimbursement.
Admin view
For that go to the “Requests” menu -> select “Reimbursements” -> select any request -> select an expense account value (“Global Grants Program” in our example below) of a tag (“Grants” in our example below).**Cardholder view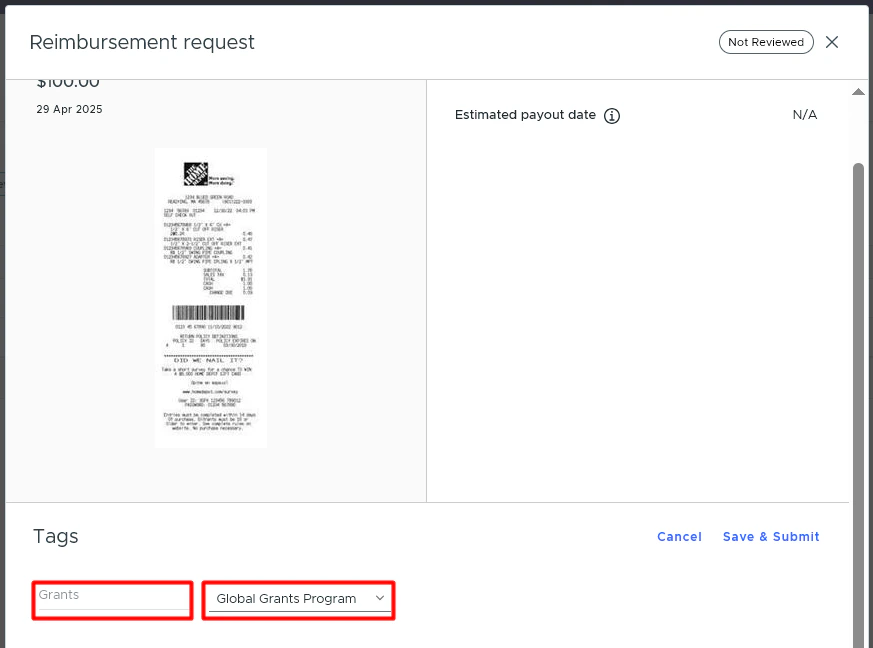
**For that cardholders go to the “Requests” menu -> select “Reimbursements” -> click “New reimbursement” -> select an expense account value (“Global Grants Program” in our example below) of a tag (“Grants” in our example below).Note that you and your cardholders can select one of the tag values for each reimbursement once you finish the Blackbaud connector setup and sync tag options from Blackbaud to PEX. When you or your cardholders tag a reimbursement with a tag option (“Global Grants Program” in the example above), that reimbursement will be recorded under the Global Grants Program grant in Blackbaud after syncing.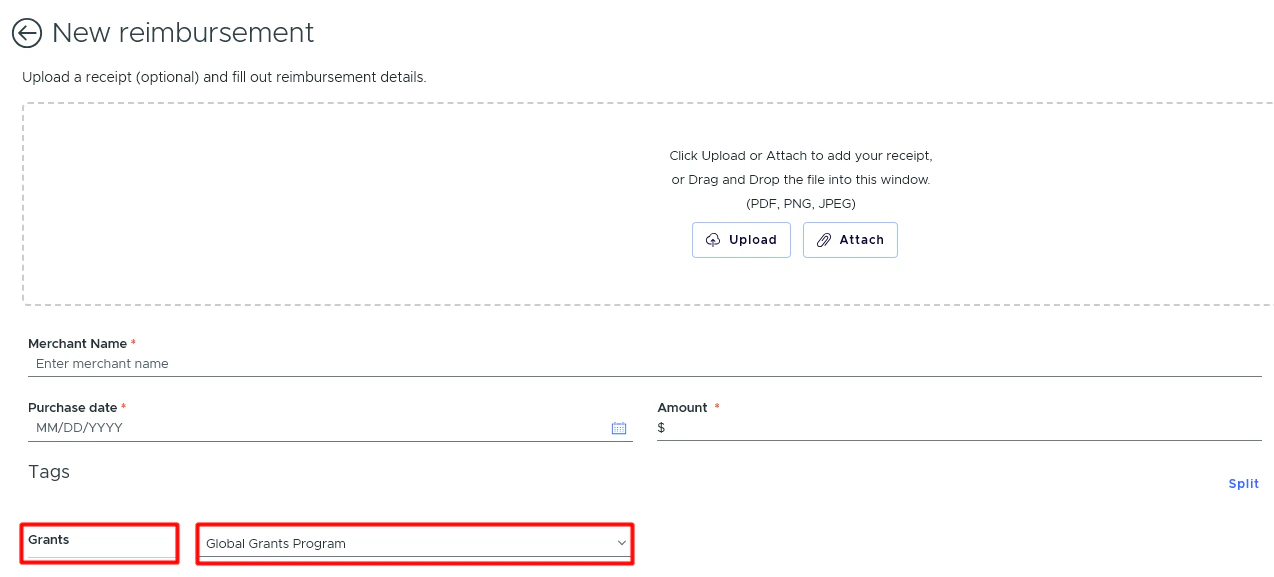
-
Mapping the “Grants” to a text value allows you to specify a custom text value (“General” in the example below), which will then be applied to all PEX reimbursements.
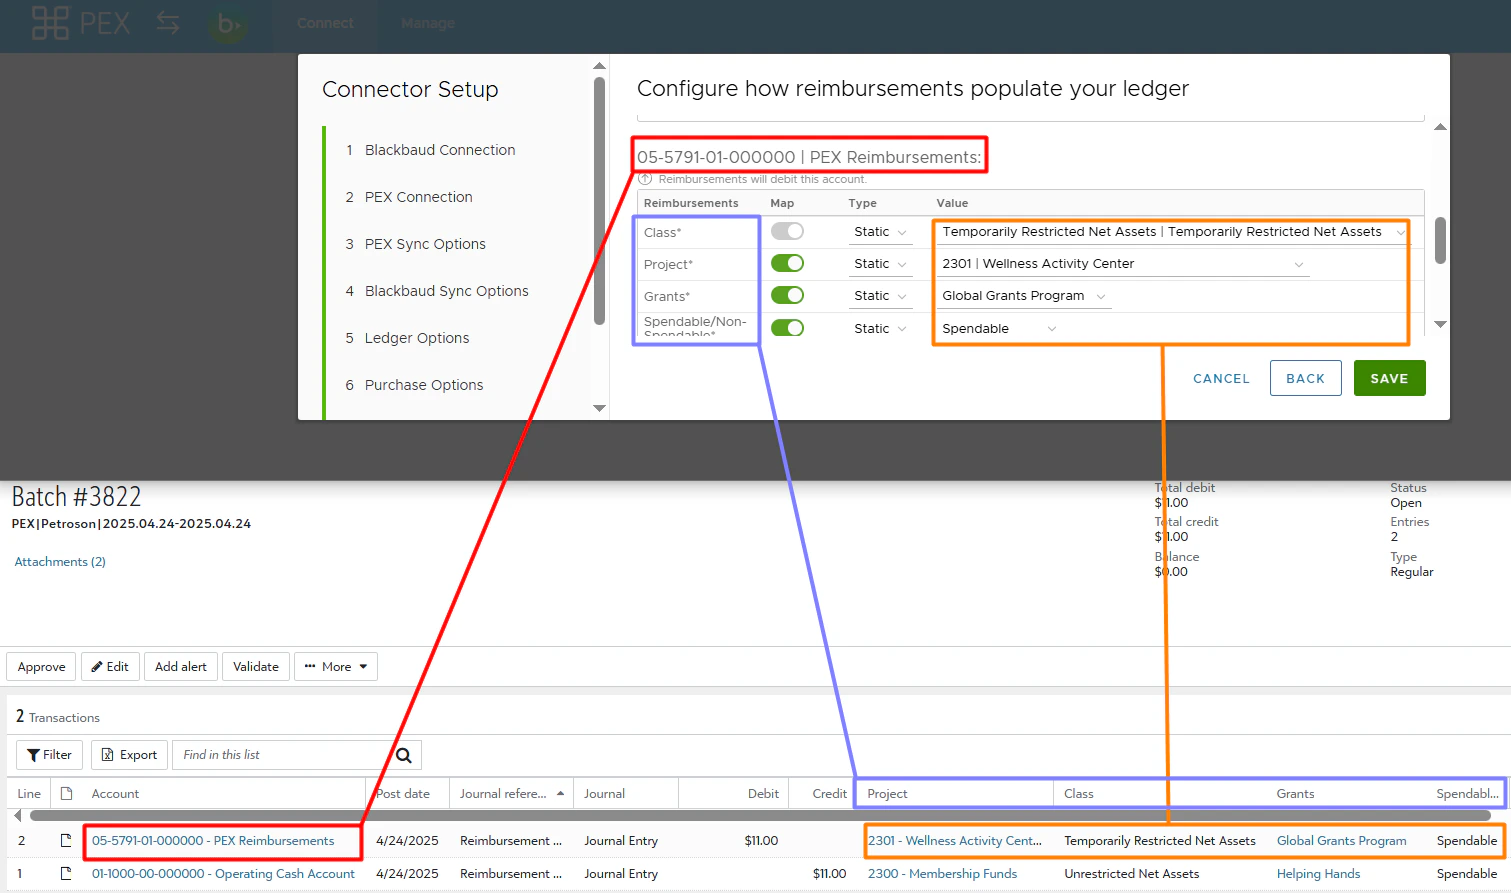
Note that a reimbursement will not be tagged with this text value. You will not see this text value on the reimbursement details screen. The text value will be used only when syncing a reimbursement to Blackbaud. See an example of the credit side configured in the connector (Grants – Static – Helping Hands and other fields), and how it appears in Blackbaud after the reimbursement sync:
 The debit side (Grants - Static - Global Grants Program and other fields):
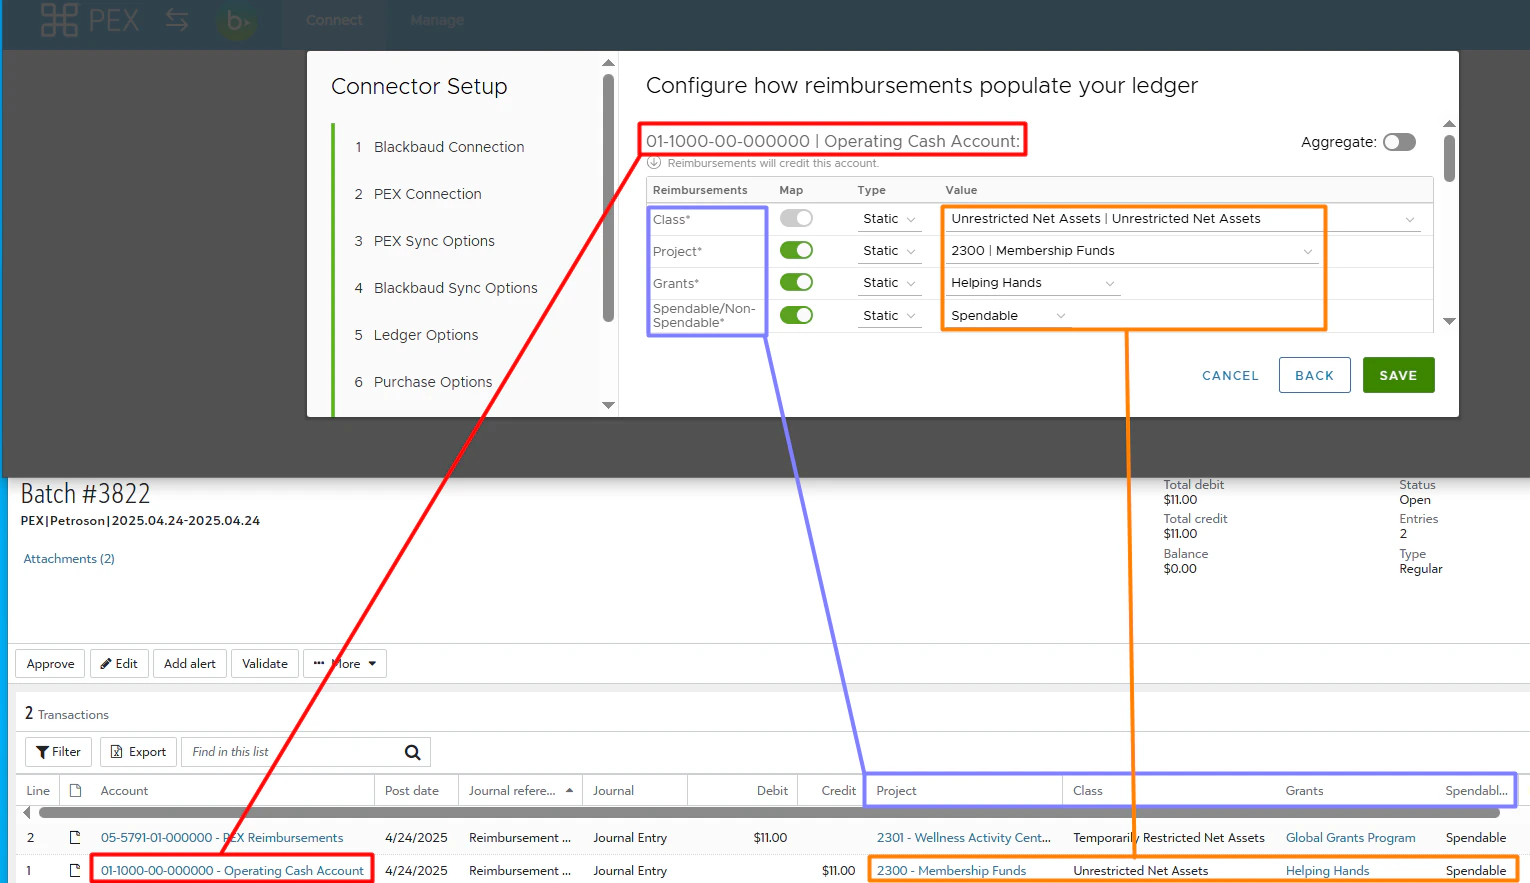

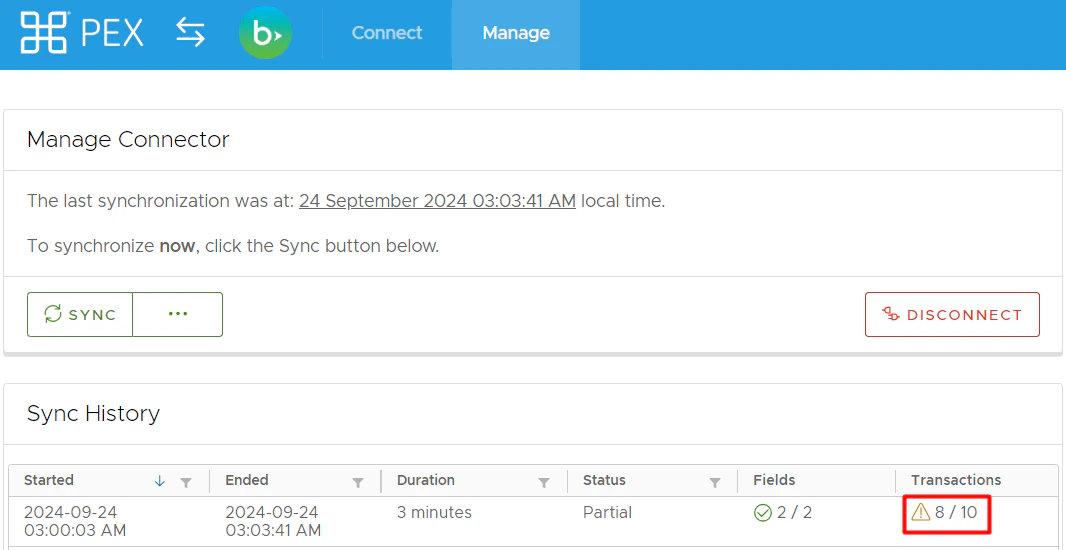
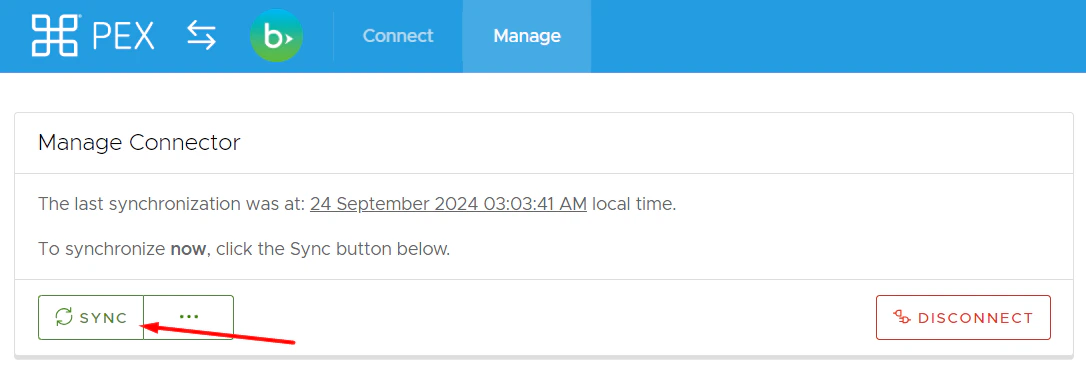
Manage Connector
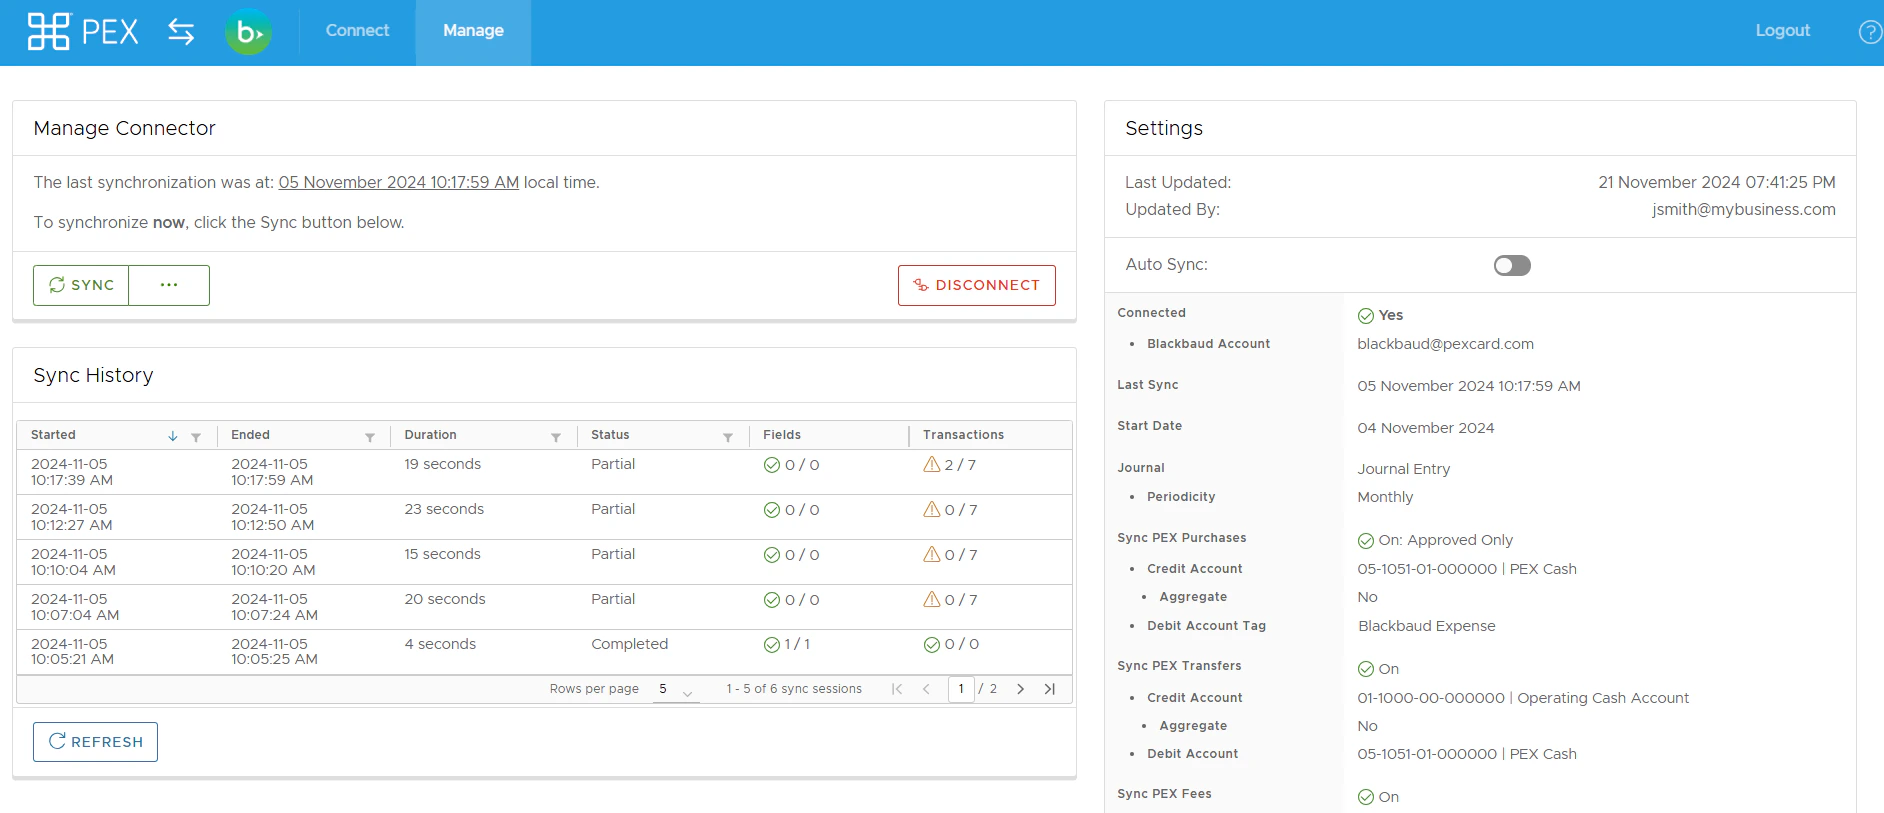
- View/Edit configuration setting.
- View/Refresh Sync history.
- Trigger Sync manually:
-
From PEX to Blackbaud (transactions)
- From Blackbaud to PEX (tag option values)
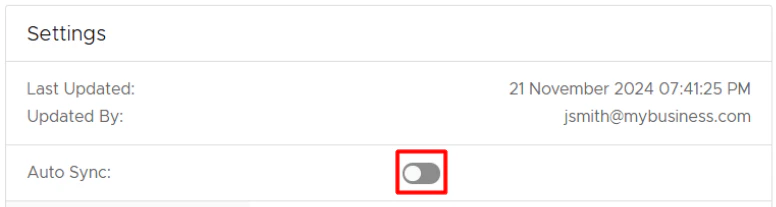
- Enable/disable auto-sync.
-
Enabled: Transactions sync automatically every 24 hours.
- Disabled: Transactions will not sync automatically.
- Disconnect from your Blackbaud account.
Auto-sync will always process transactions based on the start date specified on the PEX Sync Options step, with a maximum limit of 2 months back from today. If there is no start date specified on the PEX Sync Options step then auto-sync will sync transactions up to 2 months back from today. Manual sync
Manual sync will process transactions based on the start date specified on the PEX Sync Options step, with a limit of 1 year back from today. If there is no start date specified on the PEX Sync Options step then manual sync will process transactions only up to 2 months back from today.
Auto Tagger
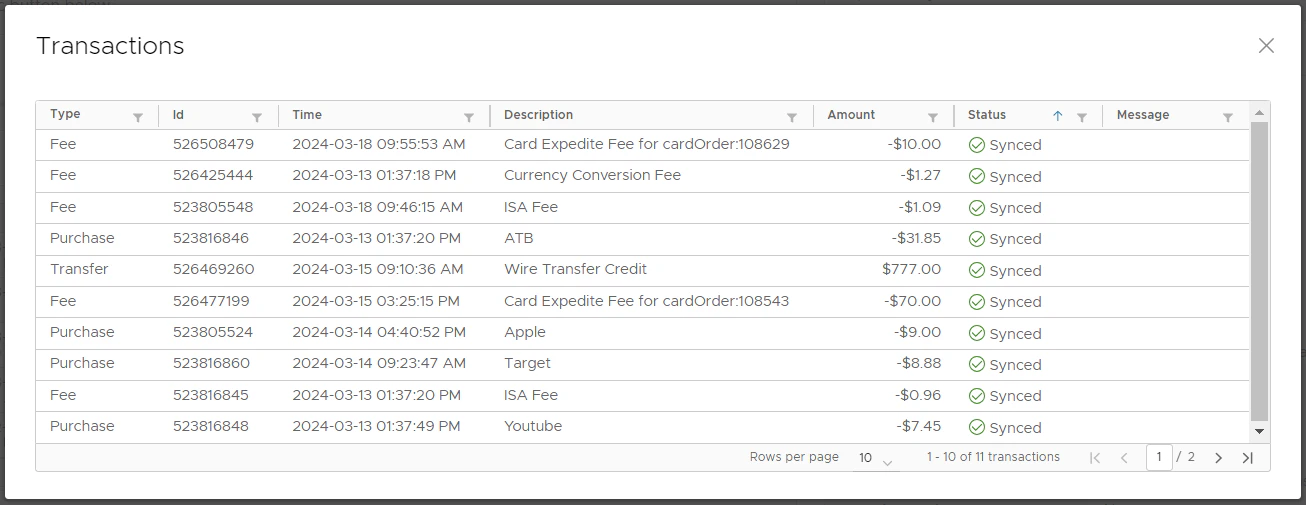
The Auto Tagger app is a great compliment to Blackbaud. It allows you to create rules that auto-tag purchases. Learn more.View Transactions in Blackbaud
View reimbursements in Blackbaud


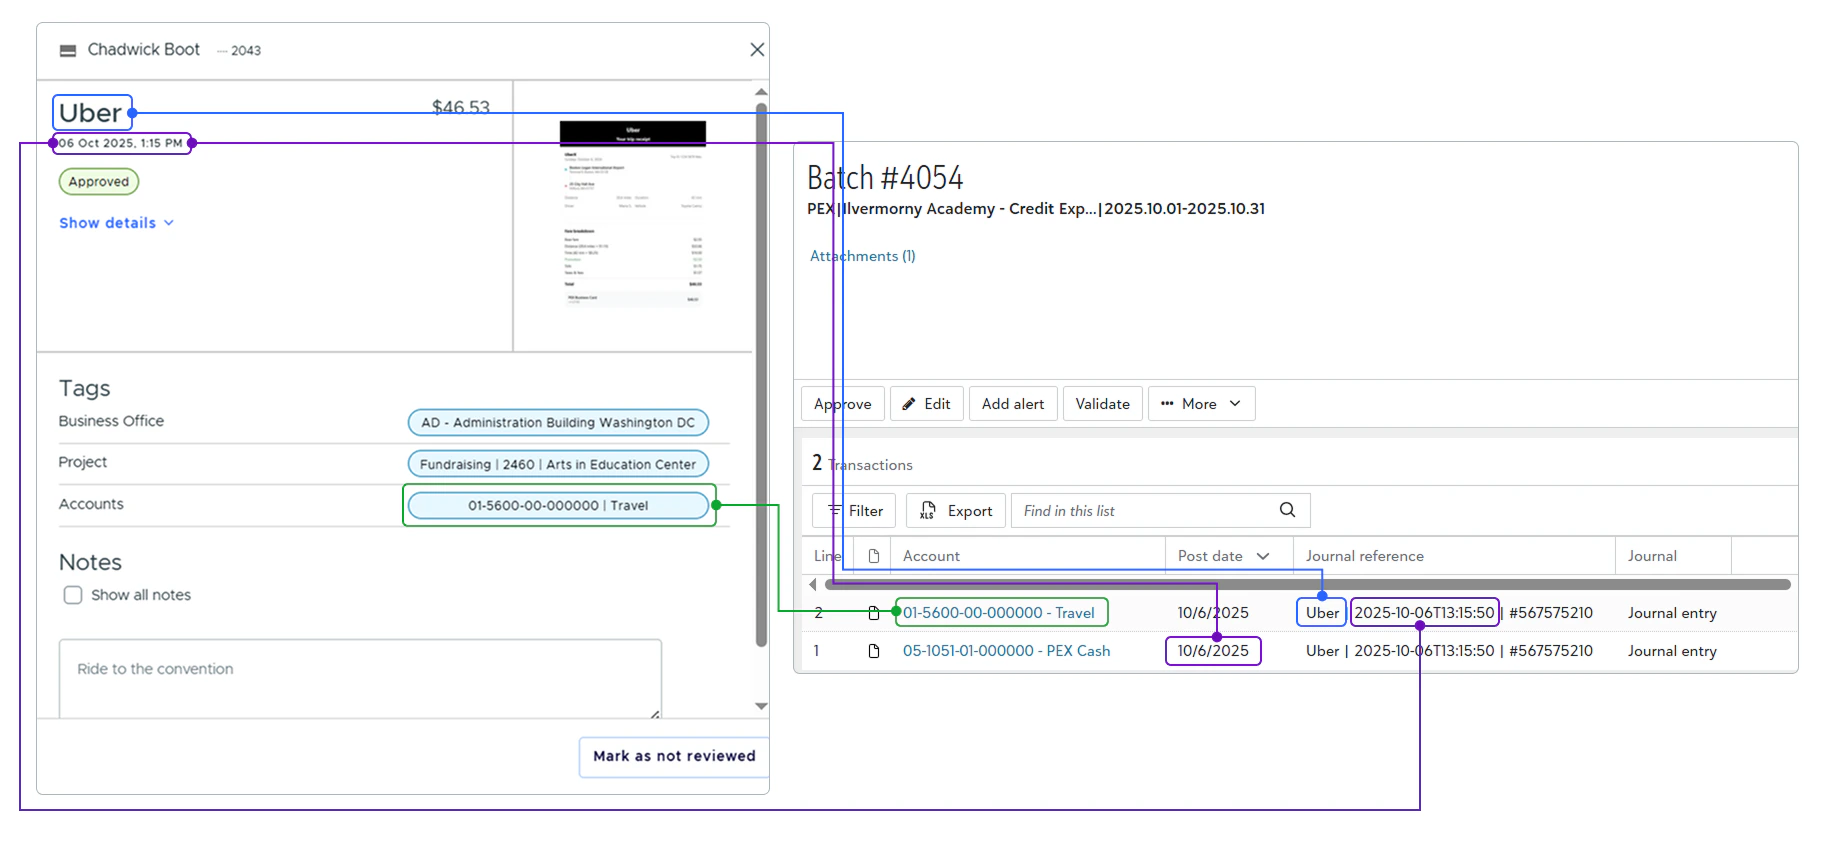
How does data flow between PEX and Blackbaud?
If everything is configured correctly and transactions are tagged, PEX will sync the following data points to Blackbaud:- Merchant name
- Transaction date and time
-
Debit account
-
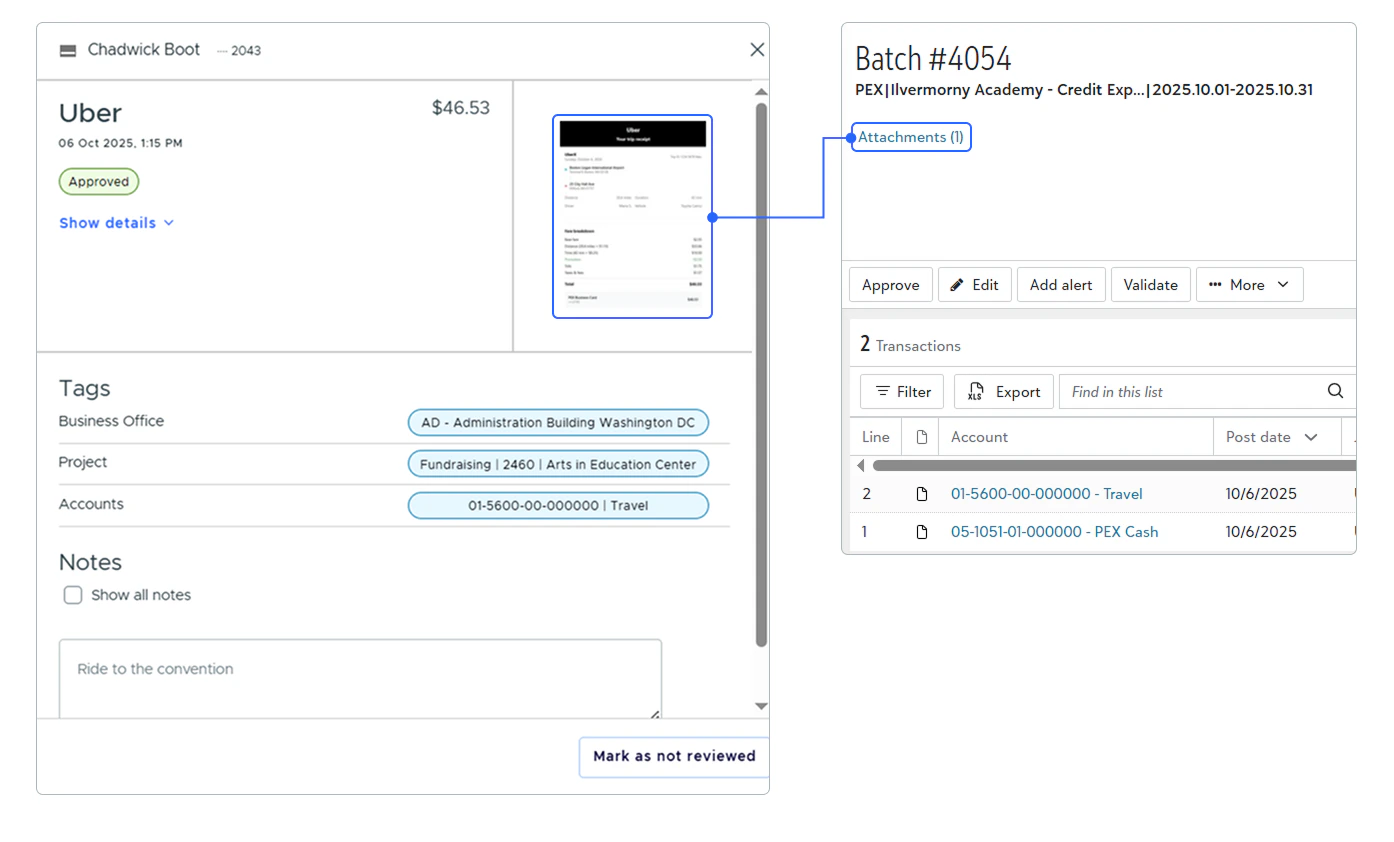
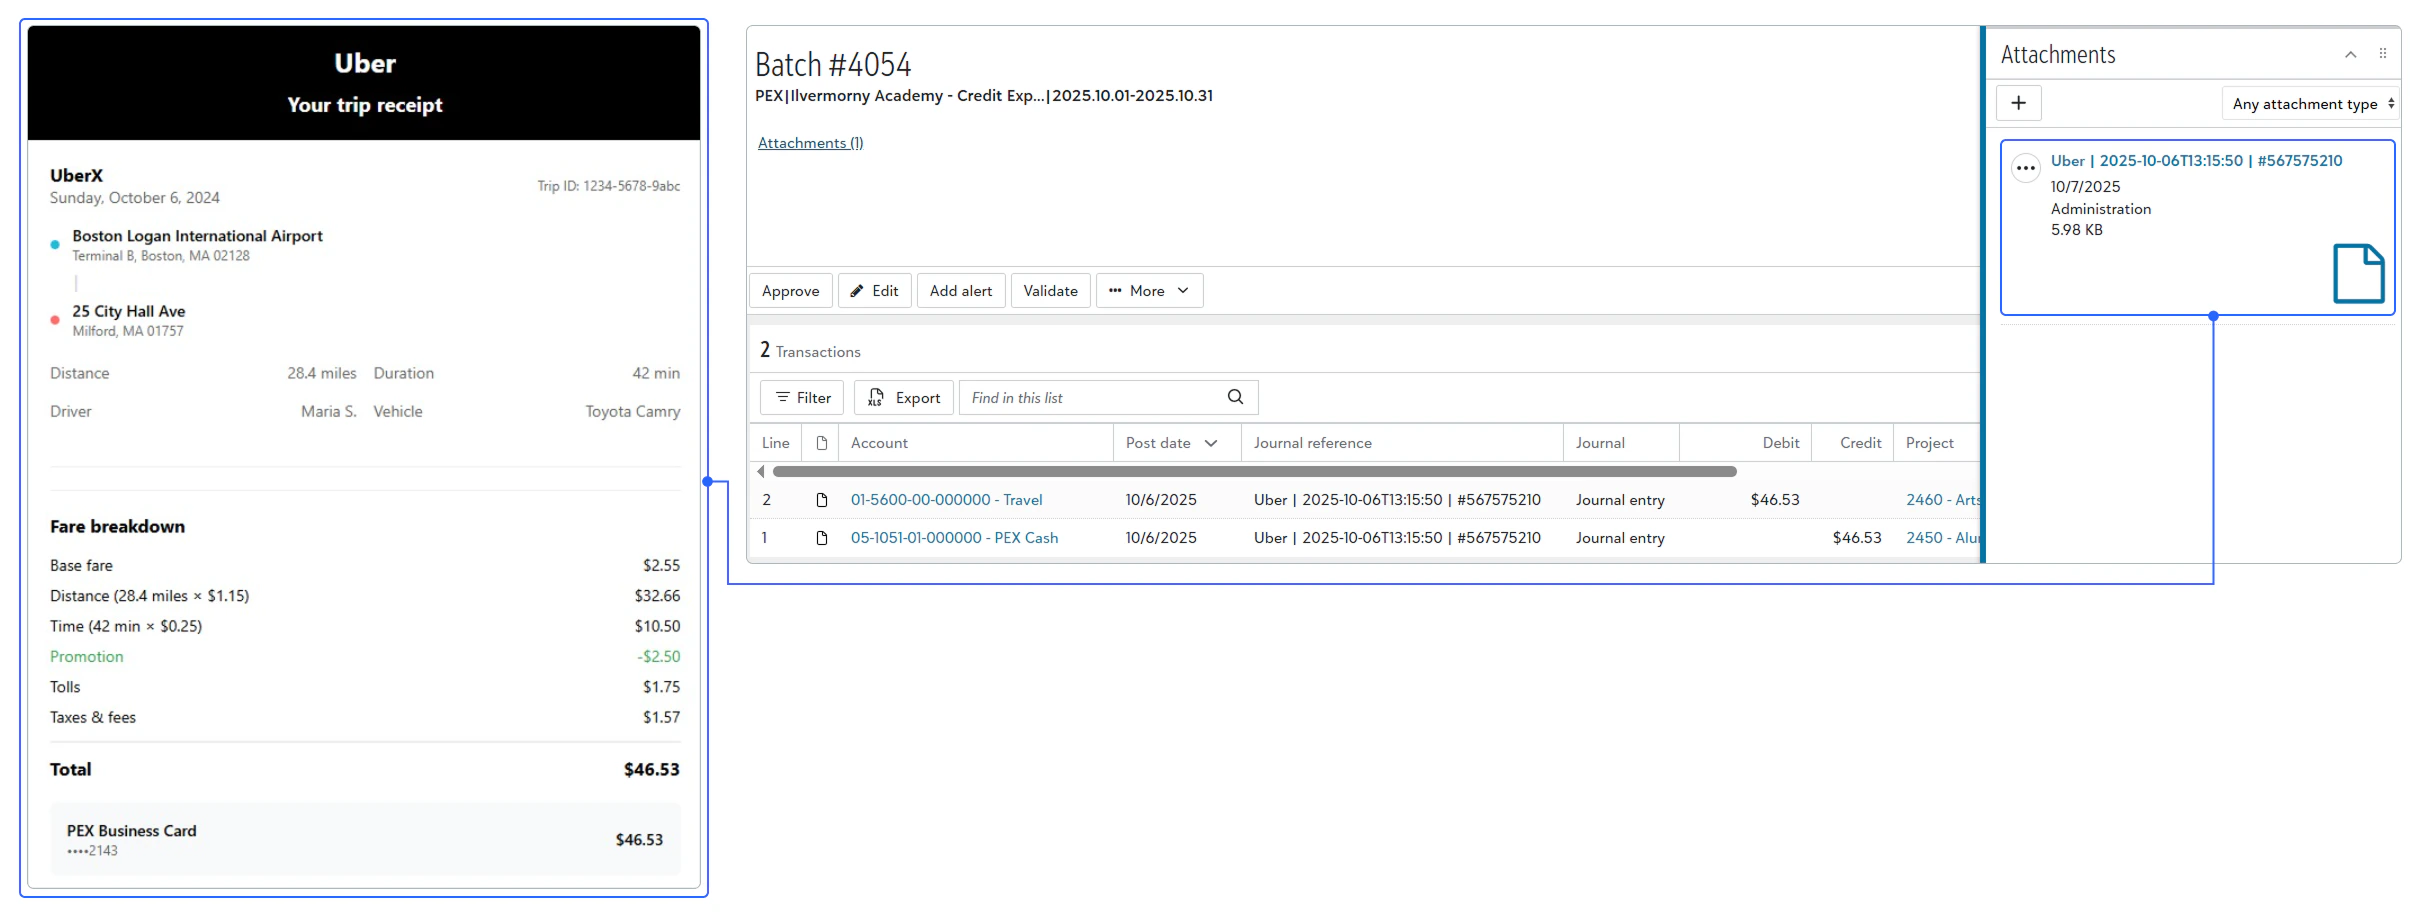
Attachments
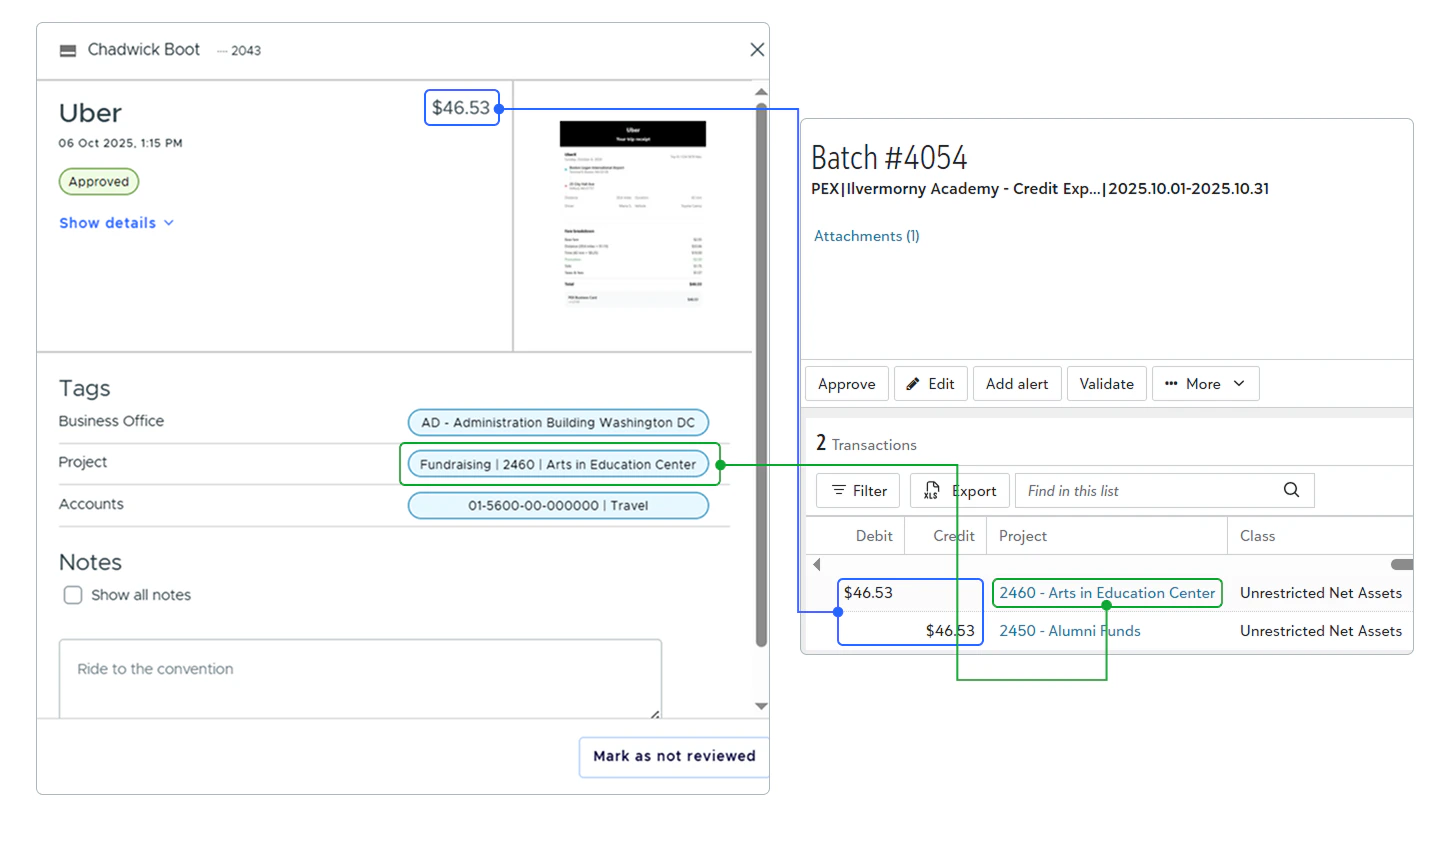
- Project
-
Transaction amount
-
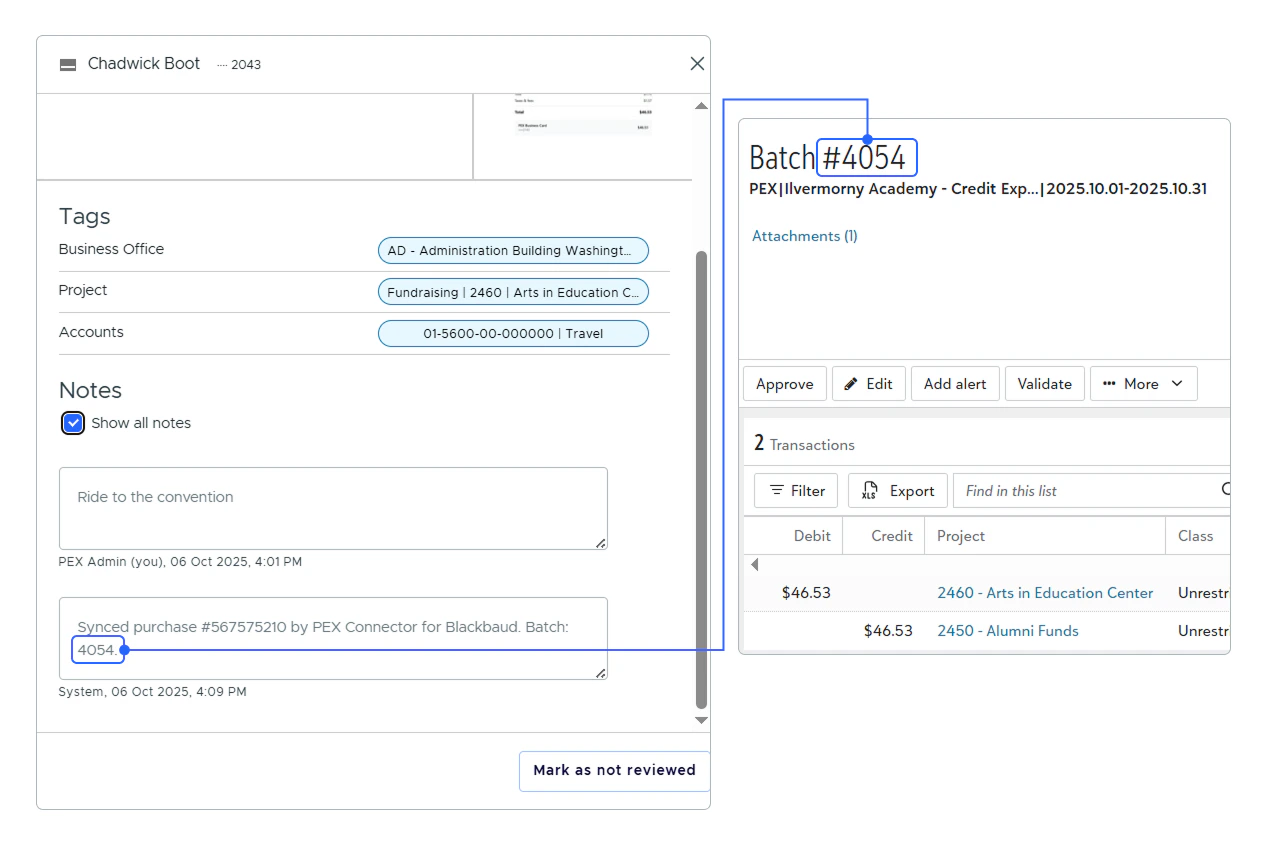
Batch #
-
Custom fields
- Journal
-
Credit account
-
Credit side:
- Class
- Project
- Grants
- Spendable/Non-Spendable
- Testing
- Expense Category
- Employee
-
Location
-
Debit side:
- Class
- Grants
- Spendable/Non-Spendable
- Testing
- Expense Category
- Employee
-
Location
FAQ
Can I combine manual tag options creation and automatic tag options sync from Blackbaud to PEX?
Can I combine manual tag options creation and automatic tag options sync from Blackbaud to PEX?
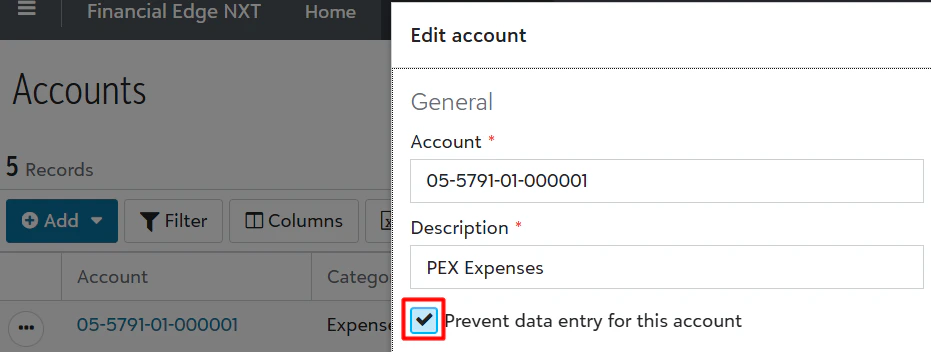
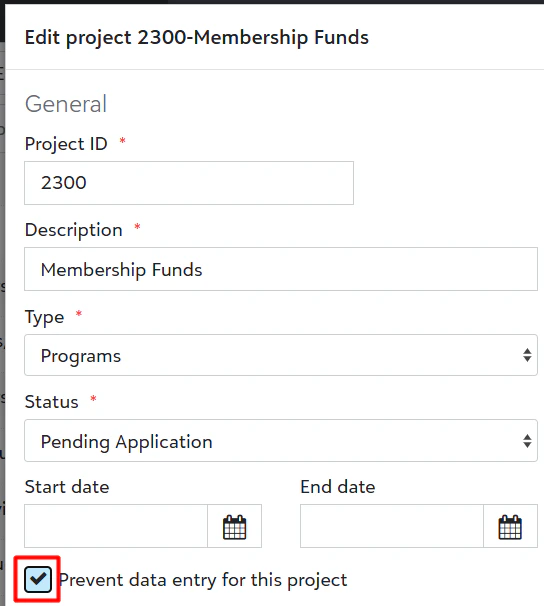
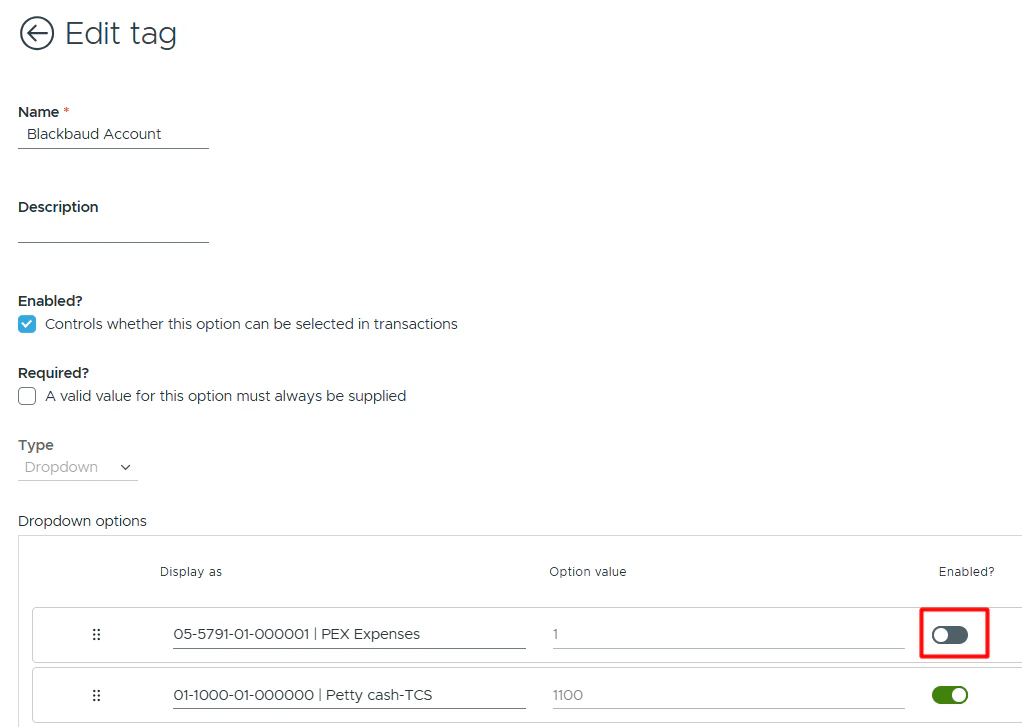
Can PEX automatically disable Account and Project tag options?
Can PEX automatically disable Account and Project tag options?
Can transactions be automatically tagged?
Can transactions be automatically tagged?
Do pending transactions get synced?
Do pending transactions get synced?
Will a previously synced purchase transaction re-sync to my Blackbaud account if I change its status (Rejected -> Approved), re-tag or add another receipt?
Will a previously synced purchase transaction re-sync to my Blackbaud account if I change its status (Rejected -> Approved), re-tag or add another receipt?
- Remove the “Synced purchase
<purchase ID>by PEX Connector for Blackbaud: Batch<batch ID>” note from the purchase in PEX. - Delete the transaction (credit and debit lines) from the journal entry batch in Blackbaud.
- If the Aggregate credits toggle is enabled, subtract the debit amount of the deleted purchase from the aggregated credit amount.
Why do I have a duplicate purchase transaction synced?
Why do I have a duplicate purchase transaction synced?
-
The “Synced purchase
<purchase ID>by PEX Connector for Blackbaud. Batch<batch ID>” note is not edited or deleted from a transaction.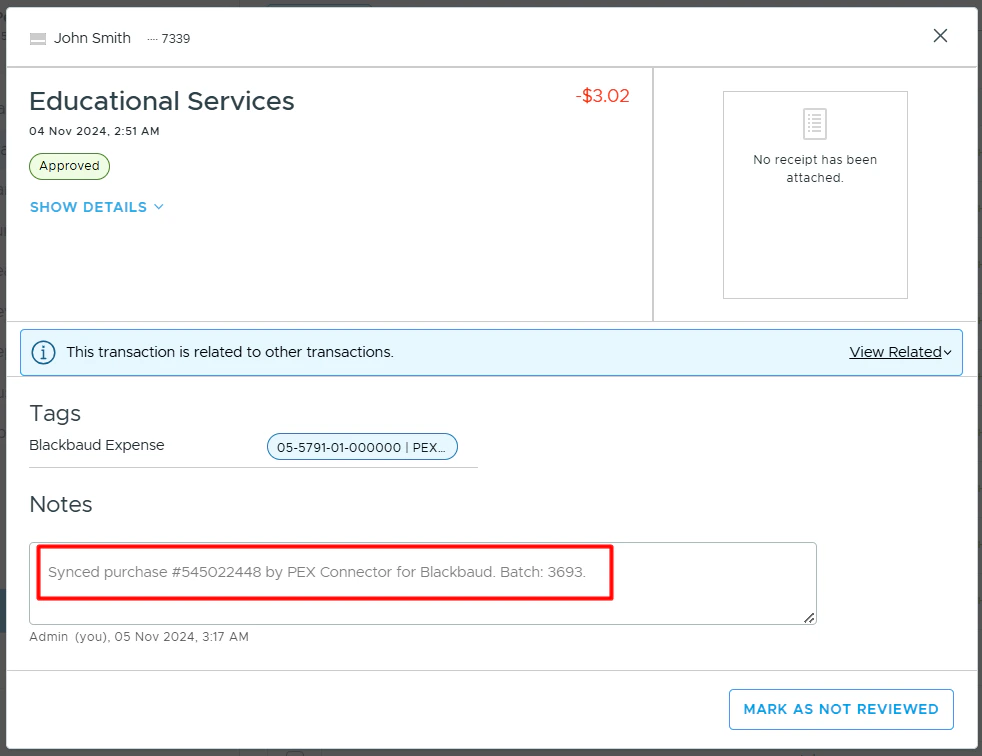
- Journal entry batch in your Blackbaud account is not deleted.
-
“PEX” is not edited or removed from the journal entry batch in your Blackbaud account.

-
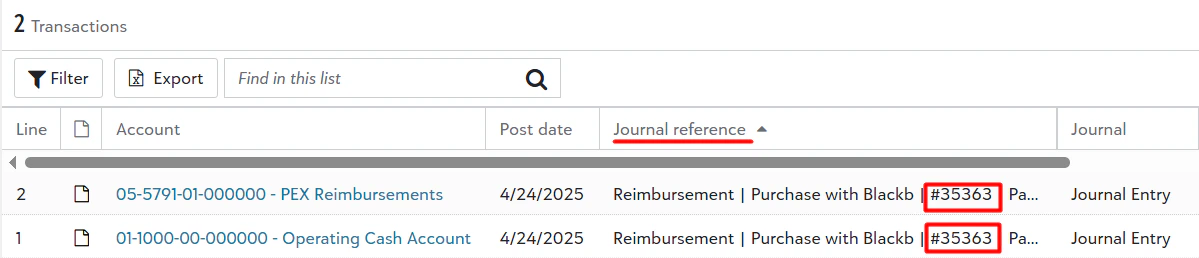
Transaction ID in the journal reference is not edited or deleted.

Why do I have a duplicate transfer/fee/rebate transaction synced?
Why do I have a duplicate transfer/fee/rebate transaction synced?
- Journal entry batch in your Blackbaud account is not deleted.
-
“PEX” is not edited or removed from the journal entry batch in your Blackbaud account.

-
Transaction ID in the journal reference is not edited or deleted.

Why do I have a duplicate reimbursement synced?
Why do I have a duplicate reimbursement synced?
- Journal entry batch in your Blackbaud account is not deleted.
-
“PEX” is not edited or removed from the journal entry batch in your Blackbaud account.

-
Reimbursement ID in the journal reference is not edited or deleted.
Why hasn't my transaction synced to the correct journal entry batch?
Why hasn't my transaction synced to the correct journal entry batch?
- If a journal batch for the given period has been posted, approved, or deleted.
- And there are still new transactions within that period ready to be synced.
- Then PEX will create a new journal batch for the same period to sync those transactions to the new batch.
Can I detect why my transaction hasn't synced on my own?
Can I detect why my transaction hasn't synced on my own?

How can I fix the error "Post Date must be in a valid fiscal period"?
How can I fix the error "Post Date must be in a valid fiscal period"?
- Reopen the August period (refer to this Blackbaud article: https://kb.blackbaud.com/knowledgebase/Article/37830).
-
Perform a manual sync by clicking the “Sync” button.
How can I sync the description/notes to Blackbaud?
How can I sync the description/notes to Blackbaud?
-
Create text tag in PEX:
- Go to Business Settings → Workflows → Tag manager → Add Tag
-
Select Text
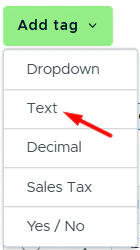
-
Configure:
- Name: Description or Notes
- Check Enabled (and Required if desired)
- Set Min: 5, Max: 200 characters
- Validation: None
- Click Save
-
Create custom field in Blackbaud:
-
Go to Settings → Fields and tables
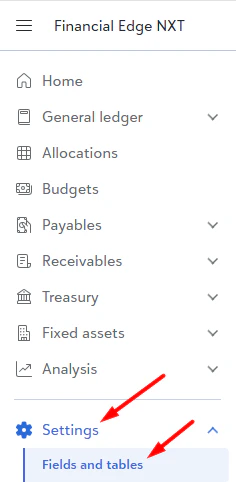
-
Click Add
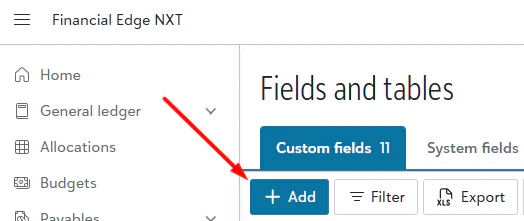
-
Configure:
- Name: Description or Notes
- Subledger: General ledger
- Displays on record type: Transaction
- Check One per record
- Input type: Text
- Click Save
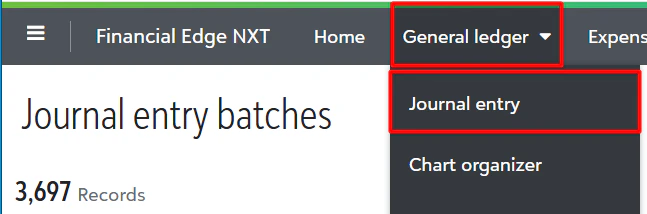
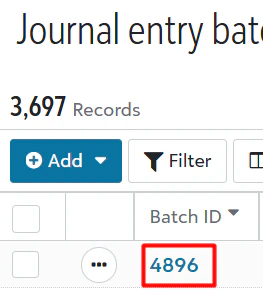
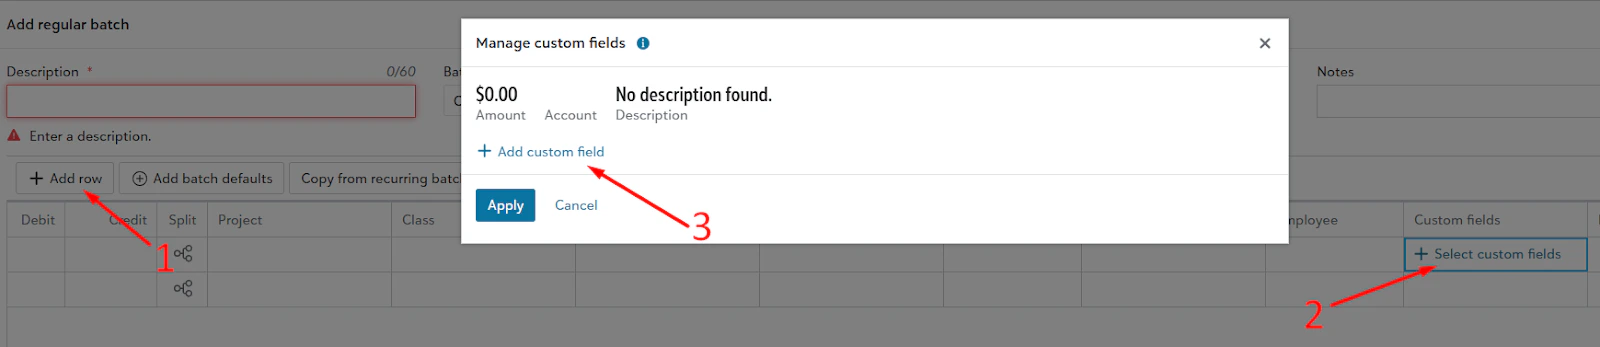
To verify: go to General Ledger → Journal entries → click Add → click Add regular batch → click Add row → click Select custom fields → click Add custom field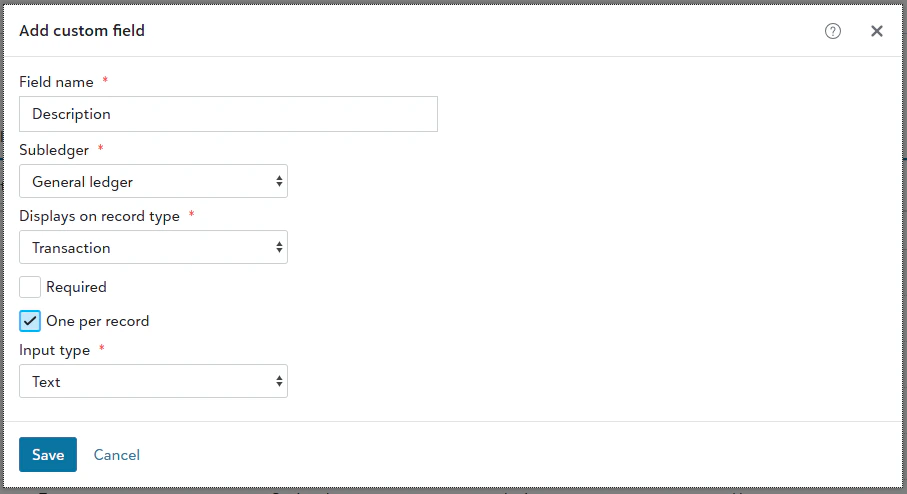
- Name: Description or Notes
-
Go to Settings → Fields and tables
-
Map tag to field in PEX:
- Go to Apps → Available → Launch PEX Connector for Blackbaud
- Go to 6. Purchase Options
-
Scroll down to the debit section (“Purchases will debit this account”).
- Find your custom field under Fields
- Enable the mapping toggle
- Type: Tag
- Value: Select your tag (Description or Notes)
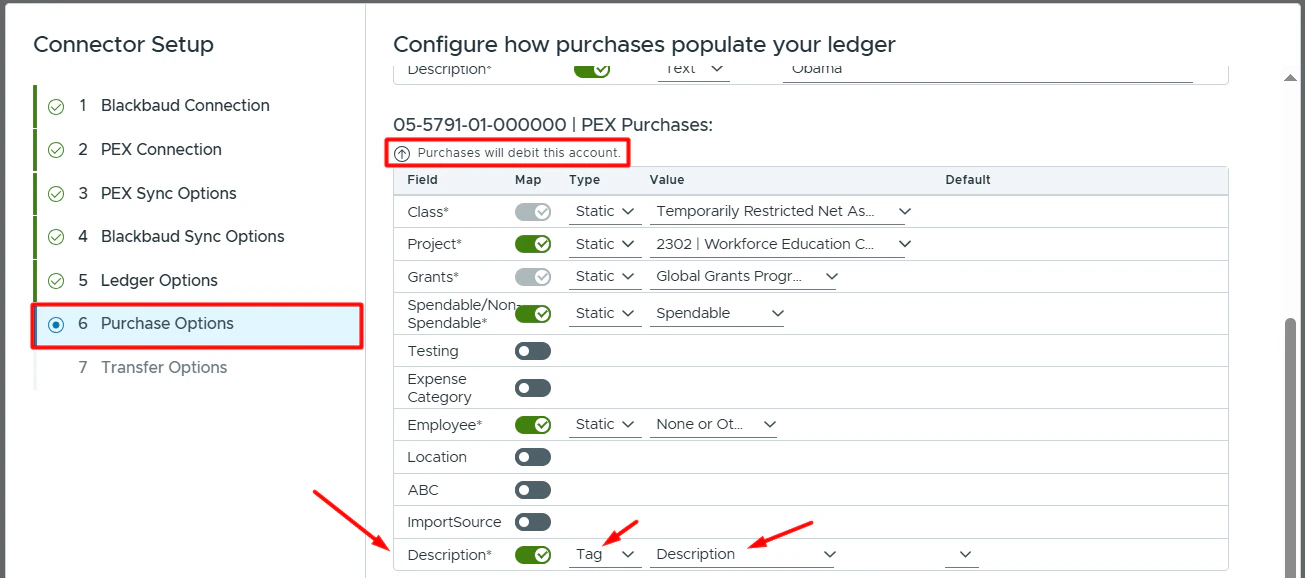
- Click Next → Save
- Tag your purchases with the Description/Notes tag, and the value will sync to Blackbaud.