Support for Multi-Level Approval Workflows
If your organization is like most, certain large purchases may require multiple approvals. You may have policies to dictate which departments, groups, or individuals need to sign off, depending on the amount, cardholder group, or tag value of the transaction, reimbursement, or funding request. Configuring Approval Policies through the Dashboard will allow you to set the conditions for items that need approval in your organization. Approval policies can be set for transactions, funding, reimbursement, spend rule, and card unblocking requests. Watch a step-by-step demonstration here!How to Configure Approval Policies
Approval Policies consist of a set of custom rules based on amount thresholds, cardholder groups or tags, and the approver(s) required to approve workflow items (transactions, fund requests, card unblocking requests, or reimbursements).Create Approval Groups
The first step in configuring an Approval Policy is to create groups of approvers based on the hierarchy in your organization (job level, role, department, tags, etc). Approval groups should consist of one or more admins with permission to approve transactions, reimbursement, or funding requests.- Creating a policy will not affect your approval workflows until you enable it in the next step.
Create Approval Policies
Now that you’ve added at least one group of approvers, the next step is to create an Approval Policy that you can apply to your approval workflows.- Creating a policy will not make any changes to your approval workflows until you enable it in the next step.
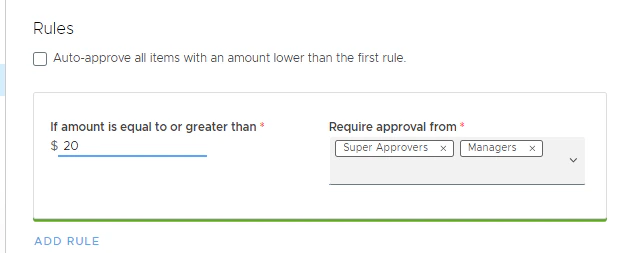
- Create a rule by entering the first threshold amount that will require approval from a certain admin group.
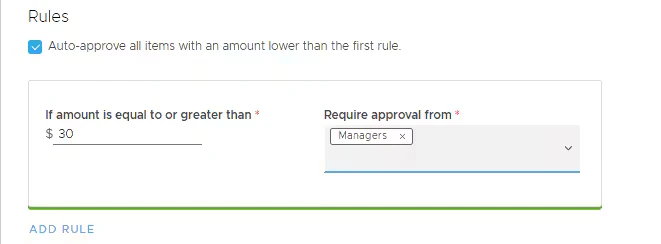
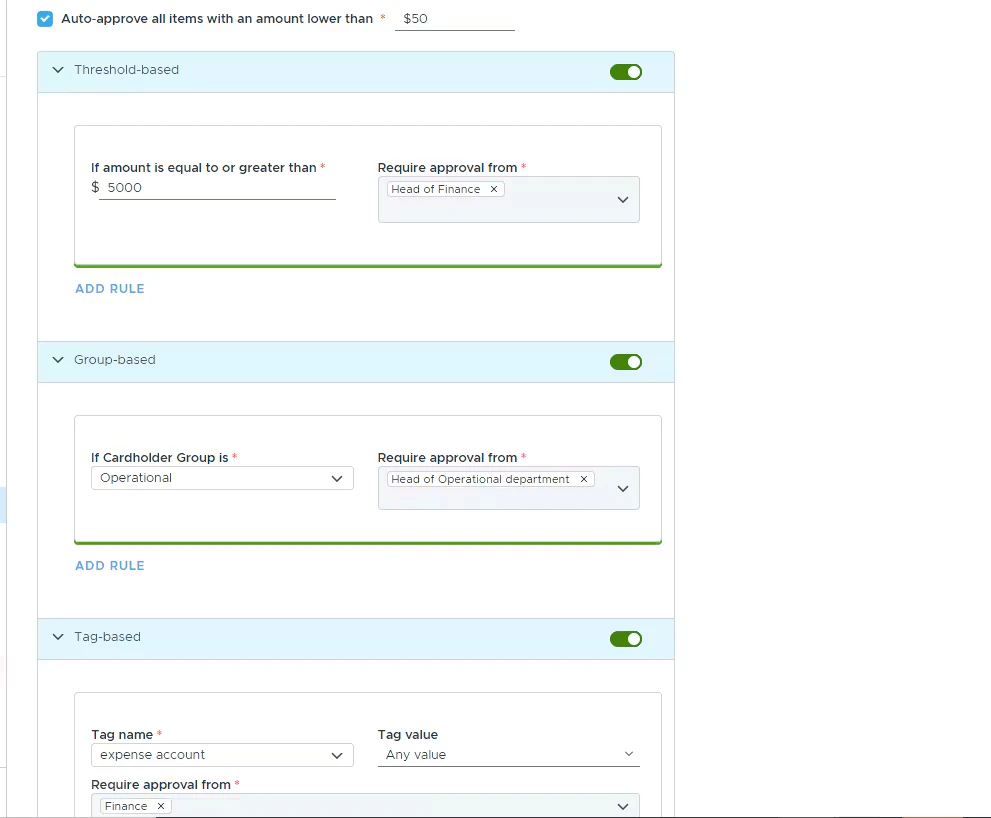
- For the threshold-based policy, you can configure “Auto-approve all items with an amount lower than the first rule” so that all items (depending on the workflow types you selected in the previous step) below the first threshold amount will be auto-approved. If the check box is unchecked, all items will require one approval from any admin with the needed permissions.
- Select user group(s) that will be required to approve for this threshold.
- All rules are independent of each other until there is a sequential approval set up.
- You can select multiple approval groups for one threshold.
- There is no sequence in approvals set up by default.
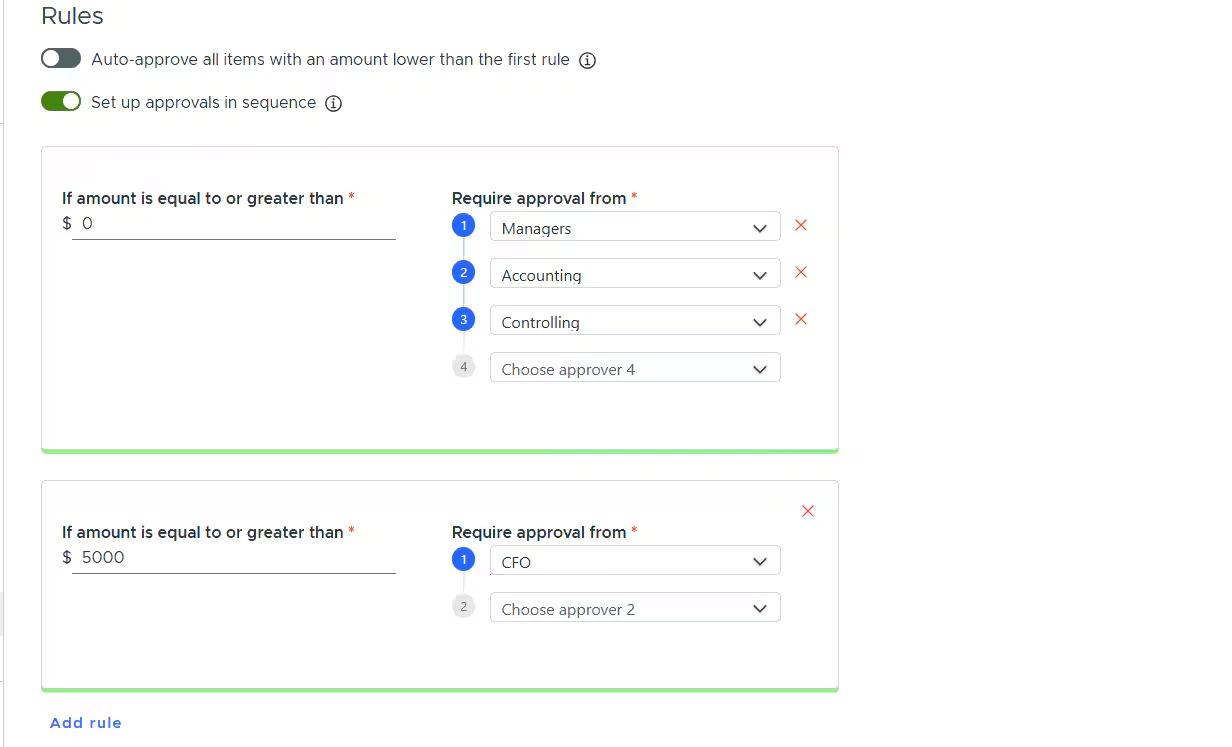
- To enable sequential approval, check the ‘Set up approvals in sequence’ toggle on the policy configuration page.
- To delete an approver group from a rule, click the red ‘X’ next to the group.
- In the example below, this rule means that all items greater than or equal to $30 will require approval from the user group ‘Managers.’ All items less than $30 will be auto-approved.
1. Managers
2. Accounting
3. Controlling
4. CFO (only for items that are greater than $5000)
Notifications will be sent accordingly
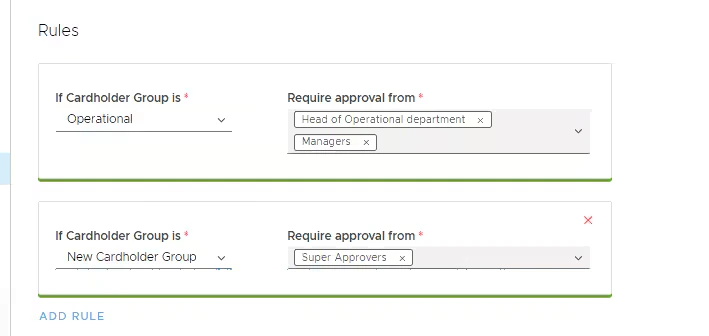
- Create cardholder groups Learn more
- Create a rule by selecting the cardholder group that will require approval from a certain user group(s).
- Select user group(s) that will be required to approve items from the selected cardholder group.
- All rules are independent of each other.
- You can select multiple approval groups for one cardholder group.
- There is no sequence in approvals set up by default.
- To enable sequential approval, check the ‘Set up approvals in sequence’ toggle on the policy configuration page.
- To delete an approver group from a rule, click the red ‘X’ next to the group.
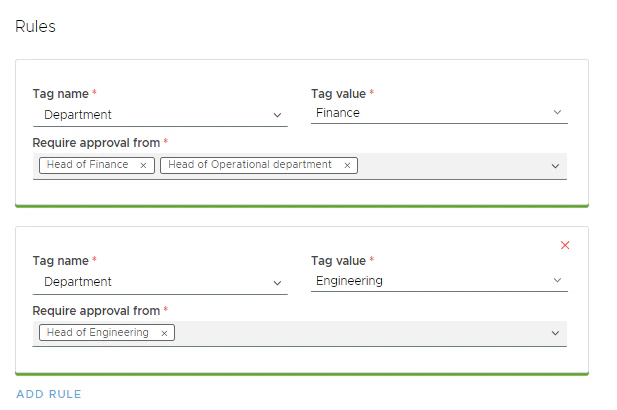
- Create tags with Tag Manager. Learn more
- Create a rule by selecting the tag name and tag value that will require approval from a certain admin group(s).
- Select user group(s) that will be required to approve items associated with selected tag values.
- All rules are independent of each other until you set up the sequential approval.
- You can select multiple approval groups for one tag.
- There is no sequence in approvals set up by default.
- To enable sequential approval, check the ‘Set up approvals in sequence’ toggle on the policy configuration page.
- To delete an approver group from a rule, click the red ‘X’ next to the group.
- You can combine multiple types of approval rules (tag, threshold, or group-based) within the same approval policy.
- The ‘Auto-approval’ checkbox is available based on a specified threshold. For example, if you create an auto-approval rule for the ‘transactions’ workflow, all transactions below the specified amount will be automatically approved, regardless of other tag, group, or threshold rules.
- To enable other types of approval rules, turn on the toggles against those rules.
- To disable some types of approval rules, turn off the toggles against those rules.
- All rules are independent of each other.
- You can select multiple approval groups for one tag/group or threshold.
- There is no sequence in approvals set up by default.
- To enable sequential approval, check the ‘Set up approvals in sequence’ toggle on the policy configuration page.
- To delete an approver group/ tag/ tag value from a rule, click the ‘X’ icon next to the group.
- To delete an approval rule, click the red ‘X’ next to the rule.
- Tag-based approval rule is available for transactions and reimbursement request workflows.
- The items will require approval from all approvers covered by policy rules (tag, group, or threshold-based), and you can`t skip approvals.
- Items with an amount lower than $50, will be automatically approved regardless of the other rules.
-
Items with an amount over $50 and up to $5,000:
- come from the ‘Operational’ cardholder group, will require approval from the ‘Head of Operational’ group.
- tagged with the ‘expense account’ tag will require approval from the ‘Finance’ user group.
- come from the ‘Operational’ cardholder group that are also tagged with the ‘expense account’ tag will require approval from the ‘Head of Operational’ and ‘Finance’ groups
-
Items with an amount over $5,000 will require approval from the ‘Head of Finance’ user group
FAQ
Can admins belong to more than one group?
Can admins belong to more than one group?
- Yes, you can add admins to multiple groups.
Can I apply an approval policy only to certain cardholder groups?
Can I apply an approval policy only to certain cardholder groups?
- Yes – please select the “Group-based approval” policy.
How many rules can I create in a given policy?
How many rules can I create in a given policy?
- There is no limit. You can add as many rules as needed to your spend policy.
Will admins receive a notification if an item requires their approval?
Will admins receive a notification if an item requires their approval?
- Notification preferences need to be enabled under ‘My Profile.’ When an item is ready for review and, per an Approval Policy, certain approval groups are required to approve, all admins with approval permissions in these groups will be notified via email.
Can I set up sequential approval?
Can I set up sequential approval?
- Yes, there is a toggle on the approval policy creation/updating page to set up sequential approval.
Will all approvers receive a notification if an item requires their approval in the sequential approval case?
Will all approvers receive a notification if an item requires their approval in the sequential approval case?
- Email and push notifications will be dispatched to the relevant approver at each stage.
Can I update my existing policy to set up the sequential approval?
Can I update my existing policy to set up the sequential approval?
- Yes, open the policy details page and enable the sequential approval toggle. After you update the policy, the change will apply to all future items.
Can I approve a transaction or a funding request on mobile?
Can I approve a transaction or a funding request on mobile?
- Yes, transactions and funding requests can be approved on mobile by an admin with appropriate permissions.
A second-level approver approved the transaction/funding request. Is the first-level approver still required to approve?
A second-level approver approved the transaction/funding request. Is the first-level approver still required to approve?
- Yes, all levels of approvers will need to approve the item in order for it to obtain ‘Approved’ status. However, there is no sequence in approvals until you enable the sequential approval toggle.
How do I view approver history?
How do I view approver history?
- Approver history will be visible by clicking into Transaction details or Funding Request details.
What do the different approval statuses mean?
What do the different approval statuses mean?
- Transaction statuses
- Blank – transaction is missing a receipt or required tags
- ‘Not Reviewed’ – transaction is ready for review and has not yet been approved by one or more of the required groups
- ‘Awaiting Approval’ – transaction has been approved by one (or more) approvers but is still pending additional approval from another group
- ‘Approved’ – transaction has been approved by all required groups
- ‘Rejected’ – transaction has been rejected by an admin
- Funding Request statuses
- ‘Rejected’ – funding request has been denied
- ‘Cancelled’ – cardholder has cancelled their funding request
- ‘Awaiting Approval’ – funding request has been approved by one (or more) approvers but is still pending additional approval from another group
- ‘Approved’ – funding request has been approved by all required groups
Will the new approval policy be applied to older transactions/funding requests?
Will the new approval policy be applied to older transactions/funding requests?
- No, the newly created policy will only apply to transactions/requests that have a receipt uploaded and enter ‘Not Reviewed’ status going forward.
Can I create more than one approval policy?
Can I create more than one approval policy?
- You can create more than one approval policy, but only one policy can be enabled at a time for each workflow type (Transactions, Funding Requests).